Insert contents from Envoria: Unterschied zwischen den Versionen
Keine Bearbeitungszusammenfassung |
Keine Bearbeitungszusammenfassung |
||
| (4 dazwischenliegende Versionen desselben Benutzers werden nicht angezeigt) | |||
| Zeile 1: | Zeile 1: | ||
To use data from Envoria, firesys provides an interface. | |||
== Authentication == | |||
If you are working with text KPIs from Envoria, authentication to the WeSustain server is required. In your Word document, click the "firesys settings" button on any firesys tab in the "*firesys" group and select the "Registration" tab. In the "Authentication" Ranges, click the "Add" button. | |||
[[Datei:EN_Externe_Dienste_Anmeldung.png|600px]] | |||
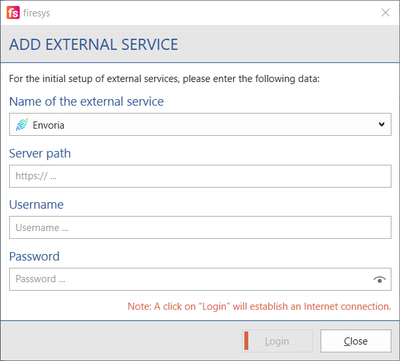
A dialogue opens in which the server path, the user name and the password must be stored. | |||
[[Datei:EN_Externe_Dienste_hinzufügen_Envoria.png|400px]] | |||
== Video: Add external service "Envoria" == | |||
To use data from Envoria (figures), you need authentication in firesys for this. | |||
{{Vorlage:Video-Externen Dienst hinzufügen Envoria-Englisch}} | |||
== Import data from Envoria== | |||
To import the numerical KPIs from Envoria, proceed as follows. | |||
* Set an import definition according to which your data should be inserted into the MeetingPoint. In the "*Content" ribbon, in the "Data import" group, select the "Data import manager" button. | |||
* The Data import manager opens. | |||
* Select the "Create" button in the "Import definition" group. A dialog appears. | |||
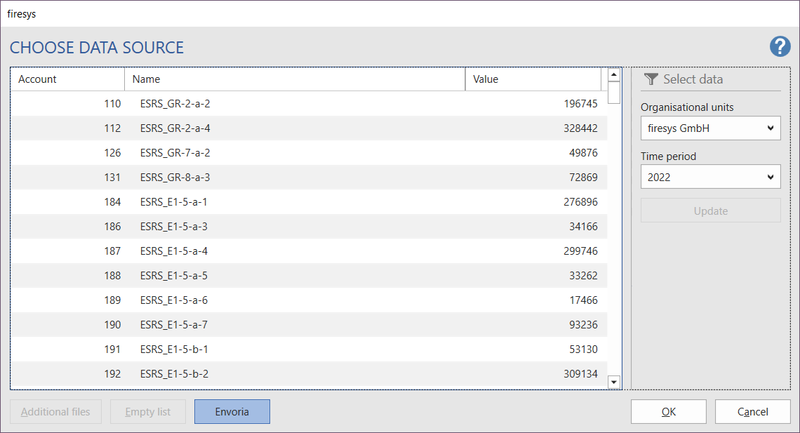
* In the dialog you have the possibility to select a data source from which the data should be imported. Clicking on the radio button opens the file selection dialog in which numbers can be imported directly from Envoria. | |||
* Select an organizational unit and a Time period and click on the "Update" button to display the data in the list. | |||
[[Datei:EN_Inhalte_aus_Envoria_einfügen_Datenquelle.png|800px]] | |||
== Video: Data import from Envoria == | |||
Define how the data from Envoria is transferred to MeetingPoint "modeled" using firesys. | |||
{{Vorlage:Video-Envoria-Daten-Import-Englisch}} | |||
* Click on the "OK" button to apply this data to the import definition. | |||
* In the Ranges Details further meta information can be added to the Import definition. An existing key date in the firesys MeetingPoint can be used as the target for your data or a new one can be defined at this point. | |||
* In the "Column Mapping and Preview" Ranges, the data from Envoria is already mapped to the required structure of firesys. Additional [https://hilfe.firesys.de/wiki/Create_an_import-definition <b>Import options</b>] can be created to be applied when the data is imported. Using these options, the data can be modeled and then transferred to the firesys MeetingPoint. | |||
* The connected data is imported by firesys using the Data import. In the Data import manager, you can recognize the imports from Envoria via the Envoria icon. The number KPIs can be used by the function [https://hilfe.firesys.de/wiki/Insert_an_account_calculation_or_account_aggregate <b>insert account values</b>] or the function [https://hilfe.firesys.de/wiki/Automated_worksheet <b>automate worksheet</b>] in Excel to create "automated" tables. | |||
== See also == | == See also == | ||
| Zeile 7: | Zeile 57: | ||
{{MoreContent}} | {{MoreContent}} | ||
[[Kategorie: | [[Kategorie: Insert contents from Envoria]] | ||
Aktuelle Version vom 7. Dezember 2022, 15:45 Uhr
To use data from Envoria, firesys provides an interface.
Authentication
If you are working with text KPIs from Envoria, authentication to the WeSustain server is required. In your Word document, click the "firesys settings" button on any firesys tab in the "*firesys" group and select the "Registration" tab. In the "Authentication" Ranges, click the "Add" button.
A dialogue opens in which the server path, the user name and the password must be stored.
Video: Add external service "Envoria"
To use data from Envoria (figures), you need authentication in firesys for this.
How to add Envoria as an external service:
-
Click on the "firesys settings" button in the ribbon under "*Design" in the "firesys" group.
-
Click the "Add" button in the "Registration" tab under the "Authentication to external services" Ranges. The "Add external service" window will open.
-
Select "Envoria" in the drop-down menu there, enter your user data and confirm with "Login".
Import data from Envoria
To import the numerical KPIs from Envoria, proceed as follows.
- Set an import definition according to which your data should be inserted into the MeetingPoint. In the "*Content" ribbon, in the "Data import" group, select the "Data import manager" button.
- The Data import manager opens.
- Select the "Create" button in the "Import definition" group. A dialog appears.
- In the dialog you have the possibility to select a data source from which the data should be imported. Clicking on the radio button opens the file selection dialog in which numbers can be imported directly from Envoria.
- Select an organizational unit and a Time period and click on the "Update" button to display the data in the list.
Video: Data import from Envoria
Define how the data from Envoria is transferred to MeetingPoint "modeled" using firesys.
How to add a new Import definition of Envoria in the Data import manager:
-
Set an Import definition according to which you want your data to be inserted into MeetingPoint. In the "*Content" ribbon, select the "Data import manager" button in the "Data import" group.
-
The Data import manager opens.
-
Select the "Create" button in the "Import definition" group. A dialog appears.
-
In the dialog you have the option to select a data source from which the data should be imported. By clicking on the menu under "Data source" you get to the "Select data source" dialog. By clicking on the "Envoria" button you can select Envoria data as the source and then confirm with "OK". In the Ranges Details you can add further meta information to the Import definition. An existing key date in the firesys MeetingPoint can be used as the target for your data or a new one can be defined at this point.
Clicking on "Next" takes you to the "File settings" tab.
Determine if there are column headers in the import file. If this is the case, the option will not transfer the first line of the file. Furthermore, the column separator must be specified so that firesys can correctly recognize and transfer the records.
In the Ranges "Number format" the decimal separator and the thousands separator of the import file is set.
Clicking on "Next" will take you to the "Assignment & Options" tab.
In the Ranges "Column Mapping and Preview" the records have to be structured. The Ranges contains the live view of the import options. To import the data into firesys MeetingPoint the columns of the import file must be defined. There are four types for the data columns to choose from:
Account
Designation
Value
Comment
-
The Account, Designation and Value columns are mandatory for the Data import; the Comment column is optional. All columns can be assigned only once.
-
The "Import options" Ranges can be used to create additional options that will be applied when importing the data. Using these options, the data can be modeled and then transferred to the firesys MeetingPoint.
-
In the video, an option is created that the account values should be divided by 1 million during the transfer.
-
There are more options, the choices depend on the "target column"
-
If you want to work with multiple import options the order in which the options should be applied must be defined.
-
Clicking on "Complete" will take you to the Data import manager. The created Import definition is now available to you.
File selection
File Settings
Assignment & Options
- Click on the "OK" button to apply this data to the import definition.
- In the Ranges Details further meta information can be added to the Import definition. An existing key date in the firesys MeetingPoint can be used as the target for your data or a new one can be defined at this point.
- In the "Column Mapping and Preview" Ranges, the data from Envoria is already mapped to the required structure of firesys. Additional Import options can be created to be applied when the data is imported. Using these options, the data can be modeled and then transferred to the firesys MeetingPoint.
- The connected data is imported by firesys using the Data import. In the Data import manager, you can recognize the imports from Envoria via the Envoria icon. The number KPIs can be used by the function insert account values or the function automate worksheet in Excel to create "automated" tables.
See also
![]() External services
External services
![]() Insert contents from WeSustain
Insert contents from WeSustain


