Settings in Word – MeetingPoint: Unterschied zwischen den Versionen
Keine Bearbeitungszusammenfassung |
Keine Bearbeitungszusammenfassung |
||
| (10 dazwischenliegende Versionen von 5 Benutzern werden nicht angezeigt) | |||
| Zeile 2: | Zeile 2: | ||
=== Temporarily save MeetingPoint === | === Temporarily save MeetingPoint === | ||
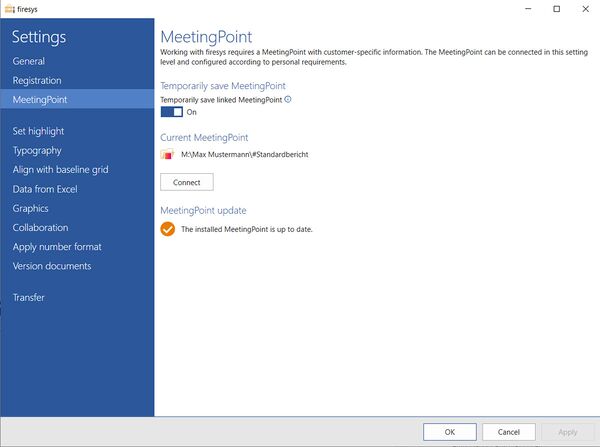
[[Datei: | [[Datei:EN Firesys Einstellungen Word MeetingPoint.jpg|mini|upright=2.0|The view of the MeetingPoint settings in Word]] | ||
==== Temporarily save linked MeetingPoint ==== | ==== Temporarily save linked MeetingPoint ==== | ||
With this option, a local version of the MeetingPoint is saved in order to | With this option, a local version of the MeetingPoint is saved in order to decrease access times. | ||
=== Current MeetingPoint === | === Current MeetingPoint === | ||
| Zeile 30: | Zeile 30: | ||
=== MeetingPoint update === | === MeetingPoint update === | ||
If an update | Updates for the Premium Layout are provided via the software. If an update is available, it is displayed in the menu bar and in the firesys settings, which also updates the existing MeetingPoint. | ||
[[Datei:EN Menüband Word MeetingPointUpdate.jpg|left|400px]] <br> <br> <br> <br> <br> <br> <br> | |||
=== Video: Reconnecting MeetingPoint === | |||
{{Vorlage:Video-Word-firesys-MeetingPoint neu anbinden-English}} | |||
== See also == | == See also == | ||
Aktuelle Version vom 4. Juli 2023, 12:40 Uhr
Working with firesys requires a MeetingPoint with customer-specific information. This dialog guides you through linking to your documents to the MeetingPoint.
Temporarily save MeetingPoint
Temporarily save linked MeetingPoint
With this option, a local version of the MeetingPoint is saved in order to decrease access times.
Current MeetingPoint
Shows the path to the currently linked MeetingPoint.
Link
Link to the current document
Please select the path to the MeetingPoint for the current document.
Select layout
Displays the current layout.
Connect further documents
Select the additional documents to which the MeetingPoint will be linked.
Password protection
If your documents are protected, you must enter the password in order to link the selected documents to the MeetingPoint.
MeetingPoint update
Updates for the Premium Layout are provided via the software. If an update is available, it is displayed in the menu bar and in the firesys settings, which also updates the existing MeetingPoint.
Video: Reconnecting MeetingPoint
To attach a MeetingPoint to a document:
Requirement: If no MeetingPoint is connected to the document or the previously used MeetingPoint has not been found, a dialogue box opens automatically when the document is opened, stating that a MeetingPoint must be specified. To connect a MeetingPoint to the document, confirm in the dialogue with “Yes”.
-
The firesys welcome dialogue opens. Select your preferred language here.
-
Then click on “Next >”.
-
On the following page of the dialogue you can select a new MeetingPoint. Click on the three dots to the right of “Please select a MeetingPoint”.
→ A selection dialogue opens.
-
Drag and drop the folder containing the MeetingPoint into the selection field.
Note: Alternatively, you can connect the MeetingPoint further down in the dialogue via the button “Additional folders”. Confirm with “OK”. Note: If you subsequently want to attach several Word documents at the same time (including stories) to the newly selected MeetingPoint, you can do this in the “Connect further documents” section. This saves you having to attach each individual document. Click on the three dots under “Connect further documents” and proceed in the selection dialogue that opens in the same way as when selecting the MeetingPoint.
-
Click on “Next >”.
→ Your documents are bound to the MeetingPoint.
Note: Please note that after changing the MeetingPoint, save, close and reopen the document to be able to work optimally with firesys.
See also
![]() The setting menus in firesys
The setting menus in firesys
![]() The firesys settings in Word
The firesys settings in Word
![]() The registration settings in firesys
The registration settings in firesys
![]() The highlighting settings in Word
The highlighting settings in Word

