New Features: Unterschied zwischen den Versionen
Keine Bearbeitungszusammenfassung |
Keine Bearbeitungszusammenfassung |
||
| (33 dazwischenliegende Versionen von 5 Benutzern werden nicht angezeigt) | |||
| Zeile 1: | Zeile 1: | ||
== Version 1. | == firesys-Version 23.3.2 == | ||
XBRL Tagger 1.10 offers several new features in regard to different areas of report creation and generation meant to enhance and facilitate your experience as users. Below, you can see a brief description of these improvements in areas such as PDF & Roll Forward, Document Settings, Report Generation, Usability, and ESG. | |||
=== PDF & Roll Forward === | |||
====PDF Information Panel==== | |||
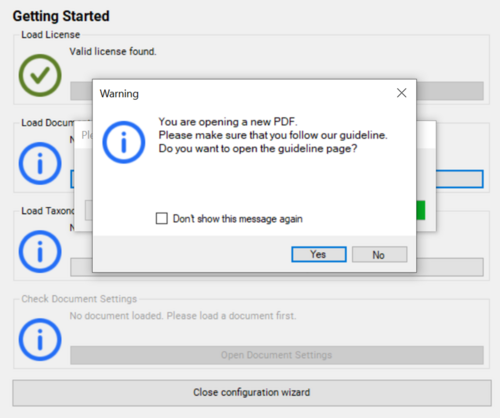
It is our experience from previous years that users who work with PDF files may experience several issues while using the Tagger if they have not prepared the PDF following our recommendations. It is therefore important that PDF users take the time to read through our guidelines and prepare the PDF correctly before they start tagging. For this reason, after loading a new PDF file into the Tagger, a window pops up reminding users to follow our guidelines and gives them the possibility to open our guidelines page in the Tagger documentation. | |||
[[Datei:PDF Information Panel1.png|center|500px]] | |||
====Roll Forward Optimization When Using Backup Functionality==== | |||
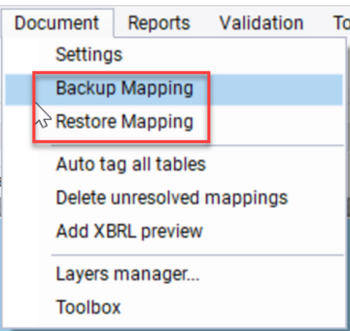
As users already know, when they tag an early version of their PDF document, they can then copy the text block tagging to the newer version of the same PDF using the Backup/Restore functionality (Document → Backup Mapping/Restore Mapping): | |||
[[Datei:Roll Forward Optimization When Using Backup Functionality1.png|center|350px]] | |||
However, it is now possible to tag some disclosures in the new version of the PDF and only later decide to restore the mapping from the previous version using the Restore Mapping functionality. In this case, the tags from both versions of the PDF files are merged and saved, if they do not overlap with each other. | |||
==== Roll Forward Wizard to Compare Text Block Mappings ==== | |||
If you are working with PDF files, it is now possible to compare the differences between text block mappings of two different versions of your document. firesys Version 23.3.2 introduces a wizard that helps users to visualize what has happened with the roll forward process and compare the results. | |||
Let say you have an early, very simple one-page version of your report (V1) that has already been tagged and a later, more developed version of your report (V2) that has not been tagged yet. You roll forward the mappings of your V1 to your V2 report and now you want to compare the results (to see how to perform a roll forward, check our documentation here) | |||
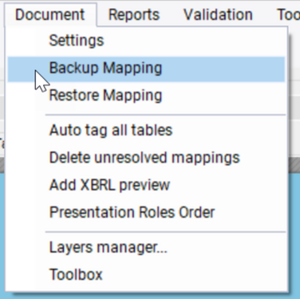
First you have to save a backup mapping for the document you want to use as a comparison, let’s say our V1 backup. Open V1 on the Tagger, then go to Document/ Backup Mapping and save the backup on your computer. | |||
[[Datei:Roll Forward Wizard to Compare Text Block Mappings1.png|center|300px]] | |||
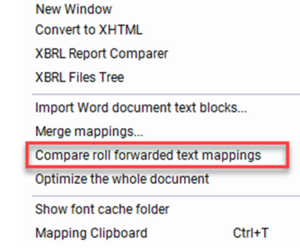
Then open V2 on the Tagger, go to Tool and click on '''Compare roll forwarded text mappings''' | |||
[[Datei:Roll Forward Wizard to Compare Text Block Mappings2.png|center|300px]] | |||
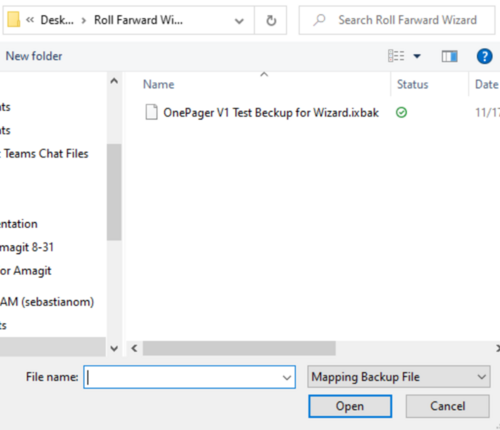
Choose you V1 backup and open it: | |||
[[Datei:Roll Forward Wizard to Compare Text Block Mappings3.png|center|500px]] | |||
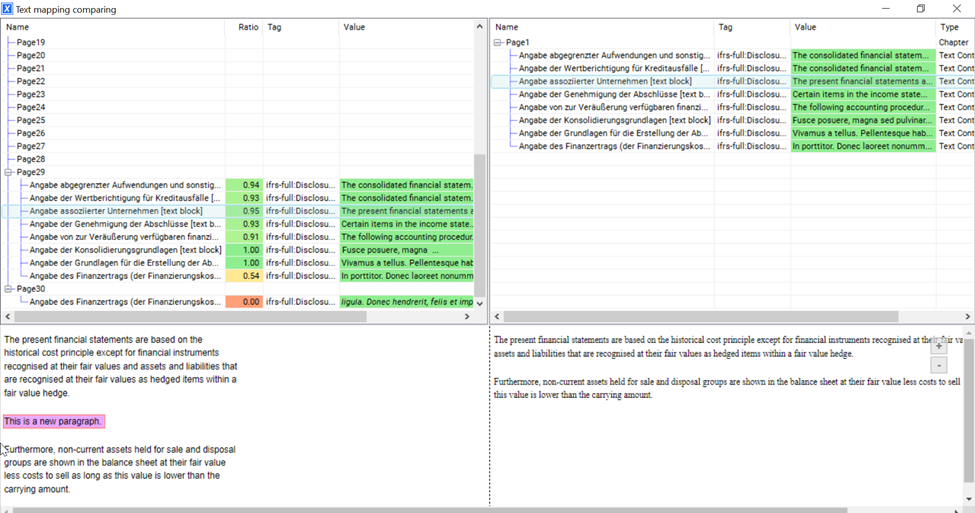
At this point, a new window will open that shows you the differences between the mappings of V1 and V2. | |||
[[Datei:Roll Forward Wizard to Compare Text Block Mappings4.png|center|1000px]] | |||
The ratio column indicates how much (0 to 1 ratio) of the content of that specific tag has changed between versions. If you click on one of the tags, the text of the two different versions of the document will appear in the boxes below. The sections that differ between the versions, words, sentences or numbers, will be highlighted for easy comparison. You can also see in these boxes if the text has different formatting between the two versions, for example a different font or if it is on two columns instead of one. | |||
==== Switch Layer for Text Block Tags ==== | |||
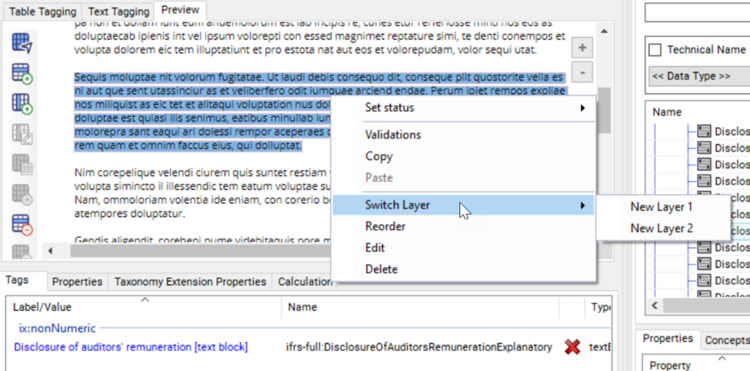
It is now possible to move text block tags and their continuations from one layer to another available layer. If you have tagged a disclosure on the default layer and now want to move it to another layer where the same section has not been tagged yet, simply right click on it and select which available layer you want to move it to from the Switch Layer menu. | |||
[[Datei:DoubleMultiple Tagging for PDF Documents6.png|center|750px]] | |||
===Document Settings === | |||
==== Additional Confirmation Window When Changing Label Handling Option ==== | |||
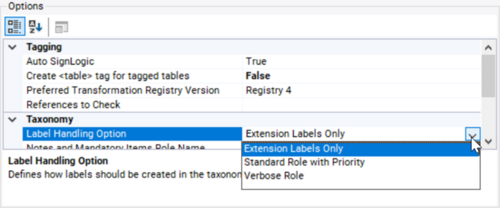
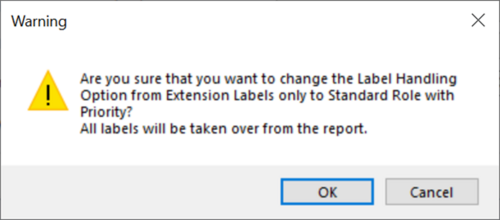
If the user wants to change the Label Handling Option from the Document Settings after the report has already been tagged, an additional confirmation window will now show up, asking to confirm the selection. | |||
[[Datei:Additional Confirmation Window When Changing Label Handling Option1.png|center|500px]] | |||
[[Datei:Additional Confirmation Window When Changing Label Handling Option2.png|center|500px]] | |||
==== Validation Message for Deviation of Registry ==== | |||
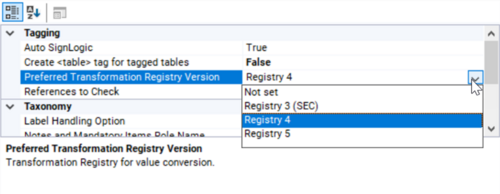
When creating a document (or afterward via Document à Settings), the registry version is selectable. | |||
[[Datei:Validation Message for Deviation of Registry1.png|center|500px]] | |||
This registry should be the only one to be used throughout the whole document. | |||
Therefore, if a different registry is used rather than the one set up in Document Settings, an error message is now generated when applying In-tool validation (or Validation → Validate document). | |||
For example, if the report is set to Registry 3 (which does not allow cells with fixed-zero), but afterwards a cell with fixed-zero is tagged (which is only allowed in Registry 4), this generates a validation message for the selected cell as the one below: | |||
[[Datei:Validation Message for Deviation of Registry2.png|center|400px]] | |||
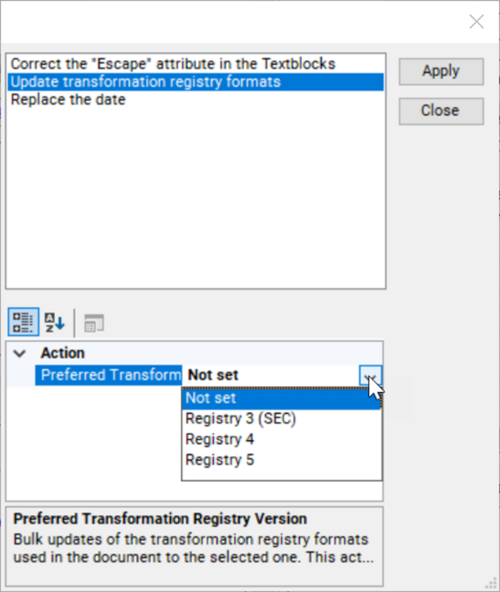
Note: To correctly change the registry on an existing document for all instances where the registry is set, there is a toolbox feature (Document → Toolbox) to do this: | |||
[[Datei:Validation Message for Deviation of Registry3.png|center|500px]] | |||
====Notification if Special Character is Removed in Extension Prefix==== | |||
The Company name of the user may include some special characters like ä, å, ø, ü. However, only basic Latin Unicode characters can be used for the Extension prefix in Document settings. The Tagger now informs the user when a special character from the Document Settings Company name will be removed in Extension prefix. The user then has to manually replace the special character that was removed in Extension prefix with a similar Latin character. | |||
[[Datei:Notification if Special Character is Removed in Extension Prefix1.png|center|750px]] | |||
====Default Settings for Create "table" Tag and Escape Attribute==== | |||
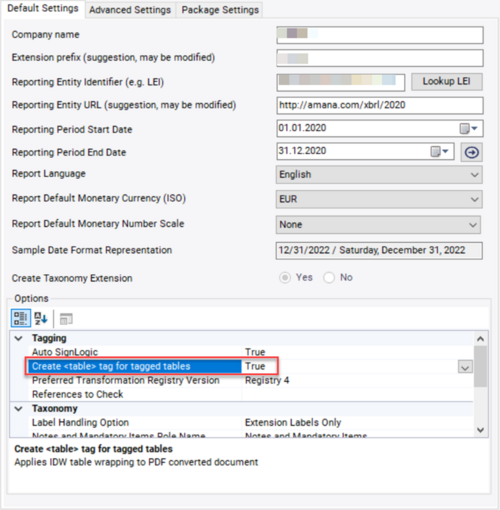
Since more and more audit firms in different countries are now requesting users to have tables in the notes section of the final report marked with an XHTML table tag, the feature to "Create <table> tag for tagged tables" in the Document Settings is now set to "true" by default. | |||
[[Datei:Default Settings for Create table Tag and Escape Attribute1.png|center|500px]] | |||
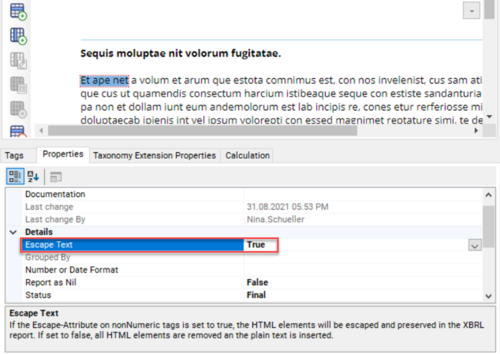
Similarly, the Escape-Attribute for text blocks in the text block properties is now set to "true" by default. The Escape Attribute controls whether the HTML tag should be included in the XBRL instance document or not. | |||
[[Datei:Default Settings for Create table Tag and Escape Attribute2.png|center|500px]] | |||
=== Report Generation === | |||
==== All Excel Reports Added to Report Folder ==== | |||
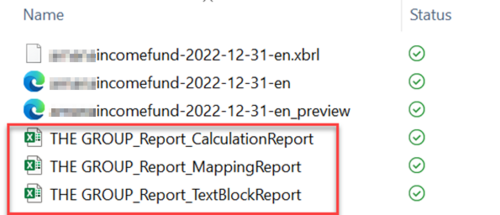
Users want to make sure that everything is filed correctly before submitting their reports to the auditors in order to minimize the potential feedback they receive from them. To facilitate this task, in addition to the Validation Results, all Excel reports are now added to the reports folder when a new iXBRL Package is generated. | |||
Just open the Reports folder and you will find the Calculation, Mapping and Text block reports: | |||
[[Datei:All Excel Reports Added to Report Folder1.png|center|500px]] | |||
==== Validation Results Excel File now contains additional information about the Linkbases ==== | |||
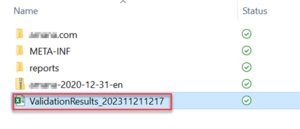
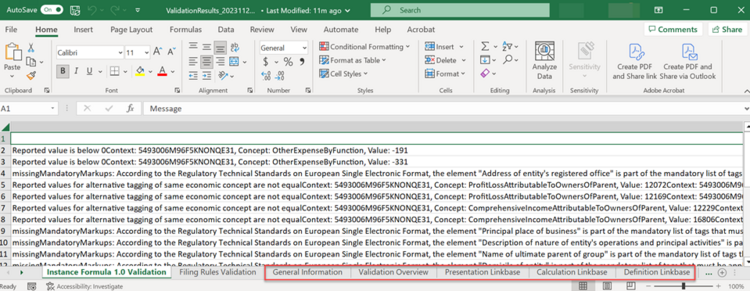
The Validation results Excel file included in the iXBRL report package now also contains results for General Information, Validation Overview and the content of the Linkbases, Enums and Roles. | |||
[[Datei:Validation Results Excel File now contains additional information about the Linkbases1.png|center|300px]] | |||
[[Datei:Validation Results Excel File now contains additional information about the Linkbases2.png|center|750px]] | |||
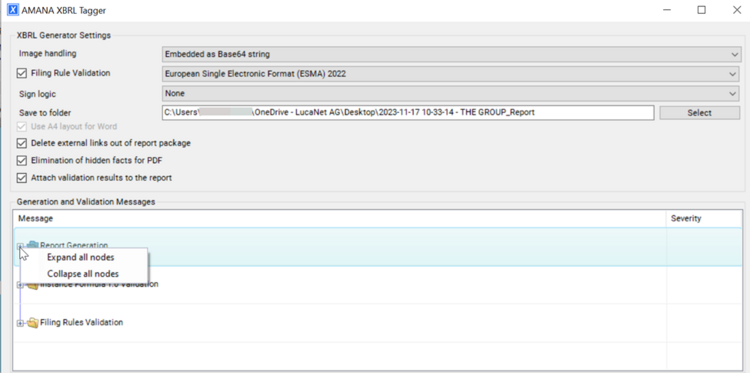
==== Possibility to Expand/Collapse All Nodes After Report Generation ==== | |||
To help users get a quick overview of the validation messages after having generated an iXBRL report, it is now possible in the result form to expand or collapse all the nodes via right click menu entry. | |||
[[Datei:Possibility to ExpandCollapse All Nodes After Report Generation1.png|center|750px]] | |||
===Usability=== | |||
==== Find Location of Used Tags in the Taxonomy ==== | |||
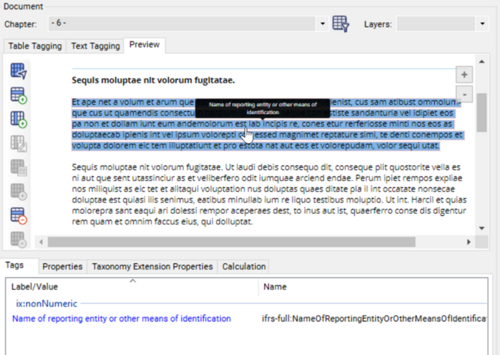
With firesys 23.3.2, it is possible to easily find the exact location of used tags in the respective taxonomy. Just select a part of your report that has been tagged, either a value in a financial statement of a text block in the notes section. | |||
[[Datei:Find Location of Used Tags in the Taxonomy1.png|center|500px]] | |||
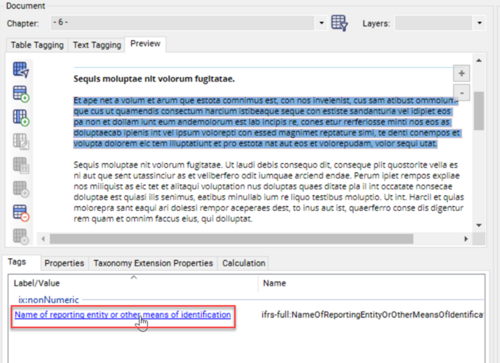
Then, move to the Tags tab below and click on the tag. | |||
[[Datei:Find Location of Used Tags in the Taxonomy2.png|center|500px]] | |||
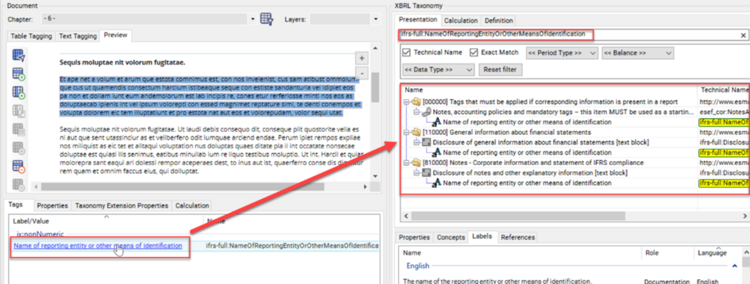
The exact location of the used tag is shown on the taxonomy in the right window of the Tagger. | |||
[[Datei:Find Location of Used Tags in the Taxonomy3.png|center|750px]] | |||
====XBRL File Tree ==== | |||
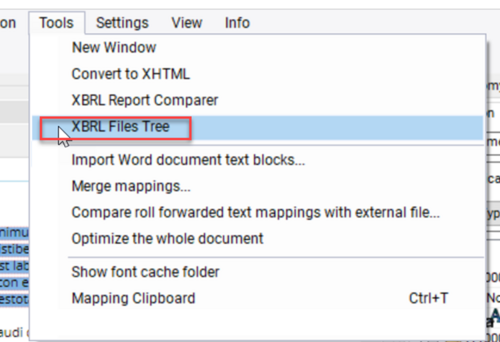
firesys 23.3.2 offers the possibility to check the File Tree of any ESEF report directly in the Tagger itself. Just go to Tools and select XBRL Files Tree. | |||
[[Datei:XBRL File Tree1.png|center|500px]] | |||
A new window will open asking you to load a file from your computer: | |||
[[Datei:XBRL File Tree2.png|center|500px]] | |||
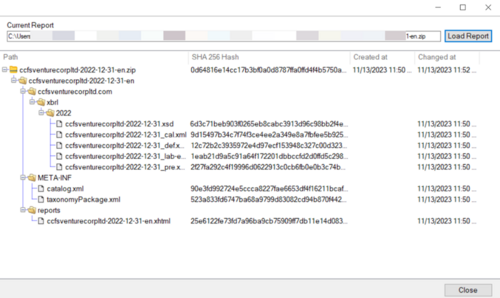
After selecting a report, the XBRL file tree will be generated within the window: | |||
[[Datei:XBRL File Tree3.png|center|500px]] | |||
====XBRL Report Comparer==== | |||
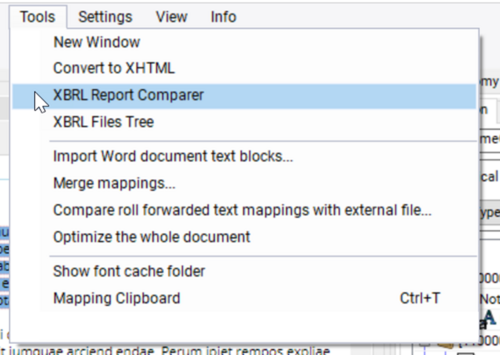
There is now an XBRL Report Comparer to view the differences between two versions of your report. Just go to Tools and select XBRL Report Comparer: | |||
[[Datei:XBRL Report Comparer1.png|center|500px]] | |||
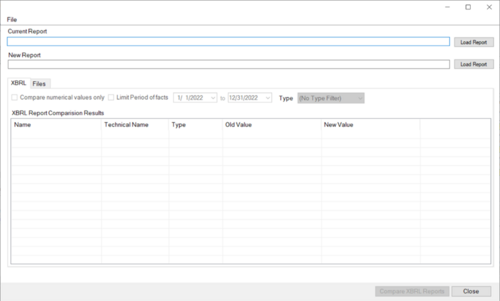
A new window will open where you can upload the desired reports for the comparison: | |||
[[Datei:XBRL Report Comparer2.png|center|500px]] | |||
====Reorder Chapter Number==== | |||
It is now possible to re-order chapter numbers in Presentation Linkbase of Extension Taxonomy. Just go to Document -> Presentation Roles Order and adjust your order in the new window. | |||
[[Datei:Reorder Chapter Number1.png|center|300px]] | |||
Select the chapter and drag it to the new position, then click on Save. | |||
[[Datei:Reorder Chapter Number2.png|center|500px]] | |||
====Other New Features==== | |||
*The Tagger now supports RTL language files. | |||
*The displayed date format can now be changed in the Tagger settings. | |||
*Text block tags and their continuations can now be moved to another free layer via right click menu. | |||
*Duplicate Hidden Elements now generate an error in the in-tool validation. | |||
*When opening a new file in the Tagger a separate window is opened instead of replacing the old file. | |||
*Entry point for ESEF 2022 is checked automatically to contain https. | |||
*The Tagger now displays a message when the weight between two periods of the same tag differs. | |||
*When creating a new layer, Tagger now reminds that tables need to be cloned before they can be tagged on the new layer. | |||
*New continuations are now automatically sorted correctly even when they are tagged before the initial tag belonging to the continuation. | |||
Some additional Item Types required for ESG were added in the Taxonomy Extension Properties. | |||
== firesys-Version 22.3.1== | |||
=== Tag PDF documents with TextBlocks from tagged Word documents === | |||
For many issuers a report creation process begins with a Word document. While the report itself is being created in Word, the final document is, for layout reasons, sometimes a PDF. While tagging text blocks in Word and maintaining those tags through different versions is very reliable, doing so in PDF is technically more challenging. | |||
[[Datei:EN_Word_Screenshot_toolsxbrl_contentcontrol.png|center|800px]] | |||
If your working document is a Word document but your final document to be tagged and published is a PDF, from firesys version 22.3.1 onwards we can offer a reliable way to restore all tagged text blocks from a Word document to the PDF. This even works with nested tags. When the time has come to tag the PDF, open it in toolsxbrl, set the default settings and then choose the "Import Word document text blocks" option from the "Tools" section: | |||
[[Datei:EN_Word_Screenshot_toolsxbrl_importTextFromWord.png|center|400px]] | |||
Choose your tagged Word document and toolsxbrl will apply all text block tags to the PDF. Make sure you apply the Word document to a PDF document based on the same version of the content. Once toolsxbrl is done applying the tags you can see them as usual in both the Preview and the Text Tagging tab. | |||
[[Datei:EN_Word_Screenshot_toolsxbrl_autoTaggedPDF.png|center|700px]] | |||
=== Copy Textblock Tags through the Mapping Clipboard === | |||
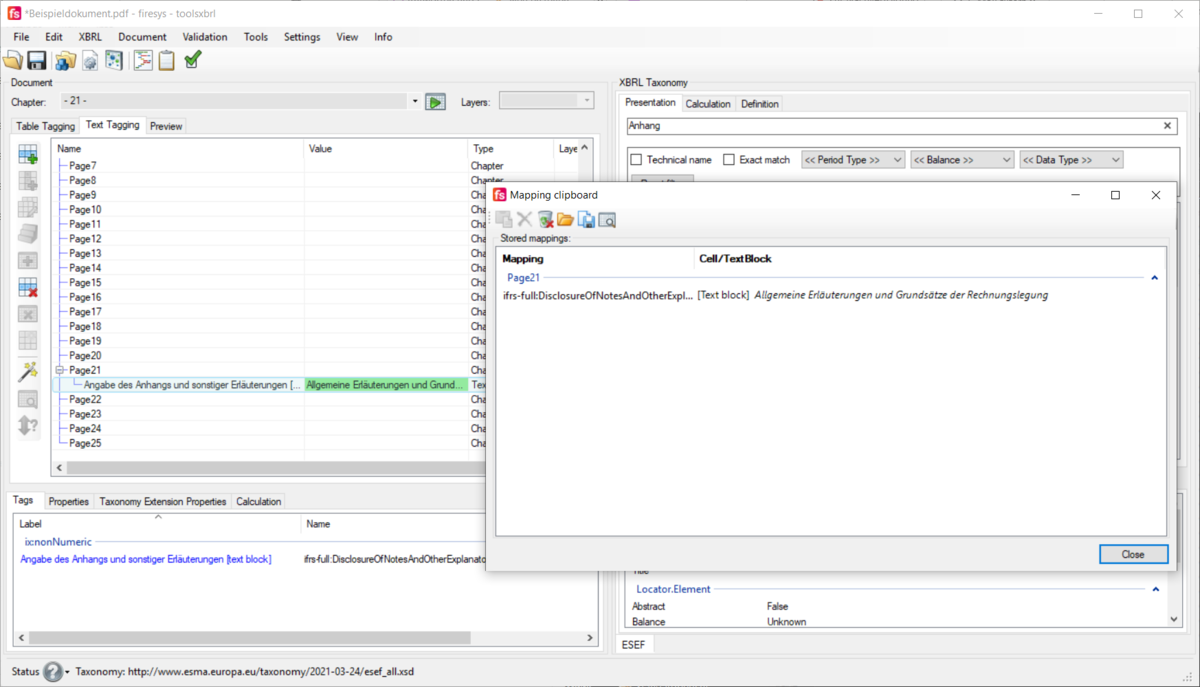
The Mapping Clipboard is a powerful tool to work with your report and also transfer tags from one version of a tagged document to another. So far it only supported tags in tables, from firesys version 22.3.1 onwards it also supports text block tags. | |||
[[Datei:EN_Word_Screenshot_toolsxbrl_clip_textblock.png|center|1200px]] | |||
=== Settings and LEI-Search === | |||
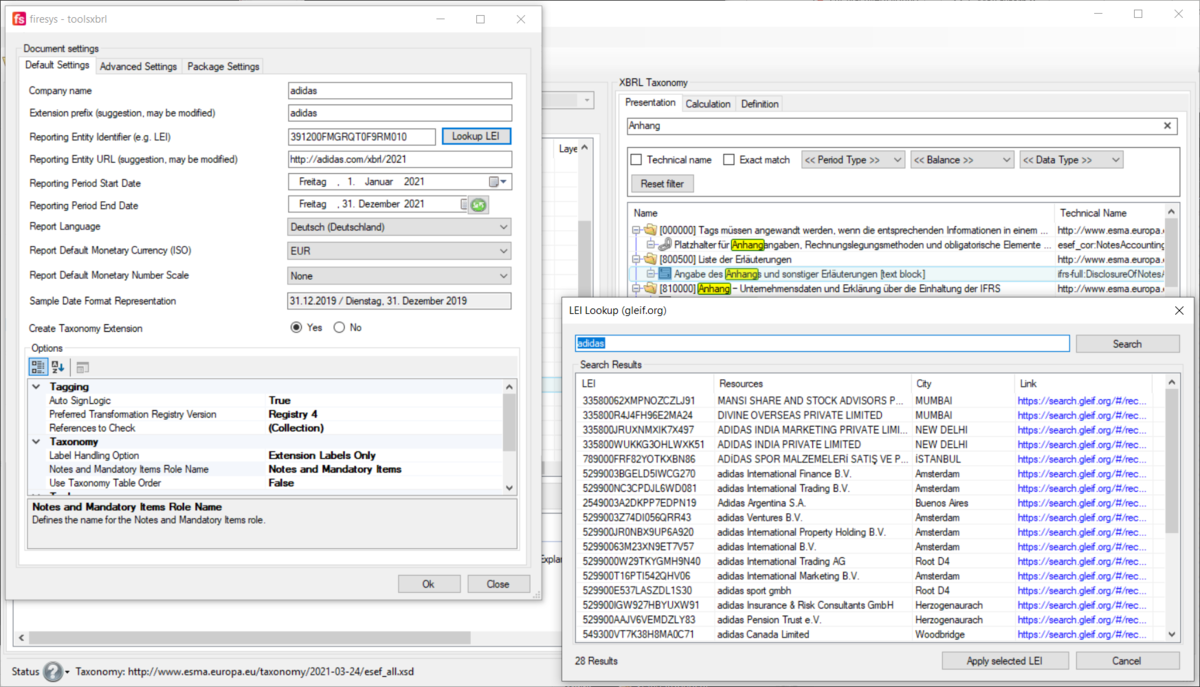
The settings dialog has been improved and provides a more clear interface and further information to most of the settings. It is now also possible to change the role name for the Names And Mandatory Items role in the settings. The LEI-Search dialog has also been improved and shows more results from the official GLEIF database. | |||
[[Datei:EN_Word_Screenshot_toolsxbrl_Settings_and_lei.png|center|1200px]] | |||
=== Mini Disclosure Checklist === | |||
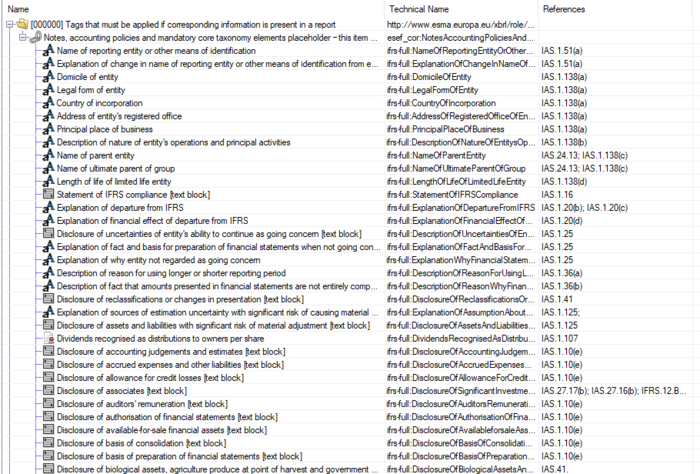
From 2022 onwards the ESEF requirements mandates text block tagging, all mandatory tags from the role 000000 in the ESEF taxonomy have to be tagged if the content is present in the document and the tag is material to the issuer. All the mandatory tags have references to the respective sections in the standard: | |||
[[Datei:EN_Word_Screenshot_toolsxbrl_mandatory_tags.png|center|700px]] | |||
toolsxbrl now allows the issuer to select the references which are material to the report, and then the validation will show a warning for all the tags that are actually referenced by that selection. To enable this feature, just go to the document settings and select the three dots for the "References to Check" property in the Options. | |||
[[Datei:EN_Word_Screenshot_toolsxbrl_options.png|center|500px]] | |||
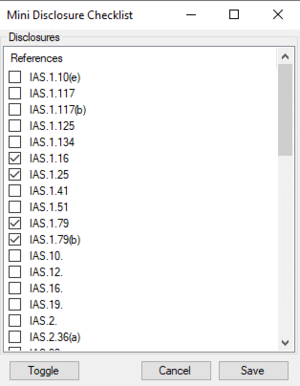
Now the Mini Disclosure Checklist appears and the references to be checked can be selected and saved. | |||
[[Datei:EN_Word_Screenshot_toolsxbrl_checklist.png|center|300px]] | |||
From now on, when the user validates the document, all tags that are not yet tagged and referenced by the selection will show up as a warning. | |||
[[Datei:EN_Word_Screenshot_toolsxbrl_results.png|center|1200px]] | |||
=== Information about Reportwide Calculations === | |||
We have improved toolsxbrl to make it clearer how and where reportwide calculations affect the report: | |||
[[Datei:EN_Word_Screenshot_toolsxbrl_reportwide.png|center|800px]] | |||
In the example above the tagged cell for "Other operating income" does not have a calculation itself, since it is part of another calculation in the "Income Statement". In the table "Other operating income" however, this tag is actually the total of the values in that table. Since the calculation for the "Other operating income" table is also valid for the tag at this position in the report, it is now also being shown here besides a possible calculation for this "Cell". The summands being shown are the summands that are valid in the context of this given cell, meaning if you have added a calculation for certain dimensions, it would show the values for tags existing in the dimension selection for the selected cells. This will make it more transparent why a calculation in another part of the report might lead to a calculation warning in the currently selected table. All calculation that have not been created for the selected cell can only be edited in the original cell. | |||
=== Improvements for table tags === | |||
toolsxbrl now has a new smart AI-powered feature that will help you selecting tables in PDF documents. While you had to manually select tables in prior versions, you can now click the "Automatically select table area" button in the upper left corner of the preview pane: | |||
[[Datei:EN_Word_Screenshot_toolsxbrl_preview_pane.png|center|1200px]] | |||
Then toolsxbrl will use the AI to select the tables available on the page. If there are multiple tables, it will highlight all of them: | |||
[[Datei:EN_Word_Screenshot_toolsxbrl_multiple_tables.png|center|1200px]] | |||
You can then simply select the table you want to tag, manually adjust the area if necessary and tag the table as usual: | |||
[[Datei:EN_Word_Screenshot_toolsxbrl_tagged_table.png|center|1200px]]--> | |||
You can change the table area even when you already have a table tag and cell tags applied to it. Just right click the border, click „Edit“ and then adjust the area. All tags that are within the newly selected area will be kept: | |||
[[Datei:EN_Word_Screenshot_toolsxbrl_selected_area.png|center|1200px]] | |||
=== Improvements to textblock-tagging === | |||
We have vastly improved the algorithm for textblock-restoration to make tagging documents, that are still a work in progress, more reliable. toolsxbrl is now able to restore most textblock-tags, even in the following situations: | |||
* A text block moves from version 1 to version 2 to another page. | |||
* A text block that was on one page in version 1 wraps to two pages in version 2. | |||
* Words are inserted or deleted within a text block. | |||
* Paragraphs are inserted or deleted within a text block. | |||
To furthermore support this process it is now also possible to edit the area of a textblock-tag, without having to retag it: | |||
[[Datei:EN_Word_Screenshot_toolsxbrl_edit.png|center|1200px]] | |||
When you have to use the same tag in multiple areas of your report, the XBRL concept of continuations are the way to go. We have also simplified the way to tag those. Whenever you use a textblock-tag that you have already tagged to a different area, you will be asked if this is supposed to be a continuation of the already existing tag. If you select yes, the continuation will automatically be set in the correct order. | |||
[[Datei:EN_Word_Screenshot_toolsxbrl_continuation.png|center|1200px]] | |||
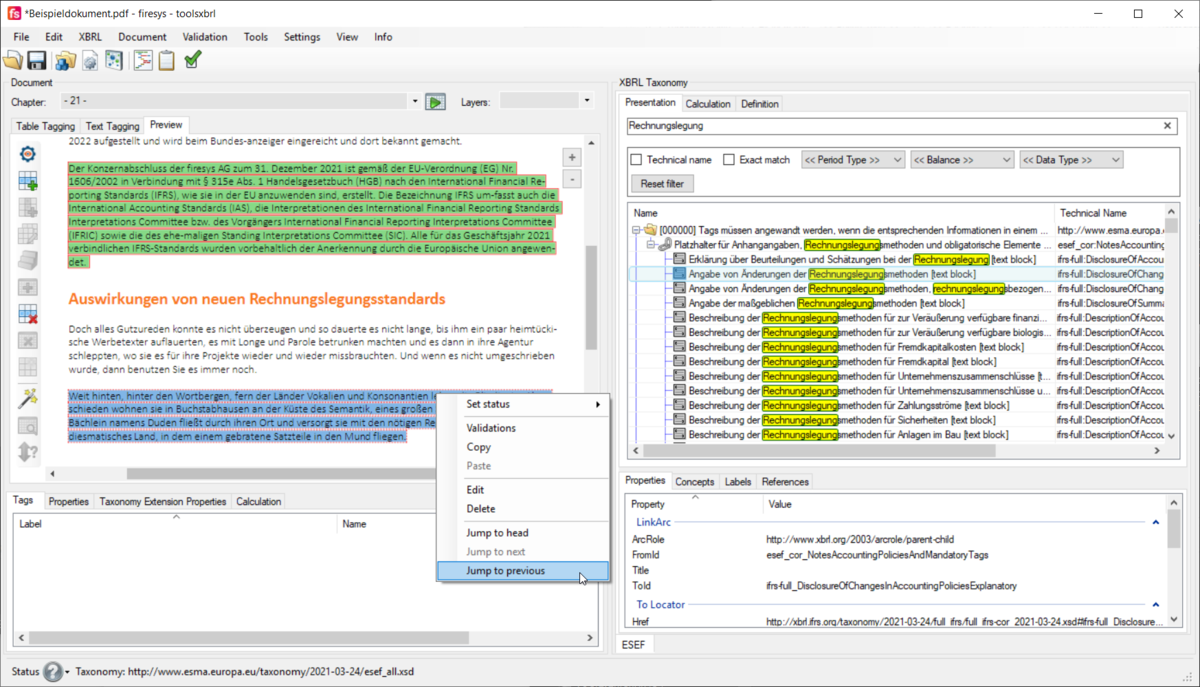
You can now also jump between all continuations of a textblock-tag, by rightclicking one instance and using the "jump to" functionality: | |||
[[Datei:EN_Word_Screenshot_toolsxbrl_jump.png|center|1200px]] | |||
=== Big Textblock tagging for the full notes from page to page (PDF) === | |||
Create or use a new layer. Tag the first page with the Tag for example: “Disclosure of notes and other explanatory information”. | |||
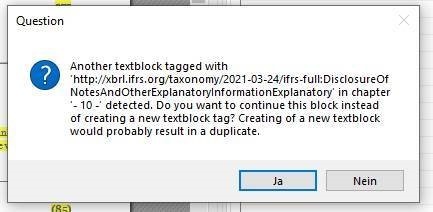
Go to the last page of your notes section and repeat the step. You will get this screen. Answer it with yes: | |||
[[Datei:Big_text_block_question.jpg|center|433px]] | |||
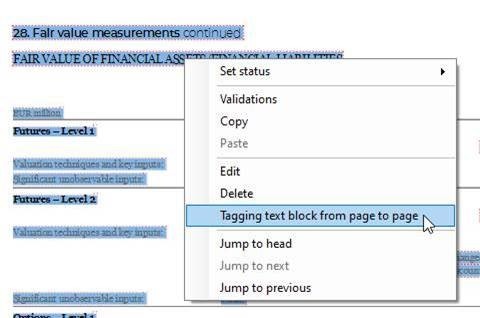
Rightclick on the tagged text and chose this part of the menu: | |||
[[Datei:Tagging text block from page to page.jpg|center|480px]] | |||
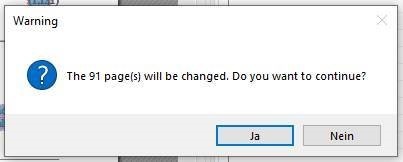
Answer the next window with yes: | |||
[[Datei:Big text block warning.jpg|center|480px]] | |||
After this all pages will be tagged. | |||
If you work with a <b>word document:</b> To insert the whole notes section (“Disclosure of notes and other explanatory information [text block]”) into your word document, you need to select all the text you wish of your document and insert the Content Control and the Technical Name as it would for any tag, <b>but please note</b> that the selection of the text must be made <b>under a headline</b>, for example the first one in the document. | |||
=== Further improvements === | |||
* PDF: toolsxbrl now shows the "true" page numbers of a document (according to information in the PDF) in the chapter selection | |||
* PDF: In accordance with the new ESEF reporting manual section 2.2.6 whitespaces of PDF documents will be preserved to ensure readability of the content in the XBRL layer. | |||
* Calculation Linkbase 1.1: While not yet mandatory for ESEF, the new implementation of the calculation linkbase in version 1.1 can be chosen in the settings. | |||
* .NET6: toolsxbrl is now running on Microsofts latest Long Term Evolution Framework, allowing for an updated and stable development. NET6 also allows us to deploy a version of toolsxbrl that is not dependent on a local installation of the Framework, thus minimizing compatibility issues. | |||
== firesys-Version 21.3.1 == | |||
=== Double/Multiple Tagging for PDF documents === | === Double/Multiple Tagging for PDF documents === | ||
In some reports some content has to be tagged more than once. This can be <b>two tags</b> for the same table cell, two tags for the same text or a <b>text block</b> around a table that is already tagged. With | In some reports some content has to be tagged more than once. This can be <b>two tags</b> for the same table cell, two tags for the same text or a <b>text block</b> around a table that is already tagged. With the firesys-Version 21.3.1 we are adding <b>tagging layers</b> to PDF documents. Each layer can then be tagged independently. When creating a result document, all the tags will be merged according to the iXBRL specifications. | ||
To get started, first load your document as usual and then add a new layer via the <b>axis manager:</b> | To get started, first load your document as usual and then add a new layer via the <b>axis manager:</b> | ||
| Zeile 28: | Zeile 360: | ||
=== Continuations === | === Continuations === | ||
In reporting text that belongs to a single XBRL textblock or text tag might be in several places in the document. XBRL has a mechanism called <b>continuation</b> for this case that essentially tells the XBRL processors to merge all the content that has been tagged with this tag and is part of the continuation for the output. From | In reporting text that belongs to a single XBRL textblock or text tag might be in several places in the document. XBRL has a mechanism called <b>continuation</b> for this case that essentially tells the XBRL processors to merge all the content that has been tagged with this tag and is part of the continuation for the output. From firesys-Version 21.3.1 the places to continue a tag can not explicitly be selected: | ||
| Zeile 36: | Zeile 368: | ||
=== Abstract hierarchy customizer === | === Abstract hierarchy customizer === | ||
In addition to the Dimension Hierarchy Customizer ([[Document_Tagging#Customizing_the_dimensional_hierarchy]]) | In addition to the Dimension Hierarchy Customizer ([[Document_Tagging#Customizing_the_dimensional_hierarchy]]) firesys-Version 21.3.1 adds a similar feature for <b>Abstract Hierarchies</b>. If the hierarchy of a statement in your report does not resemble the one in the ESEF taxonomy, you can now rearrange the positions and levels, add additional abstracts from the taxonomy and remove abstracts that are part of the default: | ||
| Zeile 64: | Zeile 396: | ||
=== Custom date formats === | === Custom date formats === | ||
There are countless ways to represent a <b>date</b>, it is challenging to support all <b>formats</b> automatically in | There are countless ways to represent a <b>date</b>, it is challenging to support all <b>formats</b> automatically in toolsxbrl. If a date is not recognized by default, from firesys-Version 21.3.1 a <b>custom format description</b> can be created for the table in question. | ||
Click on the table properties after selecting the table in question. The following window opens with a new setting ("Custom date formats"). Click in the right empty cell. A button appears. This opens the editor for user-defined date formats. | Click on the table properties after selecting the table in question. The following window opens with a new setting ("Custom date formats"). Click in the right empty cell. A button appears. This opens the editor for user-defined date formats. | ||
| Zeile 77: | Zeile 409: | ||
=== New Settings === | === New Settings === | ||
Three further new features can be enabled or disabled from the <b> | Three further new features can be enabled or disabled from the <b>toolsxbrl Settings:</b> | ||
<b> Readonly Properties</b> | <b> Readonly Properties</b> | ||
| Zeile 100: | Zeile 432: | ||
toolsxbrl has now an <b>Auto Save</b> feature to prevent accidental loss of work. If your PC crashes and you have not saved your work, you will get a prompt on the next load of the document if you want to restore the latest auto save backup rather then the original mapping file. This option deactivates this mechanism if it is not desired. | |||
| Zeile 111: | Zeile 443: | ||
toolsxbrl usually detects changes in table headers during a <b>roll</b> forward and adjusts the mapping periods accordingly. For tables that don't have the date explicitly in the header, for example <b>Statement of Changes in Equity</b>, this option moves the mapping periods forward according to the date set in the document settings. Just select <i>"Yes"</i> and click on OK for a roll forward. This option will always be <i>"No"</i> by default and also after a roll forward. | |||
| Zeile 122: | Zeile 454: | ||
=== Calculation Validation === | |||
Failed calculations in XBRL are often just <b>rounding errors</b>, and thus ignored by most filers and regulators. Sometimes the actual delta between the calculated value and the tagged value is so too big to be a rounding error, so it would make more sense to be an <b>error than a warning</b>. This behavior can now be changed in the XBRL Processor settings: | Failed calculations in XBRL are often just <b>rounding errors</b>, and thus ignored by most filers and regulators. Sometimes the actual delta between the calculated value and the tagged value is so too big to be a rounding error, so it would make more sense to be an <b>error than a warning</b>. This behavior can now be changed in the XBRL Processor settings: | ||
| Zeile 132: | Zeile 464: | ||
=== Detach Controls === | |||
With the firesys-Version 21.3.1 you can now make full usage of multiple displays while tagging. Simply use the Detach Controls feature and independently move the windows around your desktops: | |||
[[Datei:EN Word Screenshot Detach Controls.jpg|center|1500px]] | [[Datei:EN Word Screenshot Detach Controls.jpg|center|1500px]] | ||
== See also == | == See also == | ||
[[Datei:Navigation_hoch.svg|link=]] [[ | [[Datei:Navigation_hoch.svg|link=]] [[Technical_Documentation|Technical Documentation]] <br> | ||
[[Datei:Navigation_rechts.svg|link=]] [[ | [[Datei:Navigation_rechts.svg|link=]] [[Getting_Started|Getting Started]] <br> | ||
[[Datei:Navigation_rechts.svg|link=]] [[ | [[Datei:Navigation_rechts.svg|link=]] [[Toolsxbrl_Settings| toolsxbrl Settings]] <br> | ||
{{MoreContent}} | {{MoreContent}} | ||
[[Kategorie:English-Word Inhalte-veröffentlichen-toolsxbrl-Content]] | |||
Aktuelle Version vom 29. November 2023, 13:59 Uhr
firesys-Version 23.3.2
XBRL Tagger 1.10 offers several new features in regard to different areas of report creation and generation meant to enhance and facilitate your experience as users. Below, you can see a brief description of these improvements in areas such as PDF & Roll Forward, Document Settings, Report Generation, Usability, and ESG.
PDF & Roll Forward
PDF Information Panel
It is our experience from previous years that users who work with PDF files may experience several issues while using the Tagger if they have not prepared the PDF following our recommendations. It is therefore important that PDF users take the time to read through our guidelines and prepare the PDF correctly before they start tagging. For this reason, after loading a new PDF file into the Tagger, a window pops up reminding users to follow our guidelines and gives them the possibility to open our guidelines page in the Tagger documentation.
Roll Forward Optimization When Using Backup Functionality
As users already know, when they tag an early version of their PDF document, they can then copy the text block tagging to the newer version of the same PDF using the Backup/Restore functionality (Document → Backup Mapping/Restore Mapping):
However, it is now possible to tag some disclosures in the new version of the PDF and only later decide to restore the mapping from the previous version using the Restore Mapping functionality. In this case, the tags from both versions of the PDF files are merged and saved, if they do not overlap with each other.
Roll Forward Wizard to Compare Text Block Mappings
If you are working with PDF files, it is now possible to compare the differences between text block mappings of two different versions of your document. firesys Version 23.3.2 introduces a wizard that helps users to visualize what has happened with the roll forward process and compare the results.
Let say you have an early, very simple one-page version of your report (V1) that has already been tagged and a later, more developed version of your report (V2) that has not been tagged yet. You roll forward the mappings of your V1 to your V2 report and now you want to compare the results (to see how to perform a roll forward, check our documentation here)
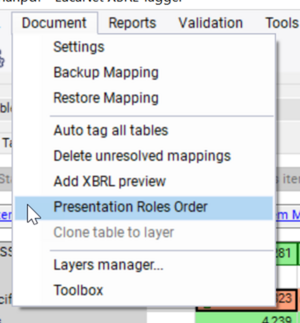
First you have to save a backup mapping for the document you want to use as a comparison, let’s say our V1 backup. Open V1 on the Tagger, then go to Document/ Backup Mapping and save the backup on your computer.
Then open V2 on the Tagger, go to Tool and click on Compare roll forwarded text mappings
Choose you V1 backup and open it:
At this point, a new window will open that shows you the differences between the mappings of V1 and V2.
The ratio column indicates how much (0 to 1 ratio) of the content of that specific tag has changed between versions. If you click on one of the tags, the text of the two different versions of the document will appear in the boxes below. The sections that differ between the versions, words, sentences or numbers, will be highlighted for easy comparison. You can also see in these boxes if the text has different formatting between the two versions, for example a different font or if it is on two columns instead of one.
Switch Layer for Text Block Tags
It is now possible to move text block tags and their continuations from one layer to another available layer. If you have tagged a disclosure on the default layer and now want to move it to another layer where the same section has not been tagged yet, simply right click on it and select which available layer you want to move it to from the Switch Layer menu.
Document Settings
Additional Confirmation Window When Changing Label Handling Option
If the user wants to change the Label Handling Option from the Document Settings after the report has already been tagged, an additional confirmation window will now show up, asking to confirm the selection.
Validation Message for Deviation of Registry
When creating a document (or afterward via Document à Settings), the registry version is selectable.
This registry should be the only one to be used throughout the whole document.
Therefore, if a different registry is used rather than the one set up in Document Settings, an error message is now generated when applying In-tool validation (or Validation → Validate document).
For example, if the report is set to Registry 3 (which does not allow cells with fixed-zero), but afterwards a cell with fixed-zero is tagged (which is only allowed in Registry 4), this generates a validation message for the selected cell as the one below:
Note: To correctly change the registry on an existing document for all instances where the registry is set, there is a toolbox feature (Document → Toolbox) to do this:
Notification if Special Character is Removed in Extension Prefix
The Company name of the user may include some special characters like ä, å, ø, ü. However, only basic Latin Unicode characters can be used for the Extension prefix in Document settings. The Tagger now informs the user when a special character from the Document Settings Company name will be removed in Extension prefix. The user then has to manually replace the special character that was removed in Extension prefix with a similar Latin character.
Default Settings for Create "table" Tag and Escape Attribute
Since more and more audit firms in different countries are now requesting users to have tables in the notes section of the final report marked with an XHTML table tag, the feature to "Create
tag for tagged tables" in the Document Settings is now set to "true" by default.Similarly, the Escape-Attribute for text blocks in the text block properties is now set to "true" by default. The Escape Attribute controls whether the HTML tag should be included in the XBRL instance document or not.
Report Generation
All Excel Reports Added to Report Folder
Users want to make sure that everything is filed correctly before submitting their reports to the auditors in order to minimize the potential feedback they receive from them. To facilitate this task, in addition to the Validation Results, all Excel reports are now added to the reports folder when a new iXBRL Package is generated.
Just open the Reports folder and you will find the Calculation, Mapping and Text block reports:
Validation Results Excel File now contains additional information about the Linkbases
The Validation results Excel file included in the iXBRL report package now also contains results for General Information, Validation Overview and the content of the Linkbases, Enums and Roles.
Possibility to Expand/Collapse All Nodes After Report Generation
To help users get a quick overview of the validation messages after having generated an iXBRL report, it is now possible in the result form to expand or collapse all the nodes via right click menu entry.
Usability
Find Location of Used Tags in the Taxonomy
With firesys 23.3.2, it is possible to easily find the exact location of used tags in the respective taxonomy. Just select a part of your report that has been tagged, either a value in a financial statement of a text block in the notes section.
Then, move to the Tags tab below and click on the tag.
The exact location of the used tag is shown on the taxonomy in the right window of the Tagger.
XBRL File Tree
firesys 23.3.2 offers the possibility to check the File Tree of any ESEF report directly in the Tagger itself. Just go to Tools and select XBRL Files Tree.
A new window will open asking you to load a file from your computer:
After selecting a report, the XBRL file tree will be generated within the window:
XBRL Report Comparer
There is now an XBRL Report Comparer to view the differences between two versions of your report. Just go to Tools and select XBRL Report Comparer:
A new window will open where you can upload the desired reports for the comparison:
Reorder Chapter Number
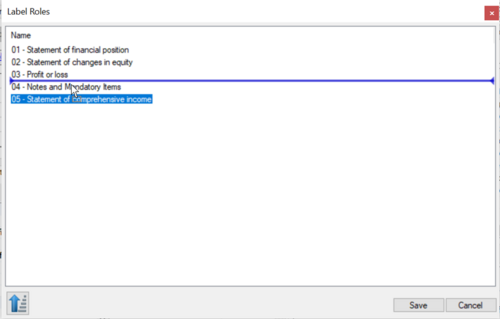
It is now possible to re-order chapter numbers in Presentation Linkbase of Extension Taxonomy. Just go to Document -> Presentation Roles Order and adjust your order in the new window.
Select the chapter and drag it to the new position, then click on Save.
Other New Features
- The Tagger now supports RTL language files.
- The displayed date format can now be changed in the Tagger settings.
- Text block tags and their continuations can now be moved to another free layer via right click menu.
- Duplicate Hidden Elements now generate an error in the in-tool validation.
- When opening a new file in the Tagger a separate window is opened instead of replacing the old file.
- Entry point for ESEF 2022 is checked automatically to contain https.
- The Tagger now displays a message when the weight between two periods of the same tag differs.
- When creating a new layer, Tagger now reminds that tables need to be cloned before they can be tagged on the new layer.
- New continuations are now automatically sorted correctly even when they are tagged before the initial tag belonging to the continuation.
Some additional Item Types required for ESG were added in the Taxonomy Extension Properties.
firesys-Version 22.3.1
Tag PDF documents with TextBlocks from tagged Word documents
For many issuers a report creation process begins with a Word document. While the report itself is being created in Word, the final document is, for layout reasons, sometimes a PDF. While tagging text blocks in Word and maintaining those tags through different versions is very reliable, doing so in PDF is technically more challenging.
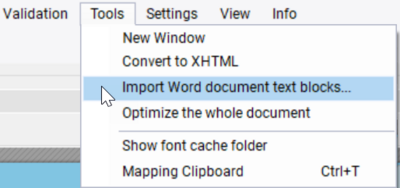
If your working document is a Word document but your final document to be tagged and published is a PDF, from firesys version 22.3.1 onwards we can offer a reliable way to restore all tagged text blocks from a Word document to the PDF. This even works with nested tags. When the time has come to tag the PDF, open it in toolsxbrl, set the default settings and then choose the "Import Word document text blocks" option from the "Tools" section:
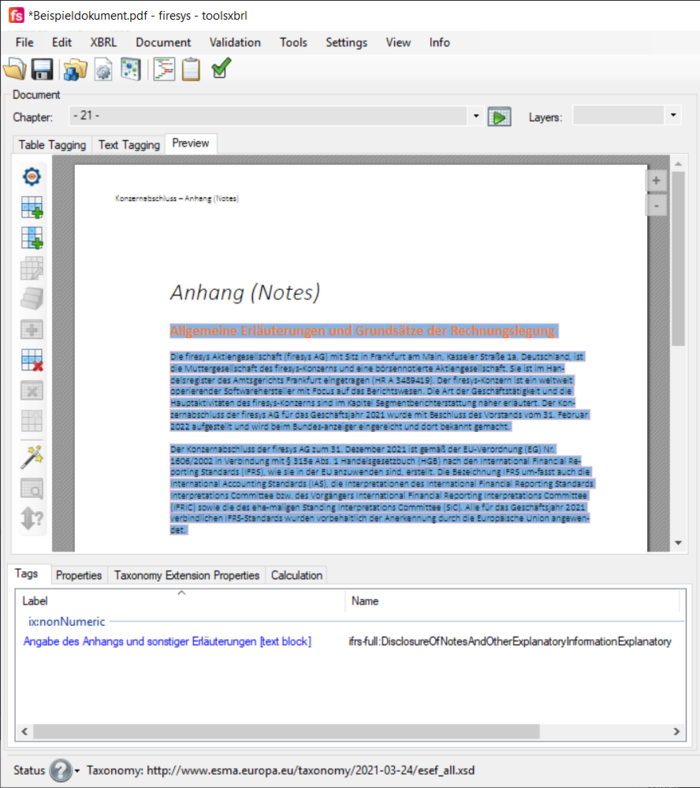
Choose your tagged Word document and toolsxbrl will apply all text block tags to the PDF. Make sure you apply the Word document to a PDF document based on the same version of the content. Once toolsxbrl is done applying the tags you can see them as usual in both the Preview and the Text Tagging tab.
Copy Textblock Tags through the Mapping Clipboard
The Mapping Clipboard is a powerful tool to work with your report and also transfer tags from one version of a tagged document to another. So far it only supported tags in tables, from firesys version 22.3.1 onwards it also supports text block tags.
Settings and LEI-Search
The settings dialog has been improved and provides a more clear interface and further information to most of the settings. It is now also possible to change the role name for the Names And Mandatory Items role in the settings. The LEI-Search dialog has also been improved and shows more results from the official GLEIF database.
Mini Disclosure Checklist
From 2022 onwards the ESEF requirements mandates text block tagging, all mandatory tags from the role 000000 in the ESEF taxonomy have to be tagged if the content is present in the document and the tag is material to the issuer. All the mandatory tags have references to the respective sections in the standard:
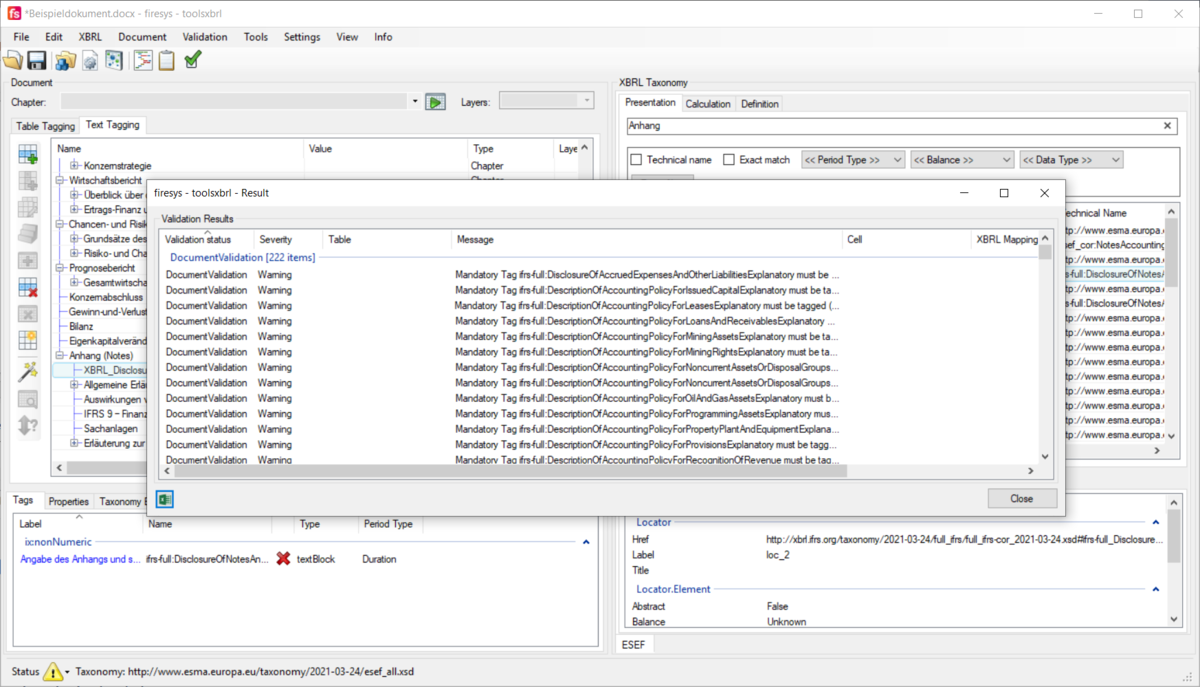
toolsxbrl now allows the issuer to select the references which are material to the report, and then the validation will show a warning for all the tags that are actually referenced by that selection. To enable this feature, just go to the document settings and select the three dots for the "References to Check" property in the Options.
Now the Mini Disclosure Checklist appears and the references to be checked can be selected and saved.
From now on, when the user validates the document, all tags that are not yet tagged and referenced by the selection will show up as a warning.
Information about Reportwide Calculations
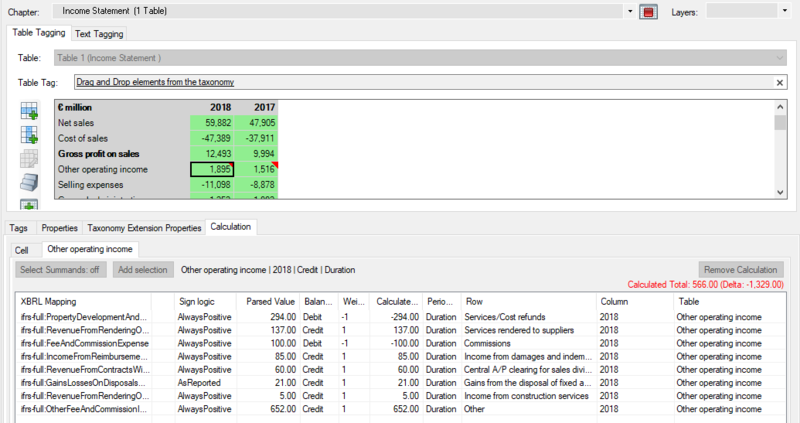
We have improved toolsxbrl to make it clearer how and where reportwide calculations affect the report:
In the example above the tagged cell for "Other operating income" does not have a calculation itself, since it is part of another calculation in the "Income Statement". In the table "Other operating income" however, this tag is actually the total of the values in that table. Since the calculation for the "Other operating income" table is also valid for the tag at this position in the report, it is now also being shown here besides a possible calculation for this "Cell". The summands being shown are the summands that are valid in the context of this given cell, meaning if you have added a calculation for certain dimensions, it would show the values for tags existing in the dimension selection for the selected cells. This will make it more transparent why a calculation in another part of the report might lead to a calculation warning in the currently selected table. All calculation that have not been created for the selected cell can only be edited in the original cell.
Improvements for table tags
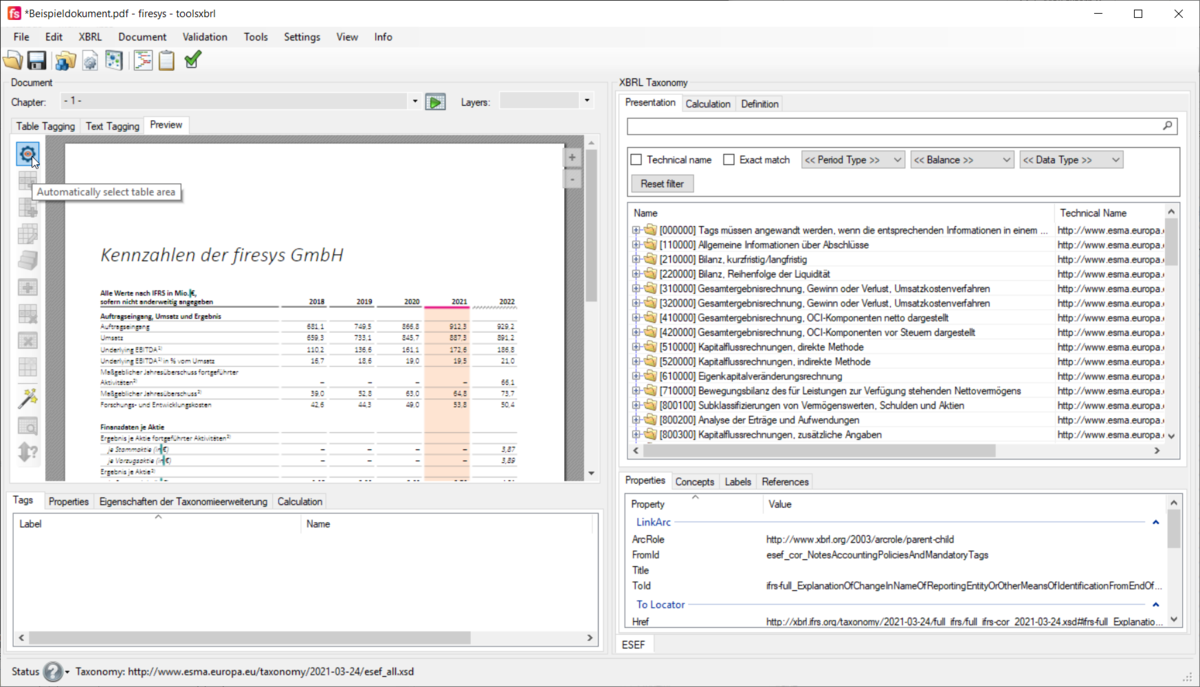
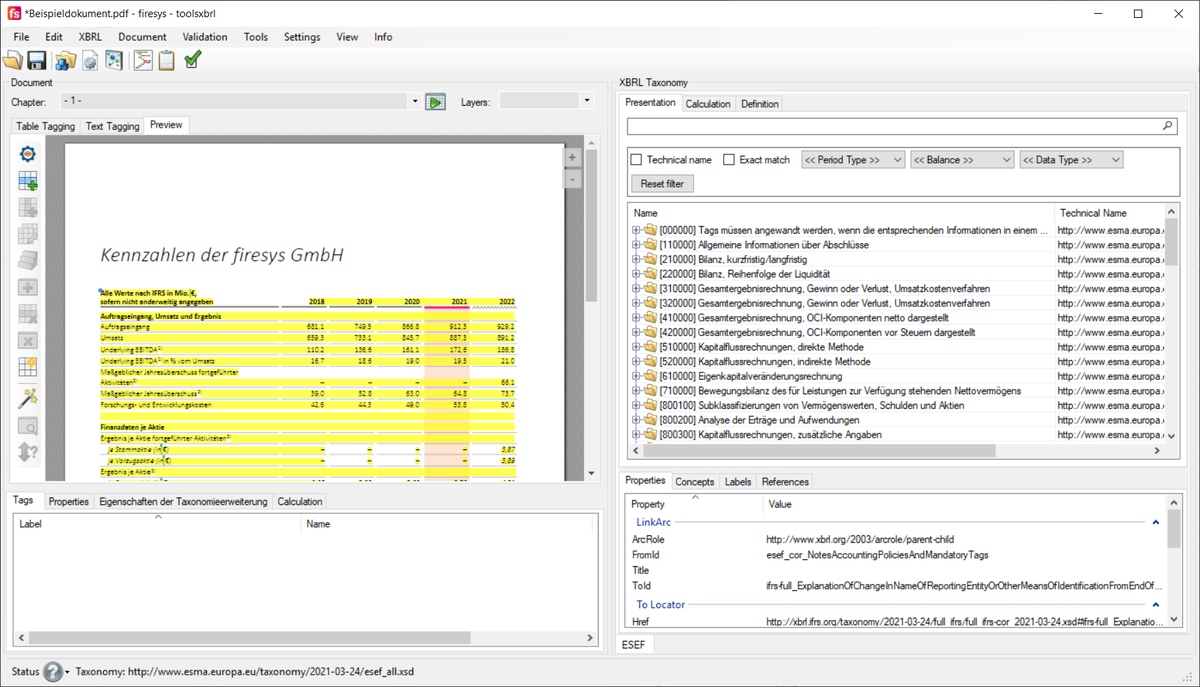
toolsxbrl now has a new smart AI-powered feature that will help you selecting tables in PDF documents. While you had to manually select tables in prior versions, you can now click the "Automatically select table area" button in the upper left corner of the preview pane:
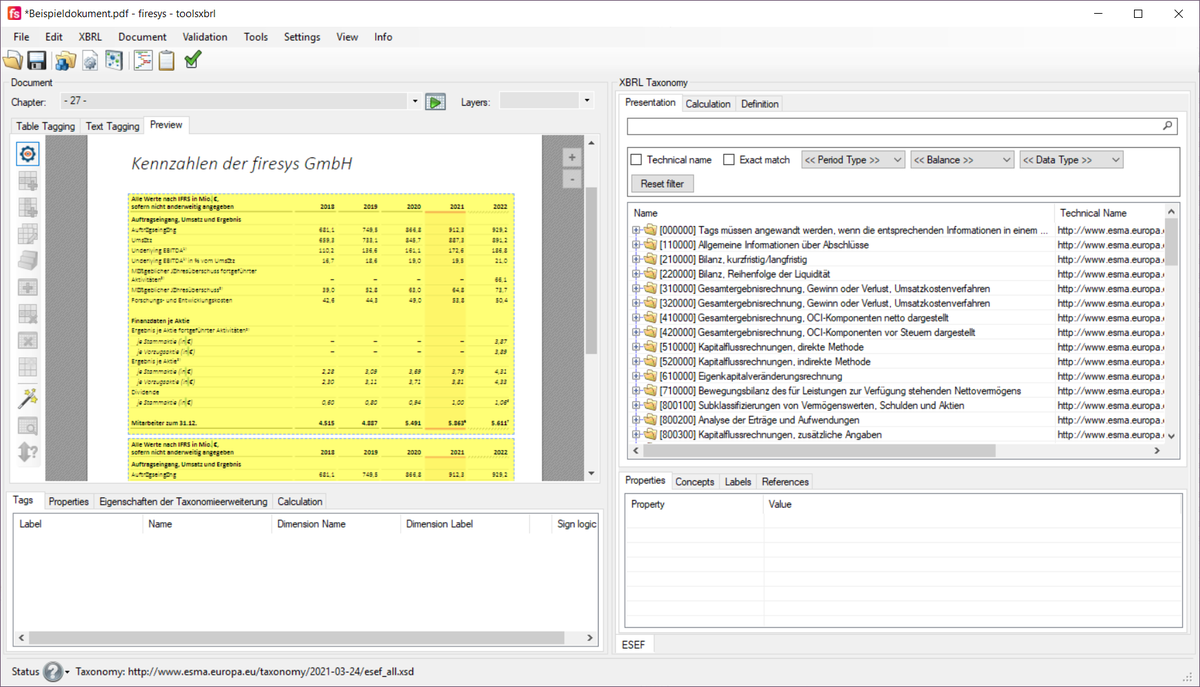
Then toolsxbrl will use the AI to select the tables available on the page. If there are multiple tables, it will highlight all of them:
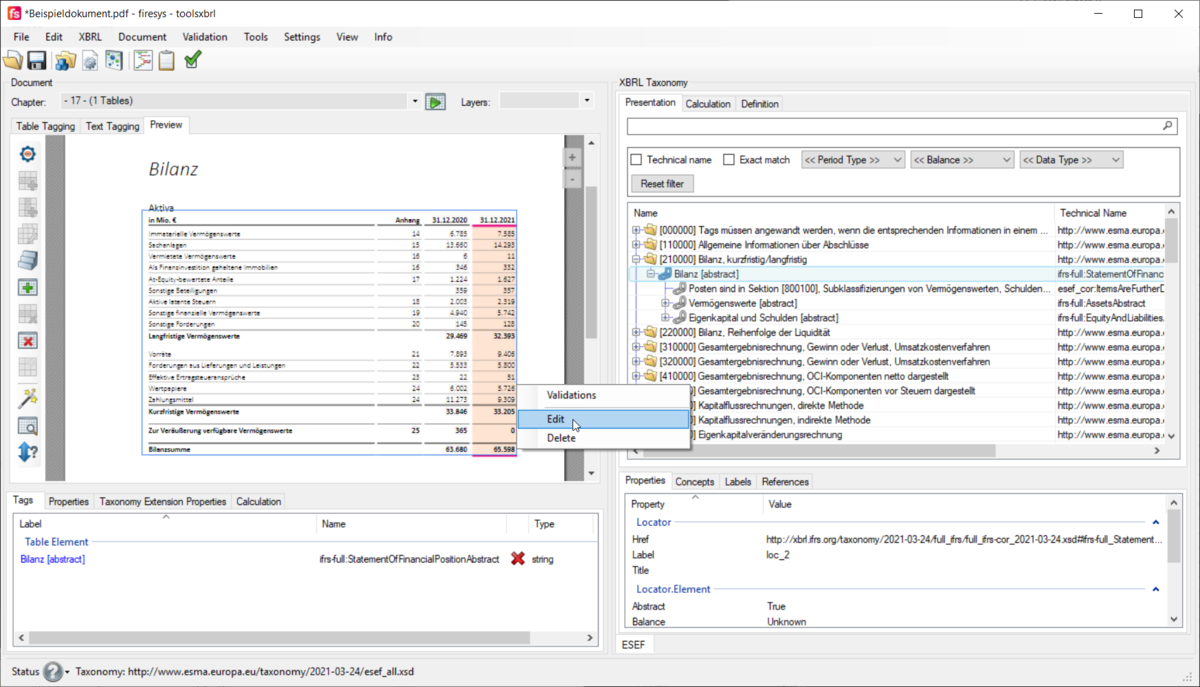
You can then simply select the table you want to tag, manually adjust the area if necessary and tag the table as usual:
You can change the table area even when you already have a table tag and cell tags applied to it. Just right click the border, click „Edit“ and then adjust the area. All tags that are within the newly selected area will be kept:
Improvements to textblock-tagging
We have vastly improved the algorithm for textblock-restoration to make tagging documents, that are still a work in progress, more reliable. toolsxbrl is now able to restore most textblock-tags, even in the following situations:
- A text block moves from version 1 to version 2 to another page.
- A text block that was on one page in version 1 wraps to two pages in version 2.
- Words are inserted or deleted within a text block.
- Paragraphs are inserted or deleted within a text block.
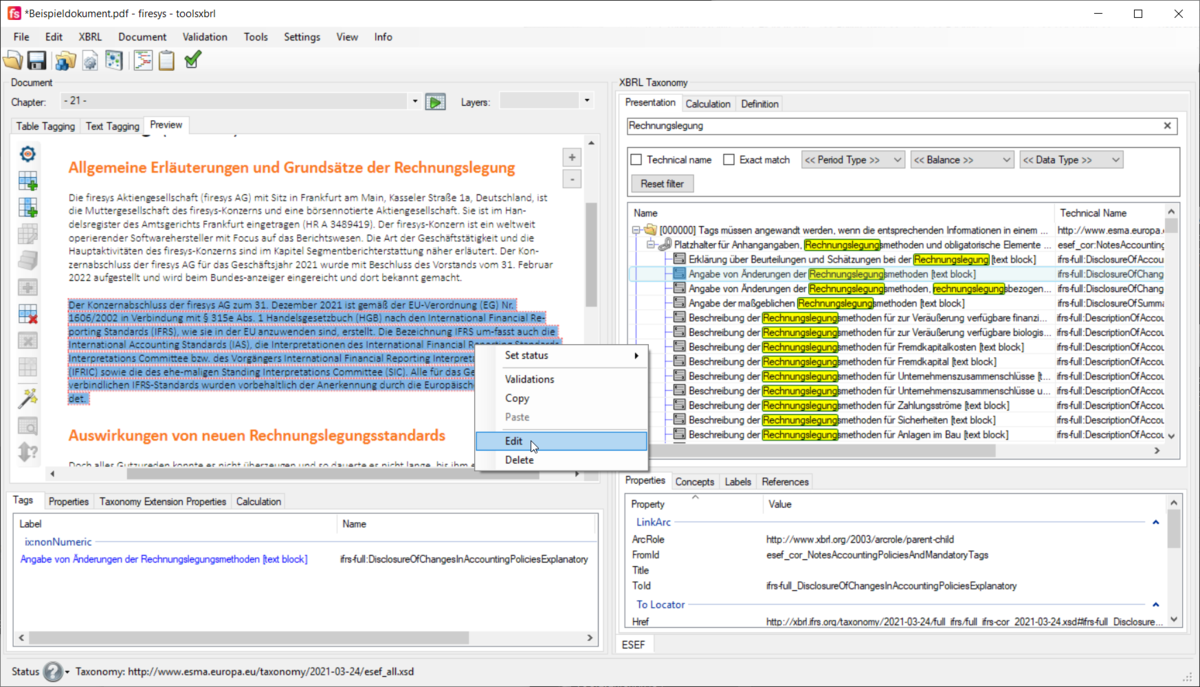
To furthermore support this process it is now also possible to edit the area of a textblock-tag, without having to retag it:
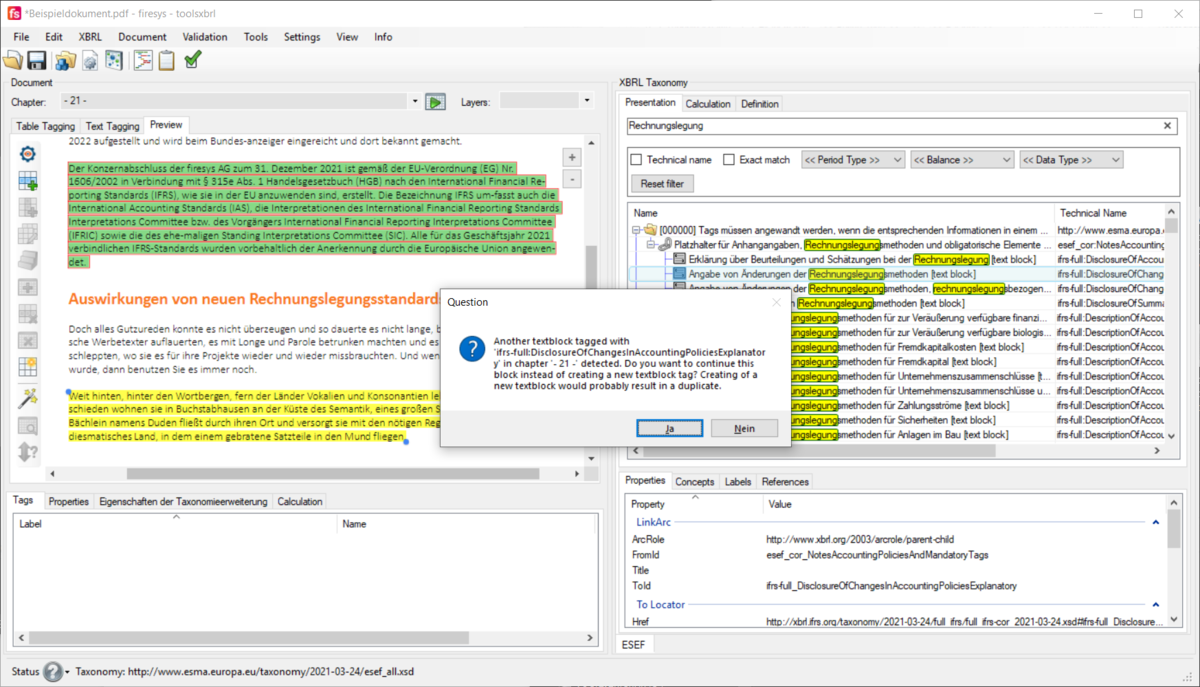
When you have to use the same tag in multiple areas of your report, the XBRL concept of continuations are the way to go. We have also simplified the way to tag those. Whenever you use a textblock-tag that you have already tagged to a different area, you will be asked if this is supposed to be a continuation of the already existing tag. If you select yes, the continuation will automatically be set in the correct order.
You can now also jump between all continuations of a textblock-tag, by rightclicking one instance and using the "jump to" functionality:
Big Textblock tagging for the full notes from page to page (PDF)
Create or use a new layer. Tag the first page with the Tag for example: “Disclosure of notes and other explanatory information”. Go to the last page of your notes section and repeat the step. You will get this screen. Answer it with yes:
Rightclick on the tagged text and chose this part of the menu:
Answer the next window with yes:
After this all pages will be tagged.
If you work with a word document: To insert the whole notes section (“Disclosure of notes and other explanatory information [text block]”) into your word document, you need to select all the text you wish of your document and insert the Content Control and the Technical Name as it would for any tag, but please note that the selection of the text must be made under a headline, for example the first one in the document.
Further improvements
- PDF: toolsxbrl now shows the "true" page numbers of a document (according to information in the PDF) in the chapter selection
- PDF: In accordance with the new ESEF reporting manual section 2.2.6 whitespaces of PDF documents will be preserved to ensure readability of the content in the XBRL layer.
- Calculation Linkbase 1.1: While not yet mandatory for ESEF, the new implementation of the calculation linkbase in version 1.1 can be chosen in the settings.
- .NET6: toolsxbrl is now running on Microsofts latest Long Term Evolution Framework, allowing for an updated and stable development. NET6 also allows us to deploy a version of toolsxbrl that is not dependent on a local installation of the Framework, thus minimizing compatibility issues.
firesys-Version 21.3.1
Double/Multiple Tagging for PDF documents
In some reports some content has to be tagged more than once. This can be two tags for the same table cell, two tags for the same text or a text block around a table that is already tagged. With the firesys-Version 21.3.1 we are adding tagging layers to PDF documents. Each layer can then be tagged independently. When creating a result document, all the tags will be merged according to the iXBRL specifications.
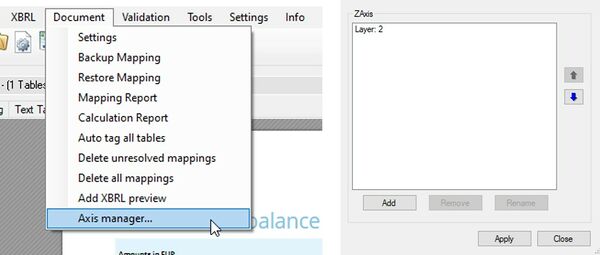
To get started, first load your document as usual and then add a new layer via the axis manager:
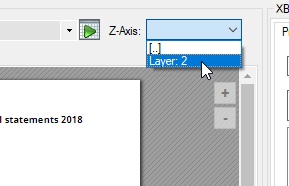
While one additional layer is enough for most reports, it is possible to add more than that. After clicking on apply you can select the new layer in the Z-Axis dropdown, with "[..]" being your default layer:
Once you switch the layer, you will see that all current tags have been hidden in the other layer and you can tag on a blank page.
- If you want to tag the same table cell twice, just tag the table again and then the desired cell (you don't have to tag the whole table again in Layer 2)
- If you want to create an additional textblock tag around the table, just select the table and tag the textblock
- If you want to tag the same text twice, just select and tag it in both layers
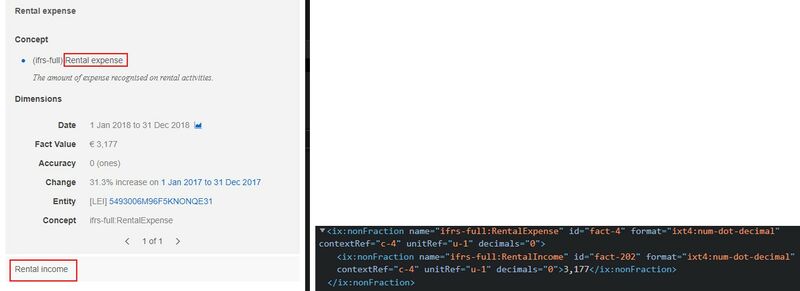
When you now create a result document and select the double tagged cell in the preview, the viewer will show two tags and the tags are properly nested in the document:
Continuations
In reporting text that belongs to a single XBRL textblock or text tag might be in several places in the document. XBRL has a mechanism called continuation for this case that essentially tells the XBRL processors to merge all the content that has been tagged with this tag and is part of the continuation for the output. From firesys-Version 21.3.1 the places to continue a tag can not explicitly be selected:
Abstract hierarchy customizer
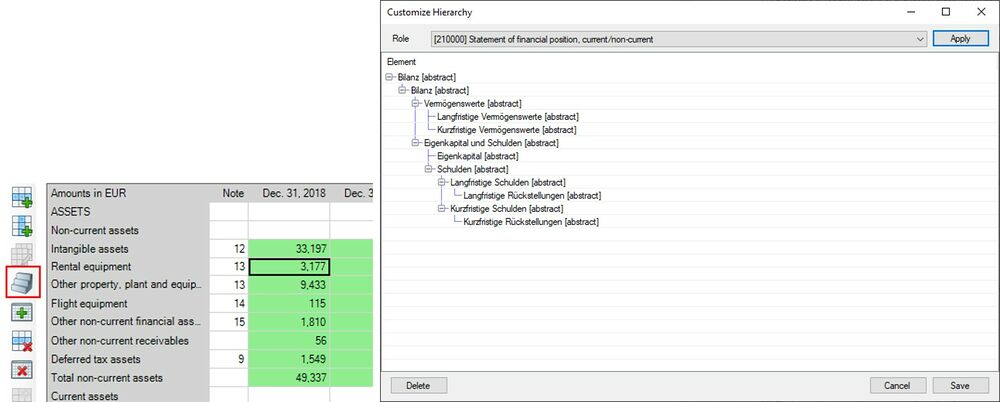
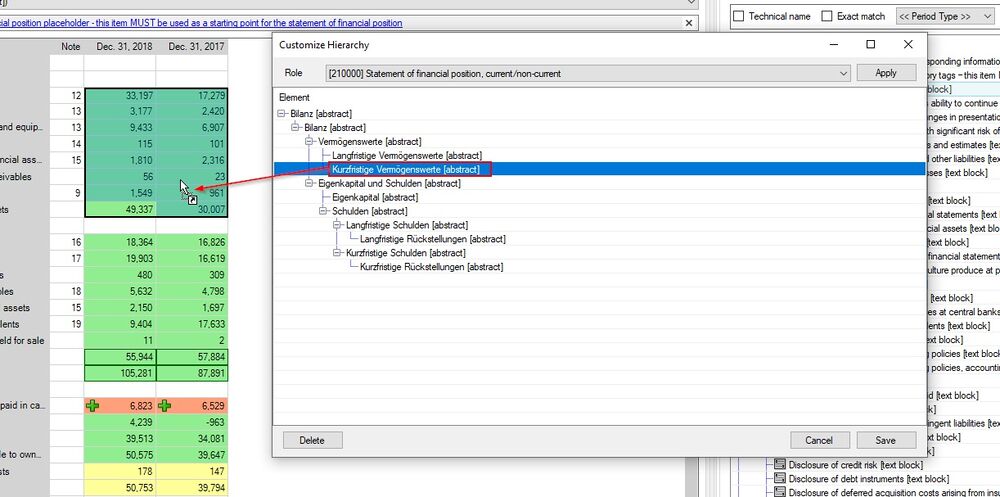
In addition to the Dimension Hierarchy Customizer (Document_Tagging#Customizing_the_dimensional_hierarchy) firesys-Version 21.3.1 adds a similar feature for Abstract Hierarchies. If the hierarchy of a statement in your report does not resemble the one in the ESEF taxonomy, you can now rearrange the positions and levels, add additional abstracts from the taxonomy and remove abstracts that are part of the default:
Just select the hierarchy customizer for your table, select the role from which you want to copy the initial hierarchy and then drag and drop abstracts to this hierarchy. Once your are done, you drag and drop the abstract for a specific tag from this dialog onto the relevant tags, just as you did before from the taxonomy:
Rearranging the row order
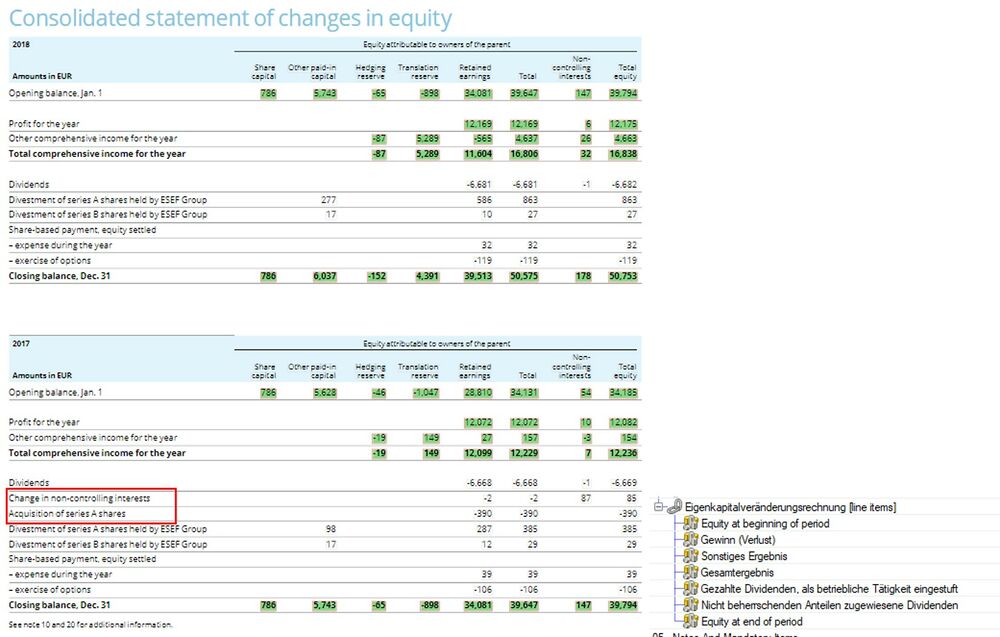
It is important to bear in mind, that the structure of statements in your company specific XBRL taxonomy extension will differ from what you have in the report. One such case is for example the following Statement of Changes in Equity. In the example report we can find two separate tables, one for each year. In the resulting taxonomy we will only have one combined table, with the period being selectable. In the below example we can further see that the table for 2017 has two rows more than the one for 2018. Where exactly these two rows are supposed to be placed in a combined table is up to the Filer and/or Auditor. Per default they will just be added at the end, as shown below.
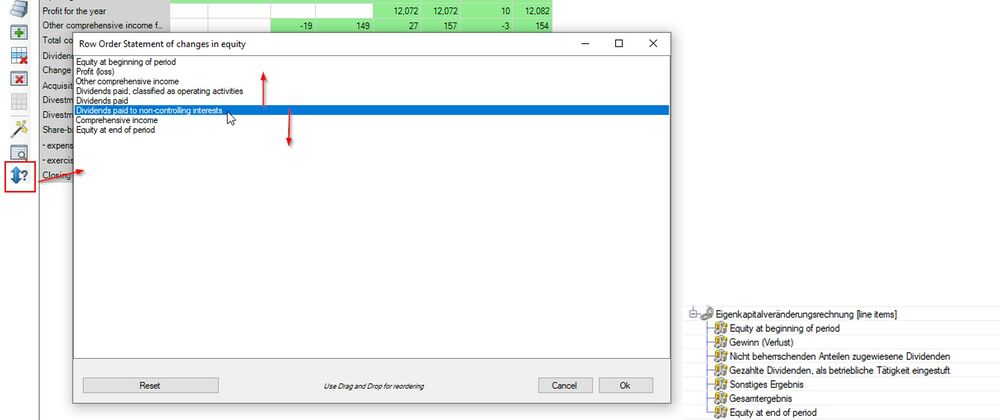
With the new custom row ordering feature, this can easily be changed by you, just click on the highlighted button and rearrange the rows to your requirements, the result in the extension taxonomy will change accordingly:
Custom date formats
There are countless ways to represent a date, it is challenging to support all formats automatically in toolsxbrl. If a date is not recognized by default, from firesys-Version 21.3.1 a custom format description can be created for the table in question.
Click on the table properties after selecting the table in question. The following window opens with a new setting ("Custom date formats"). Click in the right empty cell. A button appears. This opens the editor for user-defined date formats.
Add a new format using the + Button, this opens the editor for user-defined date formats. It is possible to add multiple formats for a table if necessary. All formats have to be described by regular expressions. A good introduction can be found here: https://github.com/ziishaned/learn-regex/blob/master/translations/README-de.md.
New Settings
Three further new features can be enabled or disabled from the toolsxbrl Settings:
Readonly Properties
If this is set to read only, changing tagging properties for cells that have been set to the Final status can no longer be changed. To change these cells revert to status to In Edit or Review Pending.
Document View Type
It is now possible to define the view type for converted Word documents. The available options are FullScreen, Manuscript and Pages. Just try them out to see what fits your report best.
Auto Save
toolsxbrl has now an Auto Save feature to prevent accidental loss of work. If your PC crashes and you have not saved your work, you will get a prompt on the next load of the document if you want to restore the latest auto save backup rather then the original mapping file. This option deactivates this mechanism if it is not desired.
Two new features have been added to the Document Settings:
Roll Forward
toolsxbrl usually detects changes in table headers during a roll forward and adjusts the mapping periods accordingly. For tables that don't have the date explicitly in the header, for example Statement of Changes in Equity, this option moves the mapping periods forward according to the date set in the document settings. Just select "Yes" and click on OK for a roll forward. This option will always be "No" by default and also after a roll forward.
Table Order
Usually the table order in the extension taxonomy should resemble the order of tables in the actual report. In some jurisdictions or auditors' opinions it has to exactly resemble the order in the original taxonomy. To achieve this just enable this option.
Calculation Validation
Failed calculations in XBRL are often just rounding errors, and thus ignored by most filers and regulators. Sometimes the actual delta between the calculated value and the tagged value is so too big to be a rounding error, so it would make more sense to be an error than a warning. This behavior can now be changed in the XBRL Processor settings:
You can enable or disable this functionality and also set the threshold for when a calculation warning should become an error.
Detach Controls
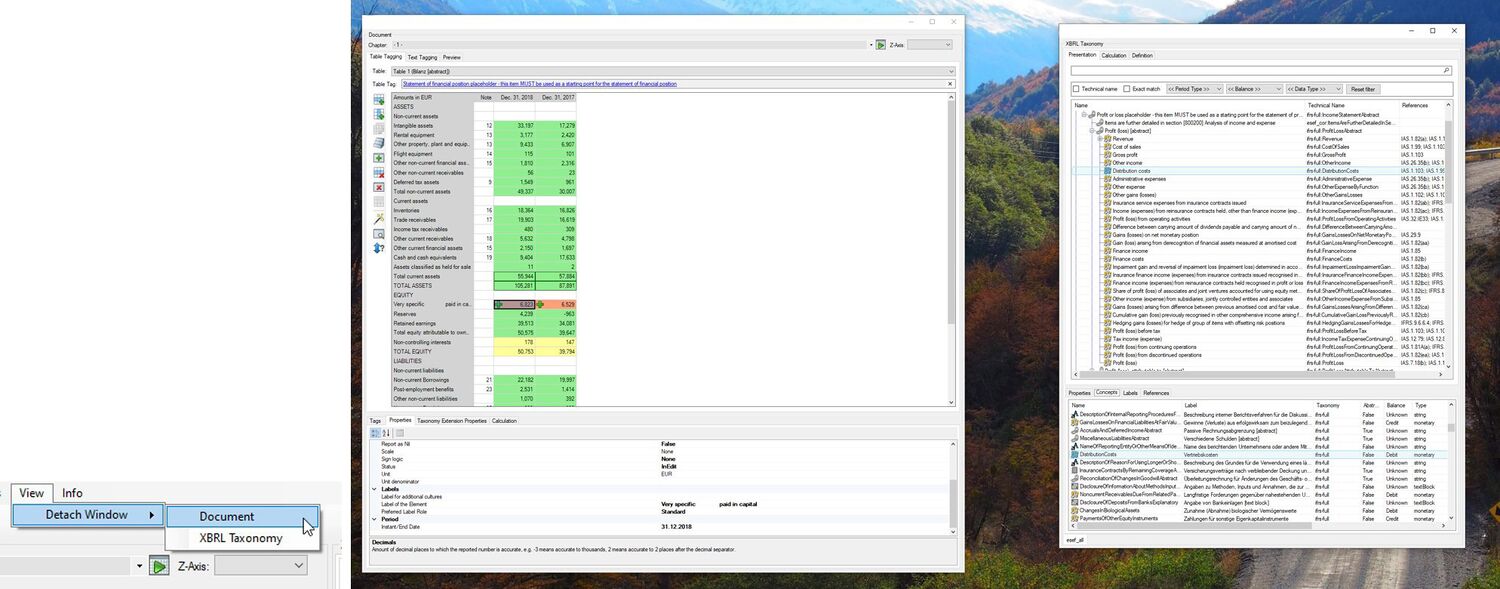
With the firesys-Version 21.3.1 you can now make full usage of multiple displays while tagging. Simply use the Detach Controls feature and independently move the windows around your desktops:
See also
![]() Technical Documentation
Technical Documentation
![]() Getting Started
Getting Started
![]() toolsxbrl Settings
toolsxbrl Settings
Further contents
→ firesys website
→ Customer area
→ YouTube
