Excel-areas: Unterschied zwischen den Versionen
Keine Bearbeitungszusammenfassung |
Keine Bearbeitungszusammenfassung |
||
| (16 dazwischenliegende Versionen von 4 Benutzern werden nicht angezeigt) | |||
| Zeile 1: | Zeile 1: | ||
The work with Excel areas is an essential element of firesys, because many functions in interaction with Word can only be used with properly assigned Excel areas. | |||
[[Datei:EN_Menüband_Excel_Gestaltung_Bereiche.jpg|center|1200px]] | |||
== | == Print area == | ||
=== [[Datei:PrintAreaSetPrintArea_16.png|link=|16px]] Define === | |||
Select a certain range of the sheet for printing or importing to Word. | |||
=== [[Datei:PrintAreaClearPrintArea_16.png|link=|16px]] Unlock === | |||
Deselect the existing print area. | |||
== | == Name manager == | ||
=== [[Datei:NameManager_16.png|link=|16px]] Name Manager === | |||
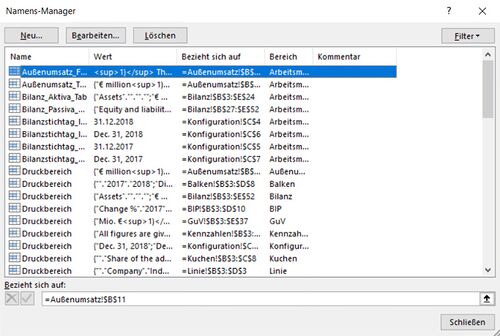
Lists all used names in the workbook. Here you can create, edit, delete and search names. | |||
[[Datei:EN_Excel_Gestaltung_Namens-Manager.jpg|center|500px]] | |||
=== [[Datei:PrintAreaClearPrintArea_16.png|link=|16px]] Remove names === | |||
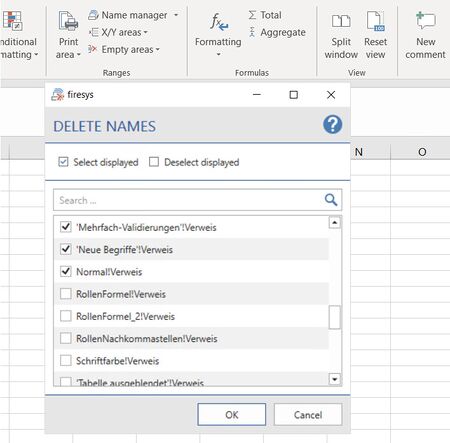
If range names exist in your Excel document which have reference errors (the cells to which the range referred were deleted), you can display and delete these range names in a dialog. | |||
[[Datei:EN Excel Gestaltung Namen-entfernen.jpg|center|450px]] | |||
== | == X/Y ranges == | ||
== | <div style="margin:0px; padding:0.7em 1em 0.7em 1em; background-color:#f6f4f2;border:1px solid #e67d05;width:50%"> | ||
{| | |||
|- | |||
! rowspan="2" |[[Datei:Glühbirne neu.png|left|link=|center|24px|]] | |||
!<div style="text-align:left; font-size:120%;">Good to know</div> | |||
|- | |||
|<div style="font-size:95%;text-align:left;margin-top:10px;"> | |||
To show or hide rows and columns, you must select the area in which the rows and columns are located using the mouse pointer. | |||
|} | |||
</div> | |||
</div> | |||
=== Hide === | |||
==== [[Datei: | ==== [[Datei:rxbtnHideRowXY_16.png|link=|16px]] Rows ==== | ||
Hides all rows in the worksheet, which start with x or y | |||
==== [[Datei: | ==== [[Datei:rxbtnHideColXY_16.png|link=|16px]] Columns ==== | ||
Hides all columns in the worksheet, which start with x or y | |||
=== | ==== [[Datei:rxbtnHideRowColXY_16.png|link=|16px]] Rows and columns ==== | ||
Hides all rows and columns in the worksheet, which start with x or y | |||
=== Show === | |||
==== [[Datei: | ==== [[Datei:rxbtnShowRowXY_16.png|link=|16px]] Rows ==== | ||
Shows all rows on the worksheet, which start with x or y | |||
==== [[Datei: | ==== [[Datei:rxbtnShowColXY_16.png|link=|16px]] Columns ==== | ||
Shows all columns on the worksheet, which start with x or y | |||
== | ==== [[Datei:rxbtnShowRowColXY_16.png|link=|16px]] Rows and columns ==== | ||
Shows all rows and columns on the worksheet, which start with x or y | |||
== | == Video: Hide columns and rows in Excel spreadsheet == | ||
{{Vorlage:Video-Excel Gestaltung Bereiche-XY-Bereiche-English}} | |||
== | == Empty areas == | ||
=== Select === | |||
==== [[Datei:rxbtnShowEmptyRow_16.png|link=|16px]] Rows ==== | |||
All empty rows in the selection are selected. | |||
==== [[Datei:rxbtnShowEmptyCol_16.png|link=|16px]] Columns ==== | |||
All empty columns in the selection are selected. | |||
=== Löschen === | === Löschen === | ||
==== [[Datei:rxbtnDeleteEmptyRow_16.png|link=|16px]] | ==== [[Datei:rxbtnDeleteEmptyRow_16.png|link=|16px]] Delete ==== | ||
All empty rows in the selection are deleted. | |||
==== [[Datei:rxbtnDeleteEmptyCol_16.png|link=|16px]] Columns ==== | |||
All empty columns in the selection are deleted. | |||
== | == Video: Delete Empty Ranges from Excel Spreadsheet == | ||
{{Vorlage:Video-Excel Gestaltung Bereiche Leere Bereiche-English}} | |||
== | == See also == | ||
[[Datei:Navigation_hoch.svg|link=]] | [[Datei:Navigation_hoch.svg|link=]] [[Design_an_Excel_document|Design an Excel document]] <br> | ||
[[Datei:Navigation_rechts.svg|link=]] [[ | [[Datei:Navigation_rechts.svg|link=]] [[The_StyleGuide_in_Excel| The StyleGuide in Excel]] <br> | ||
[[Datei:Navigation_rechts.svg|link=]] [[ | [[Datei:Navigation_rechts.svg|link=]] [[Design_texts_in_Excel|Design texts in Excel]] <br> | ||
[[Datei:Navigation_rechts.svg|link=]] [[ | [[Datei:Navigation_rechts.svg|link=]] [[Formulas|Formulas]] <br> | ||
[[Datei:Navigation_rechts.svg|link=]] [[ | [[Datei:Navigation_rechts.svg|link=]] [[Views_and_comments_in_Excel|Views and comments in Excel]] <br> | ||
{{ | {{MoreContent}} | ||
[[Kategorie:English-Excel Dokument-gestalten-Übersicht]] | [[Kategorie:English-Excel Dokument-gestalten-Übersicht]] | ||
[[en:Excel-Ranges]] | [[en:Excel-Ranges]] | ||
Aktuelle Version vom 7. März 2024, 07:55 Uhr
The work with Excel areas is an essential element of firesys, because many functions in interaction with Word can only be used with properly assigned Excel areas.
Print area
 Define
Select a certain range of the sheet for printing or importing to Word.
 Unlock
Deselect the existing print area.
Name manager
 Name Manager
Lists all used names in the workbook. Here you can create, edit, delete and search names.
 Remove names
If range names exist in your Excel document which have reference errors (the cells to which the range referred were deleted), you can display and delete these range names in a dialog.
X/Y ranges
Good to know
| |
|---|---|
To show or hide rows and columns, you must select the area in which the rows and columns are located using the mouse pointer. |
Hide
 Rows
Rows
Hides all rows in the worksheet, which start with x or y
 Columns
Hides all columns in the worksheet, which start with x or y
 Rows and columns
Hides all rows and columns in the worksheet, which start with x or y
Show
 Rows
Rows
Shows all rows on the worksheet, which start with x or y
 Columns
Shows all columns on the worksheet, which start with x or y
 Rows and columns
Shows all rows and columns on the worksheet, which start with x or y
Video: Hide columns and rows in Excel spreadsheet
How to hide individual rows and columns in your Excel spreadsheet:
-
Write an “x” to the left of the rows that are to be hidden. Write a “y” above the corresponding columns.
-
Select the table in which the rows/columns are to be hidden.
-
In the tab “*Design” in the group “Ranges” click on the button “X/Y areas”.
-
Select the option “Rows” in the drop-down under “Hide”.
→The rows marked with “x” are hidden. -
To hide the columns marked with “y”, click on the button “X/Y-Ranges” in the tab “*Design” in the group “Ranges”.
-
Select the option “Columns” in the drop-down under “Hide”.
→ The columns marked with “y” are hidden. -
To show the hidden rows and columns again, click on the button “X/Y-Ranges” in the tab “*Design” in the group “Ranges”.
-
Select the option “Rows and columns” in the drop-down under “Show”.
→ The rows marked with “x” and the columns marked with “y” are shown again.
Empty areas
Select
 Rows
Rows
All empty rows in the selection are selected.
 Columns
All empty columns in the selection are selected.
Löschen
 Delete
All empty rows in the selection are deleted.
 Columns
All empty columns in the selection are deleted.
Video: Delete Empty Ranges from Excel Spreadsheet
To delete empty rows and columns from your Excel spreadsheet:
-
Select the table in which empty rows and columns are to be marked.
-
In the “*Design” tab in the “Ranges” group, click on the “Empty areas” button.
-
Select “Rows” in the drop-down under “Select”.
→ All empty rows in your selection will be marked. -
Then select “Columns” in the drop-down under “Select”.
→ All empty columns in your selection will be marked. -
Again, select the table in which empty rows are to be deleted.
-
In the tab “*Design” in the group “Ranges” click on the button “Empty areas”.
-
Select “Rows” in the drop-down under “Delete”.
→ All empty rows in your selection will be deleted. -
Again, select the table in which empty columns are to be deleted.
-
In the “*Design” tab in the “Ranges” group, click on the “Empty areas” button.
-
Select “Columns” in the drop-down under “Delete”.
→ All empty columns in your selection will be deleted.
See also
![]() Design an Excel document
Design an Excel document
![]() The StyleGuide in Excel
The StyleGuide in Excel
![]() Design texts in Excel
Design texts in Excel
![]() Formulas
Formulas
![]() Views and comments in Excel
Views and comments in Excel


