Prepare web version
Toolsweb enables you to automatically create an html document of your financial report with just one click. if desired, you can export all your tables in one file or in individual files.
The functions in detail
Prepare web-version
Define what will happen when a web version is created.
Good to know
| |
|---|---|
The exported tables in your corporate design can be made directly available for the online version of your report. |
Web-version
With toolsweb, you can automatically create business reports as an HTML document by pressing a button. The tables in the document can also be formatted and output in one or more Excel workbooks.
Output directory
Determine which folder the documents will be saved in.
Document
The entire document will also be created as an HTML document.
Tables
Do not export an Excel file.
No table export is performed and only the HTML document is created.
Export to an Excel Workbook
The table export saves all tables, including the associated footnotes of your Word document, in an Excel file. If an HTML document has also been created, a download link is automatically generated in the HTML file for each table.
Export to an Excel Workbook and export to individual Excel Workbooks.
The table export saves all tables including the associated footnotes of your Word document in individual Excel files as well as in an Excel overall file. If an HTML document has also been created, a download link is automatically generated in the HTML file for each table.
Document
The HTML document can be split up at certain headings. All graphics in the document can also be exported.
Document
The entire report will be converted into HTML document(s). Each paragraph is enclosed by so-called Tags . These are extremely useful for further processing by the web agency. You have the choice between:
- Do not split document: The entire report is converted to one HTML document
- Split document after titles: Select a title where you would like to split the HTML document. Individual HTML documents will be created for this.
- Convert document for online first: Please select the levels at which you would like to cre-ate individual HTML documents
Graphics
This option exports all graphics which appear in the report as graphic files, which can then be used in the online report. If an HTML document was also created, a download link to each graphic is automatically generated.
Good to know
| |
|---|---|
Only graphics which have been inserted using linkgraphics are exported. |
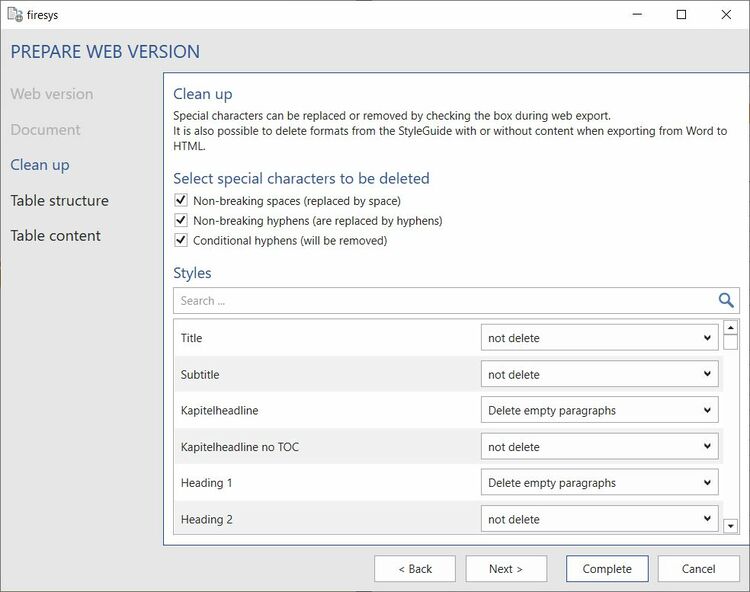
Clean up
Special characters can be replaced or removed by checking the box during web export. It is also possible to delete formats from the StyleGuide with or without content when exporting from Word to HTML.
Select special characters to delete
Non-breaking space
If the check mark is set, non-breaking spaces are deleted and replaced by spaces. If the check mark is not set, non-breaking spaces are retained during web export.
Non-breaking hyphens
If the check mark is set, non-breaking hyphens are deleted and replaced by the quarter-four stroke. If the check mark is not set, protected hyphens are retained during web export.
Conditional hyphens
If the check mark is set, conditional hyphens are deleted and not replaced. If the check mark is not set, conditional hyphens are retained in the web export.
Styles
Search
You can use the search field to select both the name of a style template and by properties from the dropdown.
Delete empty paragraphs
All empty paragraphs in the style are deleted. A paragraph is also considered empty for the following elements: page breaks, column breaks, section breaks, invisible characters and invisible fields.
Delete empty and filled paragraphs
If the option "Empty and filled paragraphs" is selected, the content between two paragraph marks is deleted during web export for filled paragraphs.
Not delete
The paragraphs in the style sheet are not changed.
Table structure
Creates general titles or automated subtitles for the tables (optional). A graphic can also be selected to be displayed as a logo on each worksheet.
Sheet title
Insert a general sheet title
Define a sheet title, which will be displayed on all Excel worksheets.
Insert individual sheet subheading
Uses the table title (provided that it has been entered with linktables) or the previous title before the table in the document as a subtitle in the export file.
Insert logo graphic
Decide whether you would like to show your company’s logo on the first worksheet or on every Excel worksheet.
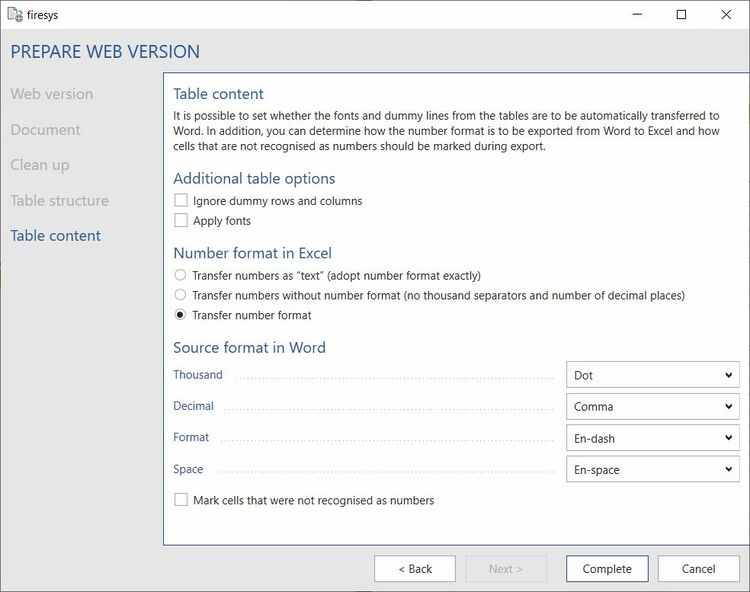
Table content
It is possible to set whether the fonts and dummy lines from the tables are to be automatically transferred to Word. In addition, you can determine how the number format is to be exported from Word to Excel and how cells that are not recognised as numbers should be marked during export.
Additional table options
Apply fonts
Transfers the fonts from the Word file to Excel when exporting.
Transfer number format
Transfers the correct number format for the numbers in the tables and in body text when export-ing.
Ignore dummy rows and columns
Ignores all rows and columns during export, which firesys only requires in Word for table design (dummy rows and columns).
Format tables as text Formats the entire range of the table as text in Excel. Here it should be noted that after the Web Export the numbers in the output Excel file no longer calculate.
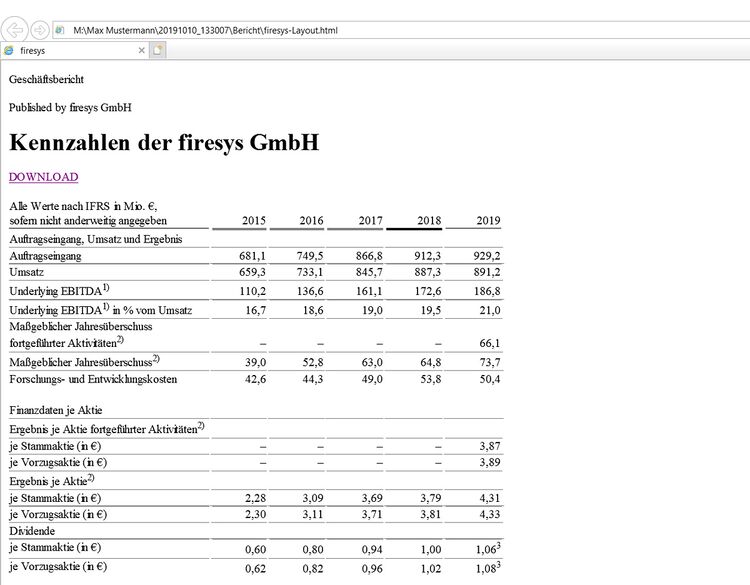
Web-Export
The web export is created in the previously defined folder and includes the following three folders and one text file (“read me”):
Report
This folder contains the HTML documents of your report.
Graphics
This folder contains the exported graphics of your report.
Tables
The folder contains the exported tables of your report.
Readme
This file contains information on the web export.
Video: Prepare Web-Version
To prepare a document as a web version:
-
On the “*Publish” tab in the “Web export” group, click on the “Prepare web version” button.
→ The "Prepare web version" dialogue opens. -
In the “Prepare web version” dialogue you can choose between different options to customise the web export according to your wishes.
-
Select the output directory in the "Web version" tab.
-
Select whether an HTML document is to be created.
-
Select whether the tables are to be exported together and/or individually.
-
-
Once all settings in “Web version” have been made, click on “Next”.
-
In the “Document” tab, you have the option of splitting your document individually and exporting graphics.
-
Once all settings have been made in “Document”, click on “Next”.
-
In the “Tables” tab, the exported tables can be given names, a logo can be inserted and other options can be set.
-
Click on the “Complete” button to start the export.
→ When the preparation of the web version is finished, there is a folder in the output directory containing the subfolders “Report”, “Graphics” and “Tables” with corresponding contents.
See also
![]() Publish Word contents
Publish Word contents
![]() Prepare contents for the export for the translator
Prepare contents for the export for the translator
![]() The toolsxbrl functions
The toolsxbrl functions


