Auto-validations in firesys: Unterschied zwischen den Versionen
Keine Bearbeitungszusammenfassung |
Keine Bearbeitungszusammenfassung |
||
| (17 dazwischenliegende Versionen von 2 Benutzern werden nicht angezeigt) | |||
| Zeile 1: | Zeile 1: | ||
[[Datei:EN_Menüband_Excel_Inhalt_Validierungen_Erstellen.jpg|1200px|center]] | |||
Auto-validations help you search for one or several of the same values in the entire Excel document. The search result can then be validated (multiple selection is possible). | Auto-validations help you search for one or several of the same values in the entire Excel document. The search result can then be validated (multiple selection is possible). | ||
[[Datei:EN Excel Validierung AutoValidierung.jpg|mini|upright=1.0|Create an auto-validation]] | |||
== Video: Creating an Auto Validation == | |||
<br>{{Vorlage:Video-Autovalidierung erstellen-English}}</br> | |||
| Zeile 16: | Zeile 25: | ||
=== Select value === | === Select value === | ||
[[Datei:EN | [[Datei:EN Excel Validierung AutoValidierung Wert-auswählen.jpg|mini|upright=2.0|Create an auto-validation]] | ||
Select the accuracy of the number range you want to search. You can also define whether you want to ignore the symbols and if you want to search the print area only. Select and click “Next”. | Select the accuracy of the number range you want to search. You can also define whether you want to ignore the symbols and if you want to search the print area only. Select and click “Next”. | ||
<b> Selection </b> | |||
The cell that is relevant for the auto-validation that was selected previously is displayed here. | The cell that is relevant for the auto-validation that was selected previously is displayed here. | ||
<b> Operator </b> | |||
The value of the cells in the auto-validation can be calculated by using a mathematical operator. | The value of the cells in the auto-validation can be calculated by using a mathematical operator. | ||
<b> Factor </b> | |||
If an operator was selected, you can select the factor of the calculation here. | If an operator was selected, you can select the factor of the calculation here. | ||
<b> Deviation </b> | |||
The following predefined deviations exist: | The following predefined deviations exist: | ||
| Zeile 40: | Zeile 49: | ||
* Very low: A percentage deviation of 0.5% is defined as the deviation. | * Very low: A percentage deviation of 0.5% is defined as the deviation. | ||
* Low: A percentage deviation of 1.0% is defined as the deviation. | * Low: A percentage deviation of 1.0% is defined as the deviation. | ||
* Value: If this option is selected, a user-defined deviation value can be selected in the field below. | |||
* Percent: If this option is selected, a percentage deviation can be specified in the field below. | |||
<b> User-defined value </b> | |||
For “Deviation”, if you selected the entry “Value”, you can define a user-defined deviation value here. | For “Deviation”, if you selected the entry “Value” or "Percentage", you can define a user-defined deviation value here. | ||
<b> Absolute values </b> | |||
The value of the auto-validation is inserted as an absolute value without a sign. | The value of the auto-validation is inserted as an absolute value without a sign. | ||
<b> Intermediate calculation </b> | |||
Here you see the result of the calculation of the values selected under “Operator” and “Factor”. | Here you see the result of the calculation of the values selected under “Operator” and “Factor”. | ||
<b> Value/result </b> | |||
The result of the calculation that was performed with the previously selected values. | The result of the calculation that was performed with the previously selected values. | ||
<b> Search area </b> | |||
Here you see the search area that was created by the deviation. | Here you see the search area that was created by the deviation. | ||
== Target selection == | == Target selection == | ||
[[Datei: | [[Datei:Excel Validierung AutoValidierung Validierungen-auswählen.jpg|mini|upright=2.0|The view of the auto-validation work area]] | ||
Select the entries that you would like to search automatically for validations. You can select multiple objects by pressing and holding the control key. Select and click “Next”. | Select the entries that you would like to search automatically for validations. You can select multiple objects by pressing and holding the control key. Select and click “Next”. | ||
| Zeile 71: | Zeile 82: | ||
== Group == | == Group == | ||
[[Datei:Excel Validierung | [[Datei:EN Excel Validierung AutoValidierung Gruppe.jpg|mini|upright=2.0|The view of the auto-validation work area]] | ||
You can supplement your auto-validation with additional information: | You can supplement your auto-validation with additional information: | ||
| Zeile 95: | Zeile 106: | ||
== See also == | == See also == | ||
[[Datei:Navigation_hoch.svg|link=]] [[The_validation_basic_functions| | [[Datei:Navigation_hoch.svg|link=]] [[The_validation_basic_functions|The validation basic functions]] <br> | ||
[[Datei:Navigation_rechts.svg|link=]] [[Create_validations|Create validations]] <br> | [[Datei:Navigation_rechts.svg|link=]] [[Create_validations|Create validations]] <br> | ||
[[Datei:Navigation_rechts.svg|link=]] [[Create_multiple_validations|Create multiple validations]] <br> | [[Datei:Navigation_rechts.svg|link=]] [[Create_multiple_validations|Create multiple validations]] <br> | ||
Aktuelle Version vom 19. November 2021, 13:15 Uhr
Auto-validations help you search for one or several of the same values in the entire Excel document. The search result can then be validated (multiple selection is possible).
Video: Creating an Auto Validation
To create an Auto Validation:
-
To do this, open the Excel workbook in which you want to create an autovalidation.
-
Select the desired cell.
-
Click the "Create" button in the "Validation" group in the "*Content" ribbon.
→ A dialog opens -
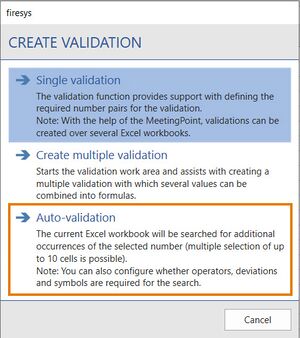
Select "Autovalidation" in the dialog.
→ A dialog opens in which you can create an autovalidation and configure it according to your requirements. -
Make your adjustments.
→ Finally, you can inform yourself about all your validations on the validation sheet.
Create an auto-validation
Select one or more cells in your Excel file and in the “*Validation” menu ribbon, in the “Validation and consistency” group, click on the “Create validation” button and select the “Auto-validation” menu option.
Select value
Select the accuracy of the number range you want to search. You can also define whether you want to ignore the symbols and if you want to search the print area only. Select and click “Next”.
Selection
The cell that is relevant for the auto-validation that was selected previously is displayed here.
Operator
The value of the cells in the auto-validation can be calculated by using a mathematical operator.
Factor
If an operator was selected, you can select the factor of the calculation here.
Deviation
The following predefined deviations exist:
- None: No deviation of the validation values is defined.
- Very low: A percentage deviation of 0.5% is defined as the deviation.
- Low: A percentage deviation of 1.0% is defined as the deviation.
- Value: If this option is selected, a user-defined deviation value can be selected in the field below.
- Percent: If this option is selected, a percentage deviation can be specified in the field below.
User-defined value
For “Deviation”, if you selected the entry “Value” or "Percentage", you can define a user-defined deviation value here.
Absolute values
The value of the auto-validation is inserted as an absolute value without a sign.
Intermediate calculation
Here you see the result of the calculation of the values selected under “Operator” and “Factor”.
Value/result
The result of the calculation that was performed with the previously selected values.
Search area
Here you see the search area that was created by the deviation.
Target selection
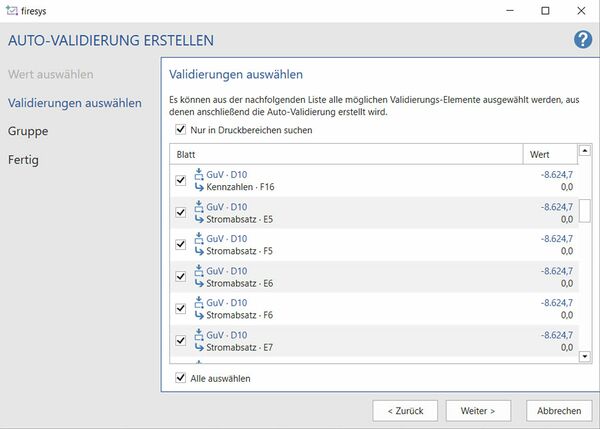
Select the entries that you would like to search automatically for validations. You can select multiple objects by pressing and holding the control key. Select and click “Next”.
Source selection
You can select the validations you would like to create from the results. To edit multiple objects at once, select these by holding down the shift or control key. Select and click “Next”.
Group
You can supplement your auto-validation with additional information:
Group
You can use the drop-down menu consisting of previously created groups or define your own name for the group, or change an existing one.
Description
Explanatory description of the individual comparison figures.
Comment
Select and click “Next”. The selected validations are created.
Good to know
| |
|---|---|
With multiple validations and auto-validations, a maximum of 10 values per entry/search are permitted. |
See also
![]() The validation basic functions
The validation basic functions
![]() Create validations
Create validations
![]() Create multiple validations
Create multiple validations
![]() Edit validation
Edit validation
![]() Delete validation
Delete validation
![]() Approve deviations
Approve deviations


