Apply dynamic texts: Unterschied zwischen den Versionen
Keine Bearbeitungszusammenfassung |
Keine Bearbeitungszusammenfassung |
||
| (2 dazwischenliegende Versionen von einem anderen Benutzer werden nicht angezeigt) | |||
| Zeile 1: | Zeile 1: | ||
With this function you can colour texts, tables and graphics from stories and dynamically show or hide them in one or more | With this function you can colour texts, tables and graphics from stories and dynamically show or hide them in one or more masters. Writing back stories is not possible when using dynamic texts and is blocked when the function is activated. | ||
| Zeile 9: | Zeile 9: | ||
== Activate dynamic texts == | == Activate dynamic texts == | ||
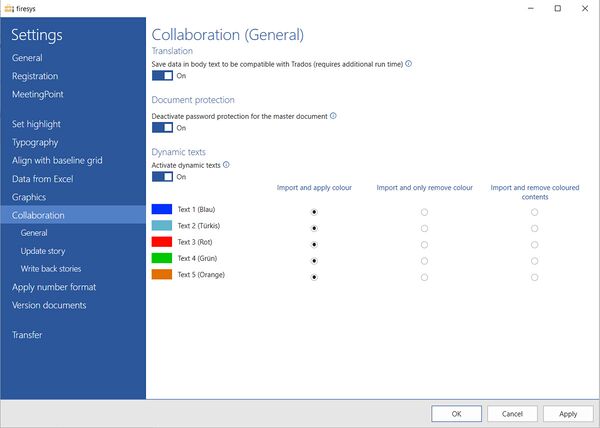
[[Datei:EN Word Einstellungen Zusammenarbeit Allgemein.jpg|mini|upright=2.0|The view of general settings]] | [[Datei:EN Word Einstellungen Zusammenarbeit Allgemein.jpg|mini|upright=2.0|The view of general settings]] | ||
In order to work with dynamic texts, you must first activate the function in both the master | In order to work with dynamic texts, you must first activate the function in both the master and the stories. | ||
<br><b> Note </b>: Please note that this option is not compatible with the option “Apply strikethrough from Excel”. <br> | <br><b> Note </b>: Please note that this option is not compatible with the option “Apply strikethrough from Excel”. <br> | ||
| Zeile 21: | Zeile 21: | ||
<li> In the settings, go to the tab “Collaboration” and activate the function “Activate dynamic texts”. </li> | <li> In the settings, go to the tab “Collaboration” and activate the function “Activate dynamic texts”. </li> | ||
<li> In the master | <li> In the master, you now have the option of specifying for each colouring within the story whether and how these are to be adopted. </li> | ||
You can choose from: | You can choose from: | ||
| Zeile 27: | Zeile 27: | ||
<ul> | <ul> | ||
<li> <i>Import and apply colour </i> </li> | <li> <i>Import and apply colour </i> </li> | ||
The coloured content is displayed in the corresponding colour in both the story and the master | The coloured content is displayed in the corresponding colour in both the story and the master. | ||
<li><i>Import and only remove colour </i> </li> | <li><i>Import and only remove colour </i> </li> | ||
The coloured text is displayed in the corresponding colour in the story. The colour is removed in the master | The coloured text is displayed in the corresponding colour in the story. The colour is removed in the master. | ||
<li><i>Import and remove coloured contents</i> </li> | <li><i>Import and remove coloured contents</i> </li> | ||
The coloured content is displayed in the corresponding colour in the story. In the master | The coloured content is displayed in the corresponding colour in the story. In the master, the coloured content is completely removed. | ||
</ul> | </ul> | ||
<li> When you have set your desired options, click on “Apply” and confirm with “OK”. </li> | <li> When you have set your desired options, click on “Apply” and confirm with “OK”. </li> | ||
| Zeile 68: | Zeile 68: | ||
<li> Save the story and close the document. </li> | <li> Save the story and close the document. </li> | ||
<li> Open the master | <li> Open the master. </li> | ||
<li>Click on the “Update” button in the “*Content” ribbon in the “Collaboration” group. </li> | <li>Click on the “Update” button in the “*Content” ribbon in the “Collaboration” group. </li> | ||
The changes from the story are transferred to the master | The changes from the story are transferred to the master according to your settings. | ||
</ol> | </ol> | ||
| Zeile 79: | Zeile 79: | ||
<b> The “Reset” function </b> | <b> The “Reset” function </b> | ||
With this function you can reset the set text formats or delete the coloured marking. The text reappears in the original formatting both in the stories and in the master | With this function you can reset the set text formats or delete the coloured marking. The text reappears in the original formatting both in the stories and in the master. | ||
<!-- | <!-- | ||
| Zeile 103: | Zeile 103: | ||
{{MoreContent}} | {{MoreContent}} | ||
[[Kategorie: | [[Kategorie:Apply dynamic texts]] | ||
Aktuelle Version vom 28. März 2023, 10:53 Uhr
With this function you can colour texts, tables and graphics from stories and dynamically show or hide them in one or more masters. Writing back stories is not possible when using dynamic texts and is blocked when the function is activated.
Activate dynamic texts
In order to work with dynamic texts, you must first activate the function in both the master and the stories.
Note : Please note that this option is not compatible with the option “Apply strikethrough from Excel”.
To activate the function:
- Go to the firesys settings. You will find these on all firesys menu ribbons in the “firesys” group. Click on the suitcase symbol to open the settings.
- In the settings, go to the tab “Collaboration” and activate the function “Activate dynamic texts”.
- In the master, you now have the option of specifying for each colouring within the story whether and how these are to be adopted. You can choose from:
- Import and apply colour The coloured content is displayed in the corresponding colour in both the story and the master.
- Import and only remove colour The coloured text is displayed in the corresponding colour in the story. The colour is removed in the master.
- Import and remove coloured contents The coloured content is displayed in the corresponding colour in the story. In the master, the coloured content is completely removed.
- When you have set your desired options, click on “Apply” and confirm with “OK”.
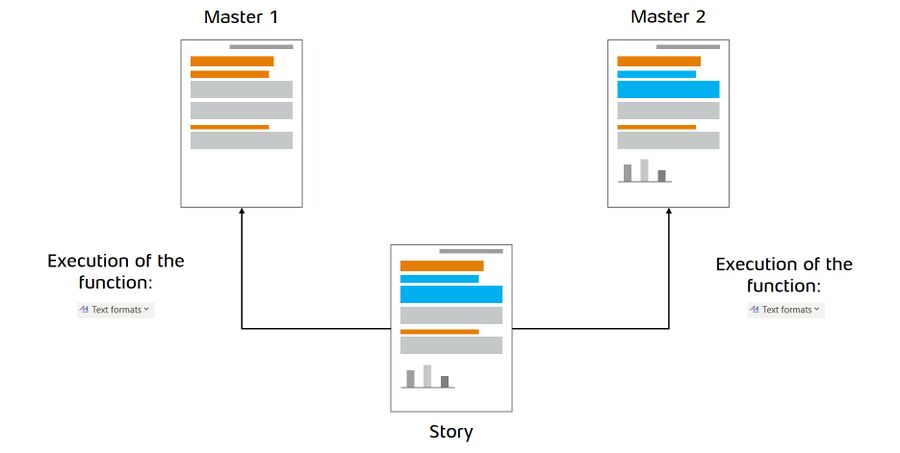
The schematic representation of the components in the application of text formats
The schematic illustration shows you the connection between the individual components that are needed to apply dynamic texts.
Apply dynamic texts
How to apply dynamic texts:
- Open the story.
- In the document, highlight the content you want to colour.
- Click in the “*Design” ribbon in the “Text” group on the “Text formats” button.
- In the drop-down menu that opens, you can assign the corresponding colour to the marked text under the item “Dynamic texts”.
- Save the story and close the document.
- Open the master.
- Click on the “Update” button in the “*Content” ribbon in the “Collaboration” group. The changes from the story are transferred to the master according to your settings.
The “Reset” function
With this function you can reset the set text formats or delete the coloured marking. The text reappears in the original formatting both in the stories and in the master.
See also
![]() An overview of the content of the content manager
An overview of the content of the content manager
![]() An overview of the content manager
An overview of the content manager
![]() Insert a story
Insert a story
![]() Create a story
Create a story
![]() Write back a story
Write back a story


