Content manager overview
You can use the content manager to manage texts from other Word documents which are called stories. For this, you’ll need the linkdocuments module. You can find further information on editing tables on the “Actions” tab. You can find further information on settings on the “Options” tab.
With the Content Manager you can divide the content of your publication into any number of "particles" that can be edited independently by different employees. Identical content only has to be maintained in one place to ensure that it is always up-to-date and can be used in several publications.
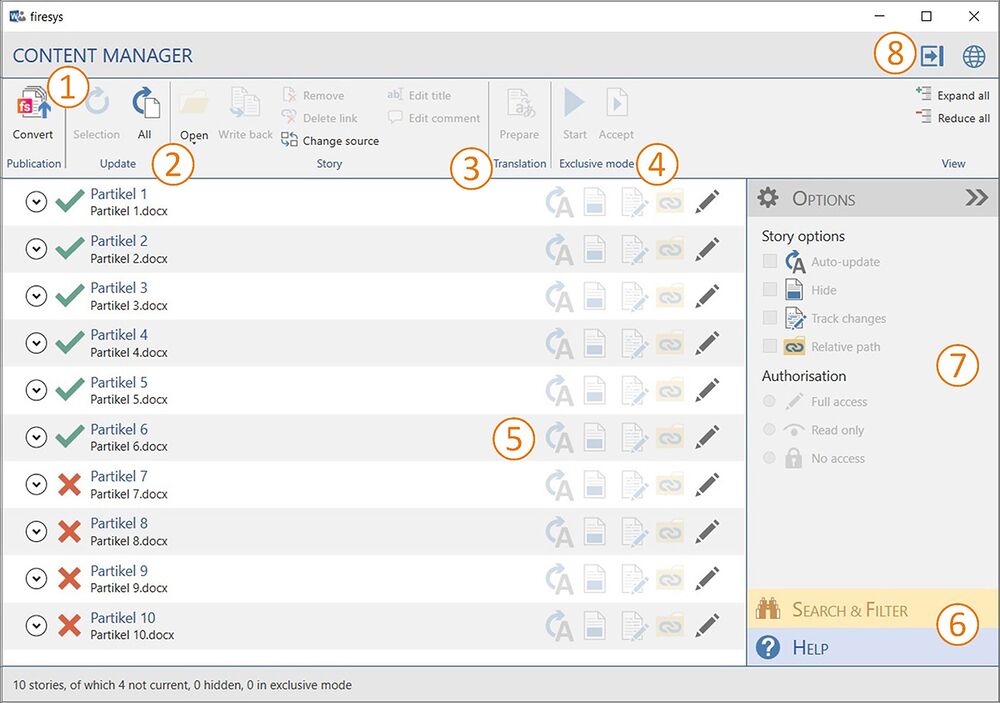
| Publication function | This function can be used to prepare your publication and the associated stories in the Content manager for the new version of linkdocuments. See #Convert publication for details. | |
| Update functions | You can use these functions to update your linked stories with one click. This means that your business report always contains the lastest values. See #Update functions for details. | |
| Prepare translation | With this function, you create copies of the marked stories to pass on for translation, optimised for processing in translation programmes. See #Prepare translation for details. | |
| Exclusive mode | This function allows you to edit your publication centrally and across all stories in the Master, while the selected stories are locked for other users. See #Exclusive mode for details. | |
| List view | This function gives you information about all the stories linked to the document. See #List view for details. | |
| Filter & help functions | You can simplify working with the content manager by using filters to structure how information is displayed. If you still have any questions about its functions, the integrated help menu will assist you further. See #Filter & help functions for details. | |
| Data Object Options | The data object options in the content manager support you when working with your stories. See #Data Object Options for details. | |
| Reduced mode | This function opens the content assistant in the work area. By using the reduced mode you can individually select the functionalities of the content manager while continuing to work on your report. See #Reduced mode for details. |
Convert publication
The “Convert” button in the “Publication” group can be used to prepare your publication and the associated stories in the Content manager for the new version of linkdocuments. The prerequisite is that all the stories in the Content manager can be accessed and that they are up to date.
Detailed information on the conversion and the conversion process can be found in the following document.
Update functions
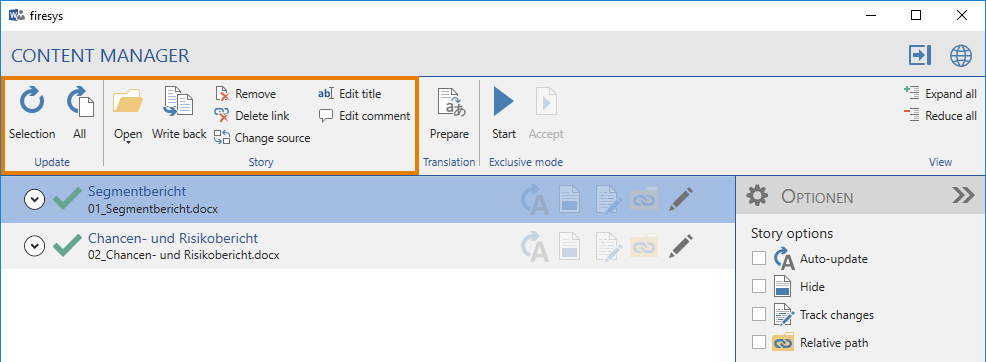
Update
![]() Update selection
Update selection
Checks and updates stories highlighted in the selection window.
![]() Update all
Update all
Checks and updates all stories in the master and generates an update report that also indicates whether problems occurred during the update.
Story
![]() Write back
Write back
Use this function to transfer any changes that you have entered in the master to the story document.
![]() Remove
Remove
Removes the story from the master. This removes the contents of the document from the file and automatically inserts the subsequent contents at this position.
![]() Delete link
Delete link
Removes the link to the story so that the story becomes part of the non-story area in the master.
![]() Change source
Change source
Changes the file name or storage location (path) of the selected story.
![]() Edit title
Edit title
Create or edit the title of the selected object to make it easier to find it in the content manager or by using the “Search” function.
![]() Edit comment
Edit comment
Create or edit the title of the selected object to make it easier to find it in the content manager or by using the “Search” function.
Good to know
| |
|---|---|
You can remove a comment or a title at any time by deleting the text that was entered and clicking on “OK”. |
Translation
![]() Prepare
Prepare
Open the function „Prepare translation“.
Exclusive Mode Open [1].
Prepare translation
From the Content Manager, click on the "Prepare" button in the "Translation" section to create copies of the stories you have selected to send for translation, optimised for use in translation software.
Function
In the Content manager, click on the "Prepare" button in the "Translation" range to create copies of the marked stories that are optimised for processing in translation programmes.
- This automated process resets manual text formatting that is not required for translation or that interferes with the work of a translation memory (non-breaking space, character formatting, highlighting, run-length adjustments).
- Data in text and tables are "protected" in this automated process so that they are not overwritten during translation.
- In this automated process, all revisions are accepted; i.e. track changes are deleted in the export file.
- All language settings are changed during this automated process
Preparing documents for translation
How to prepare your documents for the translator:
- Create a folder in Windows Explorer where you want firesys to store the files you want to send to the translator.
- Open the Content manager and select the stories you want to prepare for translation in the selection window.
- Click on "Prepare". The firesys wizard for preparing the translation files opens.
- At the item "Output directory", select the previously created folder.
- Select the target language for the documents (for more information on managing and configuring languages, see the settings in the article "Apply number format").
- If you activate the option "including Master", the entire Master will be exported as a file for the translator in addition to the marked stories. The paths can be automatically adapted to the new storage location. If you have not saved the Master before starting the preparation for translation, firesys will do this for you automatically. The wizard will inform you of this accordingly.
- If you do not activate the option "including Master", only the marked stories are exported as files for the translator.
- Select "Prepare ..." to continue preparing the selected files for translation.
Good to know
| |
|---|---|
Bei diesem Prozess ist es möglich, auch einzelne Dokumente für die Übersetzung aufzubereiten. |
Exclusive mode
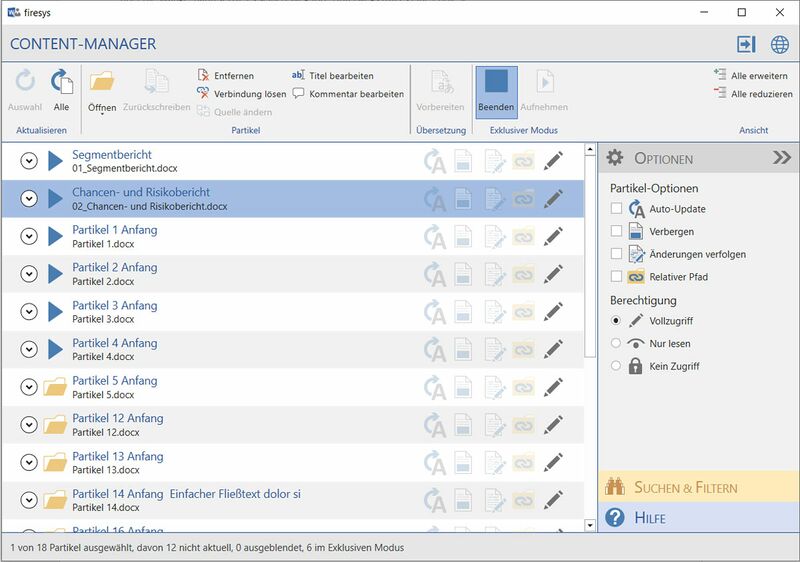
With exclusive mode you can edit your publication centrally and across stories in the master. The selected stories are blocked for other users for the entire time that you are working in exclusive mode. You can also use exclusive mode for a group of stories.
Start/end exclusive mode Used for centralized, multi-story editing of your publications in the master (see “Enter changes in exclusive mode”).
Accept stories in exclusive mode Accepts the selected story in exclusive mode.
Good to know
| |
|---|---|
If the story document was being edited while you edited the text in the master, these changes will be lost when writing back the contents from the master. For this reason, always use the “exclusive mode” for making changes to the master. |
- Open the content manager in the master and refresh the stories.
- In the selection window, highlight the story or stories you want to access in exclusive mode. This is only available for stories that are “available” for editing.
- Click “Start”. The selected stories will now have an arrow in the selection window and are blocked for editing by other users. The “Start exclusive mode” button changes to “End exclusive mode”.
- If you want to add one or more stories to the list of files to be edited in exclusive mode, highlight the story or stories you want in the selection window and click “Accept” to confirm your selection.
- Close the Content Manager and edit the contents of the selected stories in the master.
- Save the master and open the content manager again. You now have two options:
- If you want to continue working in exclusive mode and save while working: In the selection window, highlight the stories whose contents you want to write back from the master into the story documents and click “Write back”.
- To exit exclusive mode: Click “Close” to open a dialog window. Select whether you first want to write back all the selected stories and then exit exclusive mode, or whether you want to interrupt exclusive mode without writing back the changes into the story documents. Click “OK” to confirm your selection.
Good to know
| |
|---|---|
Exclusive mode is particularly useful for standardising terms in your publication (e. g. with the “Find & Replace” function in Word). |
List view
Here you get information about all the stories linked to the Master. Double-click on a story in the selection window to navigate to the beginning of that story in your Master. To edit settings for several stories at once, select them by holding down the Shift or Control key.
Good to know
| |
|---|---|
Administrators can still edit stories with the status “read only” or “no access” provided they open the stories in the master (requires toolsrights). |
Current status
 Up to date
 Outdated
 Locked for editing in exclusive mode.
Authorization (with toolsrights only)
Shows the authorisation that was set for the story
 Full access
- The content of the selected stories is released for editing.
 Read only
- Locks editing of content in the selected stories for all users.
 No access
- Locks access to the selected stories.
Good to know
| |
|---|---|
Access to particles that have been blocked is still possible with the previously set administrator password. |
Yellow vertical highlighting Indicates hidden particles or content-related inconsistencies .
Red vertical highlighting: problems
Indicates objects that could not be found or updated.
Additional information
Clicking on the left arrow expands the objects and shows additional information. In the problem/solution suggestion area, if applicable, an explanation is given as to why an object was not updated in the last update process. Here you will also find status information and the toolsrights document status information.
Show/hide document status (only available with toolsrights)
With the document status, you can visually display the status of your publication. The status of all stories (Draft, Pending, Approved) is displayed or hidden by a coloured column at the edge of the document.
Good to know
| |
|---|---|
When “writing back” content to the stories, the coloured columns are removed. |
Show
In the “*Content” ribbon, in the “Collaboration” group, click on the lower part of the “Content manager” split button and select the “Display” button. Columns with colours according to the status will be inserted for all paragraphs in the master.
 Story status – draft
 Story status – pending
 Story status – approved
Hide
In the “*Content” menu ribbon, in the “Collaboration” group, click on the drop-down menu for “Content manager” and select “Hide”. Columns with colours will be removed for all paragraphs.
Good to know
| |
|---|---|
Tables cannot be assigned a coloured column for technical reasons. |
Shows the number of linked and selected stories.
Search and help function
You can simplify working with the firesys managers by using filters to structure how information is displayed. If you still have any questions about its functions, the integrated help menu will assist you further. This article uses the Excel data manager interface to represent the content and graphics manager.
The search & filter function
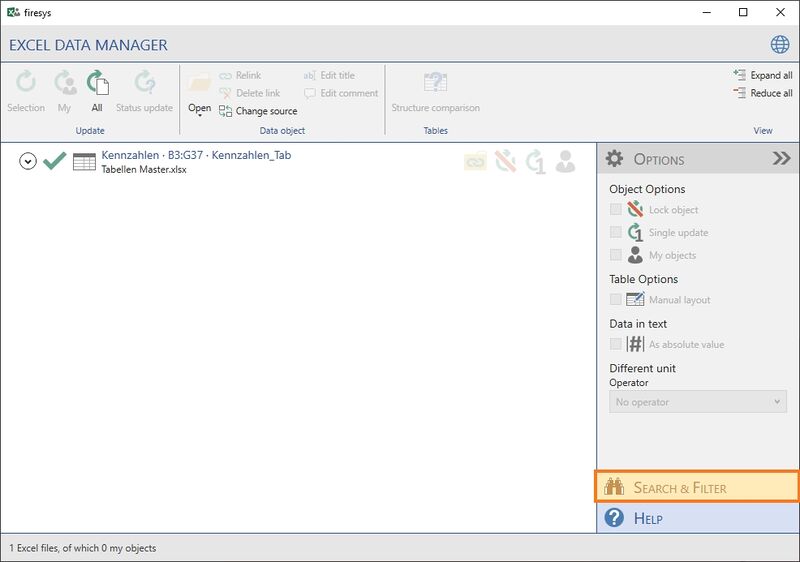
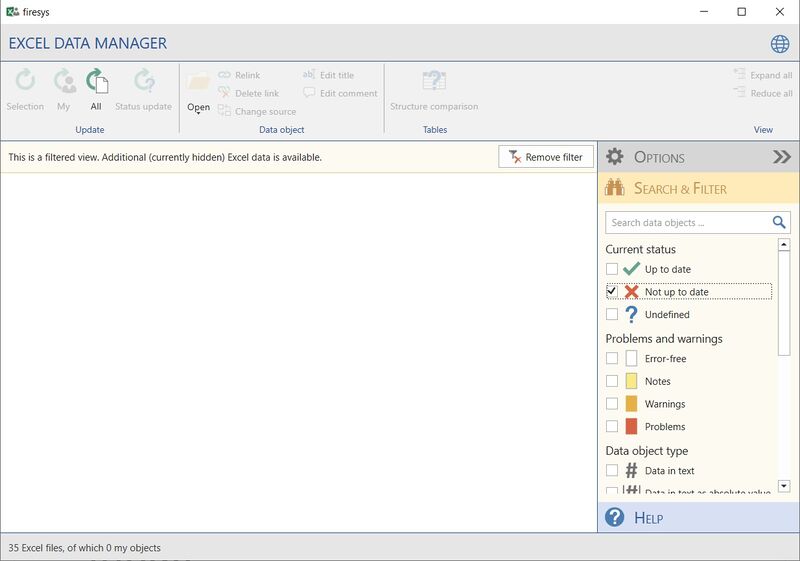
You find the search & filter function in the expandable work area on the right-hand side.
By clicking on the button you open the Search & filter area. Here you see an overview of all properties of the contents of the respective manager that can be filtered. In this example with the Excel data manager, you see the filter options categorised by the relevant types. As soon as you click on a filter, the display in the list view changes. Only those elements that correspond to the selected filter category are displayed. You can reset the selection at any time by deselecting the individual elements or clicking on the “Remove filter” button located above the list.
The help function
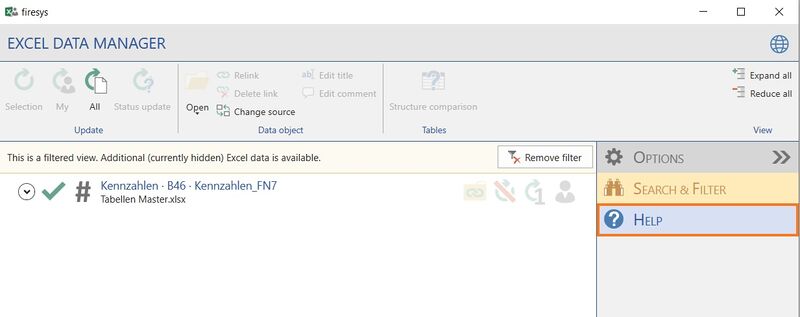
If you have a question regarding the functionality of the firesys manager, you can use the integrated help menu at any time.
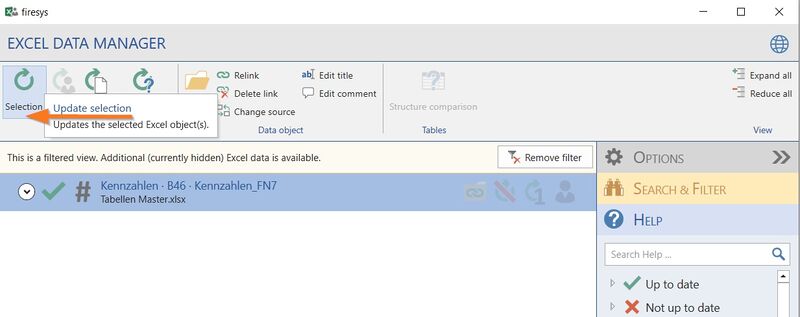
You open the help area by clicking on the button. All of the manager’s functions with the icon used and the function name are displayed here. You can expand each list element to display additional information. Furthermore, for all elements that are located in the manager’s permanently visible menu ribbon, a red information arrow is displayed when you position the mouse over the function which displays the position of the button. Functions that are located in the “Options” work area are indicated in the descriptive text.
Video: The help and search function in the managers
How to use the help and search function in the firesys managers:
-
Click on the button “Excel data manager” in the menu ribbon “*Design” in the group “Excel data”. The Excel data manager opens.
→ At the bottom right of the Excel data manager you will find both the “Search & Filter” and the “Help” function. -
If you click on the “Search & Filter” button, a task pane opens.
→Here you will find an overview of all filterable properties of the contents of the respective manager. As soon as you click on a filter, the display in the list view changes. Only the elements that correspond to the selected filter category are displayed. You can reset the selection at any time by deselecting the individual elements or by clicking on the “Cancel filter” button above the list. -
If you click on the “Help” button, the help area opens. All functions of the manager are displayed here with the symbol used and the function name. You can expand each list element to obtain further information. In addition, a red arrow is displayed for all elements that are permanently visible in the manager's menu ribbon. If you touch the functions with the mouse, it shows you the position of the button in the menu band of the data manager. If you click on an element, a descriptive text is displayed below the element.
Note: The help and search function is shown as an example for all managers using the Excel data manager.
Data object options
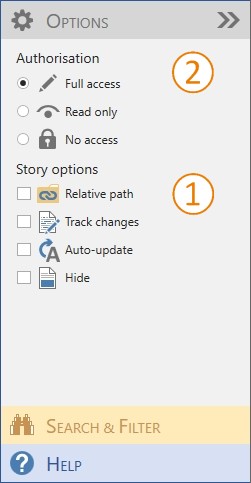
 Story options
![]() Auto-update
Auto-update
If this function is activated, the marked "not current" stories are automatically updated the next time the Master is opened.
![]() Hide
Hide
When hiding, all content such as text, Data in text, tables and graphics in the particle are replaced by x characters. The story retains its exact size (the paging is not changed). In addition, they can still be updated to adapt the scope to new content.
![]() Track changes
Track changes
If this function is activated, the change mode is switched on for the marked story or stories. The change mode is forced and cannot be deactivated in the story.
![]() Relative path
Relative path
If this function is activated, the relative path is used for the marked story or stories instead of the absolute path. This means that when the publication is rolled forward and the structure of the folders remains the same, all connections of the Master to the stories are found automatically. The connections do not have to be adjusted manually.
 Authorisation
Permissions (requires toolsrights)
As an administrator, you can set permissions for individual stories here.
![]() Full access
Full access
![]() Read only
Read only
![]() No access
No access
Reduced mode
The Reduced mode opens the content assistant in the work area. By using the reduced mode you can individually select the functionalities of the content manager while continuing to work on your report. To start the reduced mode, click the "Content manager" button in the "Collaboration" group of the "*Content" ribbon and click the blue arrow icon in the top right corner of the manager.
Story
All functionalities you selected on the “Settings” ribbon are shown on the “Stories” tab in the Content Assistant, (see “Settings” in the next section). Use the advantage of continuing to work and manage the stories in your publication at the same time.
Settings
Standard
The set for easy working with linkdocuments. Stories can be updated and opened.
Standard 2
The set for advanced working with linkdocuments. Stories can be updated, story options can be set and exclusive mode can be activated.
Roles and rights
The set for working with toolsrights. Stories can be updated, story options can be set and exclusive mode can be activated. All authorization options are also available.
Custom
Determine the functions you need when working with linkdocuments on a day-to-day basis.
Back
If you want to switch back to the Content manager, click the "advanced mode" button at the bottom left. The reduced mode closes and you can continue working in the standard manager as usual.
See also
![]() Working in the team with the content manager
Working in the team with the content manager
![]() Insert Excel contents
Insert Excel contents
![]() Update Excel contents
Update Excel contents
![]() The firesys settings in Word for data from Excel
The firesys settings in Word for data from Excel
