Tagging of Hidden Elements: Unterschied zwischen den Versionen
Zur Navigation springen
Zur Suche springen
Keine Bearbeitungszusammenfassung |
Keine Bearbeitungszusammenfassung |
||
| Zeile 2: | Zeile 2: | ||
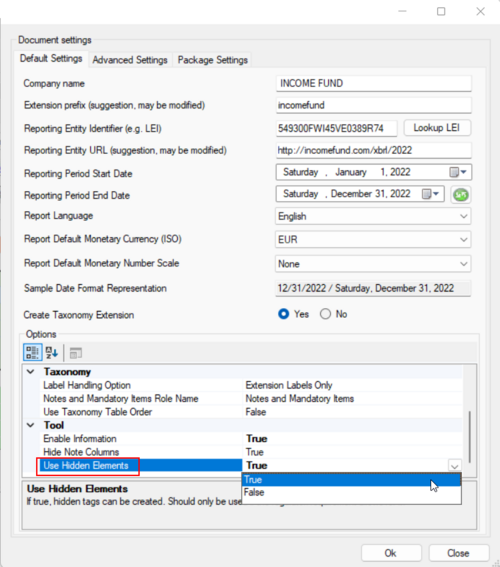
To enable hidden elements in a report, just activate the Use Hidden Elements under Document Settings by selecting True: | To enable hidden elements in a report, just activate the Use Hidden Elements under Document Settings by selecting True: | ||
[[Datei:Tagging of Hidden Elements1.png|center|500px]] | |||
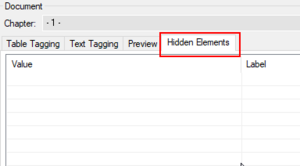
A new tab will now appear on the left side of toolsxbrl, next to Preview: | A new tab will now appear on the left side of toolsxbrl, next to Preview: | ||
[[Datei:Tagging of Hidden Elements2.png|center|300px]] | |||
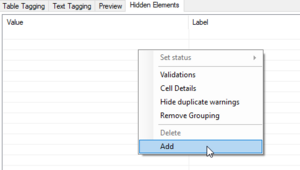
To add a value, just right click and select "Add": | To add a value, just right click and select "Add": | ||
[[Datei:Tagging of Hidden Elements3.png|center|300px]] | |||
Once a value has been entered, it can be tagged as usual per drag and drop from the Taxonomy: | Once a value has been entered, it can be tagged as usual per drag and drop from the Taxonomy: | ||
[[Datei:Tagging of Hidden Elements4.png|center|750px]] | |||
== Siehe auch == | == Siehe auch == | ||
Version vom 20. Oktober 2023, 12:54 Uhr
Some iXBRL reporting requirements might require the use of hidden elements. Hidden elements are values that are manually added to the XBRL report, but are not part of the source report; therefore, they cannot be tagged directly. With ESEF, hidden elements are not recommended.
To enable hidden elements in a report, just activate the Use Hidden Elements under Document Settings by selecting True:
A new tab will now appear on the left side of toolsxbrl, next to Preview:
To add a value, just right click and select "Add":
Once a value has been entered, it can be tagged as usual per drag and drop from the Taxonomy:
Siehe auch
Weitere Inhalte
→ Webseite
→ Kundenbereich
→ YouTube


