Toolsxbrl Settings: Unterschied zwischen den Versionen
Keine Bearbeitungszusammenfassung |
Keine Bearbeitungszusammenfassung |
||
| (Eine dazwischenliegende Version von einem anderen Benutzer wird nicht angezeigt) | |||
| Zeile 106: | Zeile 106: | ||
* Use temporary folder for iXBRL generation: this option, if selected, will create a temporary folder while generating a report and delete it after moving the final document to the designated folder in the XBRL Generator settings. | * Use temporary folder for iXBRL generation: this option, if selected, will create a temporary folder while generating a report and delete it after moving the final document to the designated folder in the XBRL Generator settings. | ||
[[Datei:Application Options.png|center|500px]] | |||
'''PDF Options:''' | '''PDF Options:''' | ||
| Zeile 128: | Zeile 122: | ||
** Sequential numbers: toolsxbrl itself assigns numbers to the pages in the document in subsequential order as "1, 2, 3, etc. | ** Sequential numbers: toolsxbrl itself assigns numbers to the pages in the document in subsequential order as "1, 2, 3, etc. | ||
* Preparing before importing text blocks: you should set this to yes if you want to import text block tags from a word to a PDF. | * Preparing before importing text blocks: you should set this to yes if you want to import text block tags from a word to a PDF. | ||
* pdfToHTMLEx local path: | * pdfToHTMLEx local path: This setting designates the specific location of the PDF2HTMLEx file on your computer. To configure it, first create a new folder on your computer. Then, open the tagger settings and navigate to the PDF option. Select the folder you created under the "PDF2HTMLEx Local Path" section. Apply the changes and close the settings. Restart the tagger and respond 'Yes' to the pop-up prompt asking if you want to download the PDF2HTMLEx. | ||
[[Datei:PDF Options.png|center|500px]] | |||
'''Word Options:''' | '''Word Options:''' | ||
| Zeile 135: | Zeile 131: | ||
* Document View Type: it is now possible to define the view type for converted Word documents. The available options are FullScreen, Manuscript and Pages. Just try them out to see what fits your report best. | * Document View Type: it is now possible to define the view type for converted Word documents. The available options are FullScreen, Manuscript and Pages. Just try them out to see what fits your report best. | ||
* Split Tables on Page Break: you can choose the option to split a table on page break if the table is too long for one page; the table then gets split in two tables and the same headers are repeated in the second page as well. | * Split Tables on Page Break: you can choose the option to split a table on page break if the table is too long for one page; the table then gets split in two tables and the same headers are repeated in the second page as well. | ||
[[Datei:PDF Options.png|center|500px]] | |||
'''Previewer Options:''' | '''Previewer Options:''' | ||
| Zeile 141: | Zeile 139: | ||
* iXBRL Viewer Text Block Grouping: if enabled the tagged text blocks are highlighted as blocks in the preview; if disabled, separate characters are highlighted. | * iXBRL Viewer Text Block Grouping: if enabled the tagged text blocks are highlighted as blocks in the preview; if disabled, separate characters are highlighted. | ||
[[Datei:Previewer Options.png|center|500px]] | |||
'''Notifications:''' | '''Notifications:''' | ||
Aktuelle Version vom 10. Juni 2024, 12:20 Uhr
Document Settings
Document Settings need to be adjusted after you have uploaded your document into toolsxbrl. You can find a detailed description of how to set these settings in the Getting Started section of the User Manual.
XBRL Processor Settings
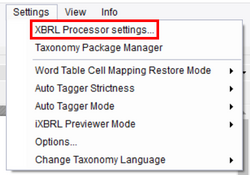
You will find the following settings under Settings → XBRL Processor Settings... in toolsxbrl:
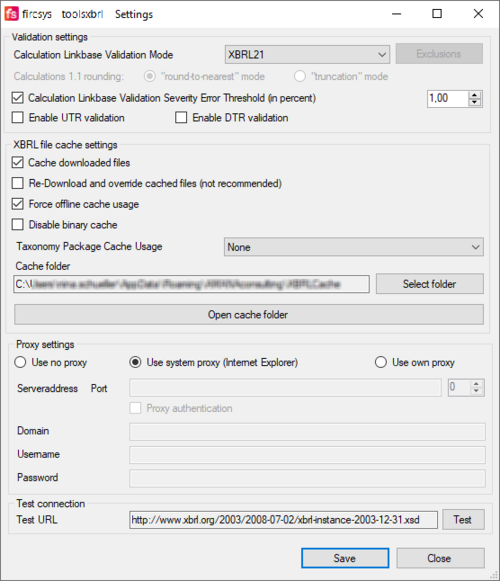
Validation Settings
- Exclusions: offers a list of entry points to exclude from calculation linkbase validation.
- Calculation 1.1 rounding: the rounding mode used for validation with Calculation 1.1. Only enabled when “Calculation Linkbase Validation Mode” is “Enabled” or “Auto”. There are two modes to choose from: "round-to-nearest" and "truncation" mode. We recommend to use "round-to-nearest" for your reports.
- While not yet mandatory for ESEF, the new implementation of the calculation linkbase in version 1.1 can be chosen in the Settings.
You can choose between "Auto", "Enabled" and "Disabled". Only "real" calculation errors are displayed, no rounding issues are displayed.
- While not yet mandatory for ESEF, the new implementation of the calculation linkbase in version 1.1 can be chosen in the Settings.
- - Auto: includes the list of exclusions (taxonomies where no calculation linkbase validation will be applied):
- - Enabled: calculation linkbase validation always enabled (regardles of selected taxonomy).
- - Disabled: calculation linkbase validation always disabled.
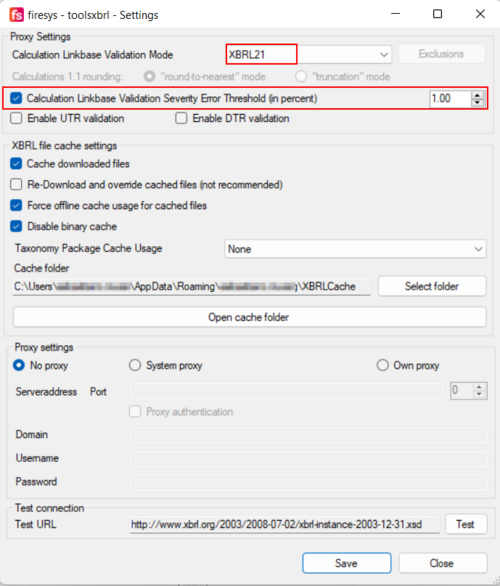
- Calculation Linkbase Validation Severity Error Threshold (in percent): when selected, a percent value can be set to define a threshold up to which calculation linkbase inconsistencies are still shown as WARNING instead of ERROR. Only selectable when “Calculation Linkbase Validation Mode” is “XBRL 2.1”.
- In order to distinguish rounding inconsistencies from real calculation issues (that usually indicate tagging issues), the firesy XBRL Engine allows to enable a Calculation Linkbase Validation Severity Error Threshold, which must be configured in the XBRL (user based) settings. If the threshold is activated and set to e.g. 1%, it means that the all calculation inconsistencies where the delta is smaller than 1% of the rounded reported value are deemed to be WARNINGS, while all inconsistencies with differences bigger then the threshold are deemed to be ERRORS. If the threshold is not set, all calculation inconsistencies are signalled with a WARNING severity.
- Further reading: ESEF Errors and Common Pitfalls: 8 – Rounding and Calculations
- Enable UTR (unit type registry) validation: when enabled checks if all units, created in the report are real, existing units (like EUR).
- Enable DTR (data type registry) validation: when enabled checks if all extension data types, created in the report are real, existing data types (like monetary).
XBRL File Cache Settings
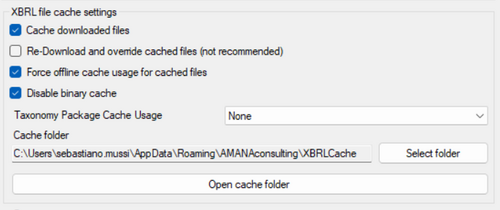
- Cache downloaded files: when selected, downloaded taxonomies will be saved locally for faster access. They are stored in a dedicated cache folder.
- Re-Download and override cached files (not recommended): when selected, the local cached files in the cache folder will always be replaced with new ones loaded from the internet (this is not recommended).
- Force offline cache usage: when selected, the local cache will be used where the taxonomies are located. If the taxonomies are not found, the engine will download them from the internet.
- Disable binary cache: when selected, the fast binary cache will not be used. The binary cache stores a serialised version of the loaded taxonomy to further speed up subsequent loadings.
- Taxonomy Package Cache Usage: select in which form the taxonomy packages will be stored.
- None: taxonomy packages will not be cached.
- Extracted: taxonomy packages will be stored in plain files (this is obsolete).
- Zip: taxonomy packages will be stored as ZIP-files.
- Cache folder: sets the local folder used for caching taxonomies.
Proxy Settings
- Proxy Settings: settings for a proxy server to access the remote location where the taxonomy is situated can be configured here.
- No proxy: no proxy server is used.
- System proxy: standard proxy is used.
- Own proxy: custom proxy is used and needs to be configured below. Enables the fields “Server address”, “Port” and “Proxy authentication”.
- Serveraddress Port: server address and port for the proxy to be used.
- Proxy authentication: when selected, toolsxbrl will try to authenticate itself against the proxy server with the information set below. Enables the fields “Domain”, “Username” and “Password”.
- Domain: domain used for authentication against the proxy server.
- Username: username used for authentication against the proxy server.
- Password: password used for authentication against the proxy server.
Test Connection
- Test URL: tests the connection to the specified URL when “Test” button is clicked and shows whether the connection was successful.
Mandatory Validations Depending on The Regulator
Each regulator has its own set of mandatory validations, which can be performed by toolsxbrl through enabling the respective validations in the above settings window.
European Securities and Markets Authority (ESMA):
- UTR: Recommended
- DTR: Mandatory
European Banking Authority (EBA):
- UTR: Mandatory
- DTR: Optional
European Insurance and Occupational Pensions Authority (EIOPA):
- UTR: Optional
- DTR: Optional
Settings Options
You will find the following settings under Settings → Options... in toolsxbrl:
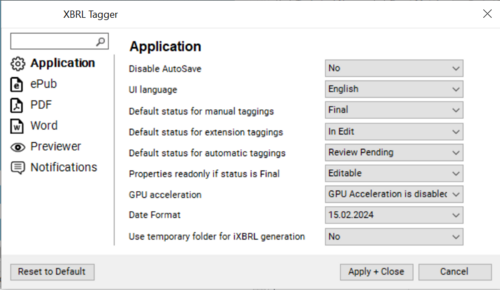
Application Options:
- Disable AutoSave: the Tagger has now an Auto Save feature to prevent accidental loss of work. If your PC crashes and you have not saved your work, you will get a prompt on the next load of the document if you want to restore the latest auto save backup rather then the original mapping file. This option deactivates this mechanism if it is not desired.
- UI language: changes the language of the user interface. The available options with Tagger version 1.9.1 are English, German, French, Polish, Italian and Czech.
- Default Status for (…): establish the default state to which toolsxbrl sets a mapping after the action is performed.
- Properties readonly if status is Final: if this is set to Readonly, changing tagging properties for cells that have been set to the Final status can no longer be changed. To change these cells revert to status to In Edit or Review Pending.
- GPU acceleration: this option disables or enables GPU acceleration in the built-in web browser for the preview. When there are side effects using hi-dpi monitor, this setting weakens the issues.
- Date Format: this option changes the way the date is displayed in the Tagger.
- Use temporary folder for iXBRL generation: this option, if selected, will create a temporary folder while generating a report and delete it after moving the final document to the designated folder in the XBRL Generator settings.
PDF Options:
- Zoom converted PDF: zoom ratio of the PDF document during the HTML converting process.
- PDF output font format: the output format of implemented fonts in the converted PDF document.
- PDF unicode CMaps handling: ToUnicode CMaps describe how the fonts are handled in to the source PDF. A ToUnicode map may be provided for each font in the PDF which indicates the 'meaning' of the characters. Sometimes there is better ToUnicode info and sometimes the map provided is wrong.
- If this value is set to Force, the map is always applied. If provided in PDF, characters may not render correctly in HTML if there are collisions.
- If set to Ignore a customized map is used, so rendering will be correct in HTML (visually the same), but you may not get correct characters by select Copy & Paste.
- If set to Auto, toolsxbrl balances the two methods above.
- Use auto hint on fonts without hint: use fontforge auto hint on fonts in the source PDF. For more details see
- PDF Background Image Format: you can choose between png, jpeg and SVG.
- PDF chapter tree behavior: this option regulates the displayed numbers in toolsxbrl while using a PDF. You can choose between three alternatives:
- Import bookmark tree: the numbers saved in the PDF will be used.
- Page numbers: toolsxbrl looks at the page numbers of the PDF and tries to use those.
- Sequential numbers: toolsxbrl itself assigns numbers to the pages in the document in subsequential order as "1, 2, 3, etc.
- Preparing before importing text blocks: you should set this to yes if you want to import text block tags from a word to a PDF.
- pdfToHTMLEx local path: This setting designates the specific location of the PDF2HTMLEx file on your computer. To configure it, first create a new folder on your computer. Then, open the tagger settings and navigate to the PDF option. Select the folder you created under the "PDF2HTMLEx Local Path" section. Apply the changes and close the settings. Restart the tagger and respond 'Yes' to the pop-up prompt asking if you want to download the PDF2HTMLEx.
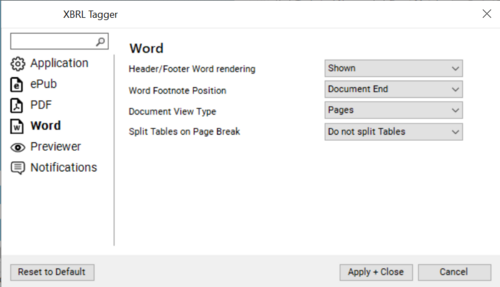
Word Options:
- Header/Footer Word rendering: if set to Shown Headers and Footers of Word documents will also be displayed in the transformed XHTML output.
- Word Footnote Position: you can choose if the footnotes should be displayed at the document end (an extra page at the end of the converted document) or page end (document view type should be set to Pages in this case).
- Document View Type: it is now possible to define the view type for converted Word documents. The available options are FullScreen, Manuscript and Pages. Just try them out to see what fits your report best.
- Split Tables on Page Break: you can choose the option to split a table on page break if the table is too long for one page; the table then gets split in two tables and the same headers are repeated in the second page as well.
Previewer Options:
- Using Chrome specific styles for HTML output: you can choose between enabled and disabled.
- Previewer Output File Type: you can choose between XHTML and HTML 5.
- iXBRL Viewer Text Block Grouping: if enabled the tagged text blocks are highlighted as blocks in the preview; if disabled, separate characters are highlighted.
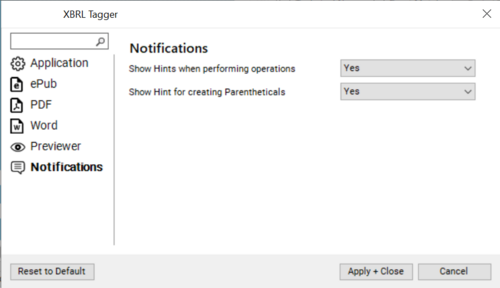
Notifications:
- Show Hints when performing operations: with this option you can choose whether you want to show hints when performing operations or not.
- Show Hint for creating Parentheticals: with this option you can choose whether you want to show hints for creating parentheticals or not.
Siehe auch
![]() Technical Documentation
Technical Documentation
![]() Getting Started
Getting Started
![]() New Features
New Features
Weitere Inhalte
→ Webseite
→ Kundenbereich
→ YouTube
