Getting Started: Unterschied zwischen den Versionen
Keine Bearbeitungszusammenfassung |
Keine Bearbeitungszusammenfassung |
||
| (20 dazwischenliegende Versionen von 2 Benutzern werden nicht angezeigt) | |||
| Zeile 1: | Zeile 1: | ||
== Open a document == | |||
To open a document with toolsxbrl there are two different ways: | |||
*Click on the "*Publish" ribbon in firesys in Word and click on "Prepare Document" in the "XBRL Export" group or. | |||
*Click on "File" and "Open" in the toolsxbrl menu and select the desired Word document. | |||
A dialogue will then appear showing you all the configuration settings of your currently open XBRL document. | |||
==Configuration Wizard== | |||
When you start toolsxbrl, the Configuration Wizard is displayed. It checks the validity of the license or helps you to activate it when used for the very first time. In addition, it helps to load a document and the current taxonomy version and it checks the document settings. | |||
[[Datei:Configuration Wizard.png|center|500px]] | |||
==Load Document== | |||
Click on Load Document in the Configuration Wizard. Alternatively, you can load the document without the Configuration Wizard: click on File in the main toolsxbrl window → Open... → Then select the desired file. Either way, after confirming your selection, the Document Settings dialog will appear, where you can set the Default Settings, the Advanced Settings, and the Package Settings. You can find below and explanation on how to adjust the different Document Settings. | |||
[[Datei:Document Settings.jpg|center|500px]] | |||
==Document Settings== | |||
===Default Settings Dialog=== | |||
[[Datei:Default Settings Dialog.png|center|500px]] | |||
This dialog configures the default settings for each tagged value as well as the whole report. | |||
* Company name: Short company name, which will be part of the reporting entity URL. Please write the name without spaces or special characters in lower case letters. This name will be used as file name, when extensions are created. | |||
* Extension prefix: Prefix for the taxonomy extensions. Please note, that only Basic Latin Unicode Elements will be added to the Extension prefix. Characters like Ä, Ü or Ø cannot be added and have to be manually replaced. | |||
* Reporting Entity Identifier: The ID of the reporting entity regarding the Context Identifier Schema. You can look up LEI by clicking on the "Lookup LEI" button. In the opening window you can modify the search query and look up again. | |||
* Reporting Entity URL: Is generated automatically and includes the value from "Company name" added above. Please write the URL without spaces or special characters in lower case letters. | |||
* Reporting Period Start/End Date: Start and end date of the reporting period | |||
* Roll Forward: toolsxbrl usually detects changes in table headers during a roll forward and adjusts the mapping periods accordingly. For tables that don't have the date explicitly in the header, for example Statement of Changes in Equity, this option moves the mapping periods forward according to the date set in the document settings. Just click the button once and click on OK for a roll forward. This option will not be executed by default, only if clicked. | |||
[[Datei:Roll Forward Icon.png]] | |||
* Report Language: The language of the report. It changes number format and date format representation. | |||
* Report Default Monetary Currency (ISO): Select the currency of the report. | |||
* Report Default Monetary Number Scale: Sets the default scale for all numbers unless stated otherwise in the respective table or individual value. There are four options available: none, thousand, million and billion. | |||
* Sample Date Format Representation: Changes automatically, depending on the report language selected above. | |||
* Create Taxonomy Extensions: Allow this feature if you plan to add your specific company extentions to the taxonomy. | |||
* Tagging | |||
** Auto SignLogic: If "True" is selected, toolsxbrl will automatically assign the best SignLogic based on an algorithm. If "False" all SignLogic is set to None. | |||
** Create <table> tag for tagged tables: if "True" is selected, toolsxbrl will allow to include HTML tags automatically. This, however, only applies to PDF files. | |||
** Preferred Transformation Registry Version: Select the transformation registry for value conversion. | |||
** References to Check: Allows to select the references for text block tagging the validation checks against. | |||
* Taxonomy | |||
** Label Handling Option: | |||
*** Extension Label Only: use the labels from the Taxonomy and only create your own labels for the extensions you created. | |||
*** Standard Role with Priority: uses standard labels for all elements and overwrites taxonomy labels. We do not recommend to use this. | |||
*** Verbose Role: use the specific labels from your report for both, the labels from the Taxonomy and your Extensions. You have the label role Verbose for new labels for existing elements and the label role Standard for Extensions. | |||
** Notes and Mandatory Items Role Name: Change the name for the role (e.g. if the report language is not English). | |||
** Use Taxonomy Table Order: Usually the table order in the extension taxonomy should resemble the order of tables in the actual report. In some jurisdictions or auditors' opinions it has to exactly resemble the order in the original taxonomy. To achieve this just enable this option. | |||
* Tool | |||
** Enable Information: Information level messages will also be shown. | |||
** Hide Note Columns: Option to hide the note column in the tables (optional, may not work if the header of the notes column is not "Note"). | |||
** Use Hidden Elements: Option to show a tab where hidden items can be tagged. | |||
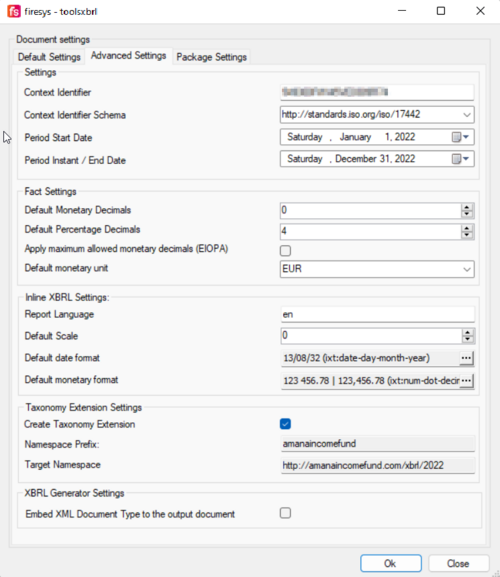
=== Advanced Settings Dialog === | |||
[[Datei:Advanced Settings Dialog.png|center|500px]] | |||
Advanced Settings Dialog | |||
This dialog configures the advanced settings for the report. Some of the fields are pre-populated, depending on the settings in the "Default Settings" dialog. | This dialog configures the advanced settings for the report. Some of the fields are pre-populated, depending on the settings in the "Default Settings" dialog. | ||
* Settings | |||
** Context Identifier: The ID of the reporting entity regarding the Context Identifier Schema, e.g. LEI. | |||
** Context Identifier Schema: Specified by the supervising authority, e.g. http://standards.iso.org/iso/17442 if LEI codes are used. | |||
** Period Start/Instant/End Date: The default period for all tagged values. If the tagged element is defined as instant rather than duration, the end date will be used (the same as in the Default Settings tab; changed automatically). | |||
* Fact Settings | |||
** Default Monetary Decimals: Defines the accuracy of the tagged element if it is a monetary value. A value of -3 states that the tagged value is accurate three places before (-) the decimal separator (thousands); changes automatically, when monetary number scale is selected in the "Default Settings" tab. | |||
** Default Percentage Decimals: Defines the accuracy of the tagged element if it is a percentage value. A value of 4 states that the tagged value is accurate four places after the decimal separator (e.g. 0.2355). | |||
** Apply maximum allowed monetary decimals: If the supervising authority is the EIOPA, this checkbox automatically sets the maximum allowed decimals per value. | |||
** Default Monetary Unit: Sets the default monetary unit for all monetary values unless stated otherwise in the respective or individual value (changes automatically, depending on the monetary currency selected in the Default Settings tab). | |||
* Inline XBRL Settings | |||
** Report Language: Defines the language of the Report (e.g. DE, EN). Changes automatically depending on the report language selected in the Default Settings tab. | |||
** Default Scale: Sets the default scale for all numbers unless stated otherwise in the respective table or individual value. The scale indicates the number of digits to be added to a value to represent its real number. For example: If values are stated in millions 450 with a scale of 6 would represent 450 000 000. Changes automatically, when monetary number scale is selected in the Default Settings tab. | |||
** Default Date Format: If the tagged value represents a date, the format specifies the exact format of that date. | |||
** Default Monetary Format: If the tagged value represents a monetary value, the format specifies the exact format of that value. | |||
* Taxonomy Extension Settings | |||
** Create Taxonomy Extension: If the checkbox is activated, taxonomy extensions will be created. It changes automatically, when one of the Taxonomy Extension options is selected in the Default Settings tab. | |||
** Namespace Prefix: The company name, which will be part of the reporting entity URL. Changes automatically depending on the Reporting Entity Ticket Symbol/Name in the Default Settings tab. | |||
** Target Namespace: It is the same as the Reporting Entity URL in the Default Settings tab. | |||
* XBRL Generator Settings | |||
** Embed XML Document Type to the output document: is a requirement in some countries. In Germany, it is currently not applicable, so it can be left deactivated. | |||
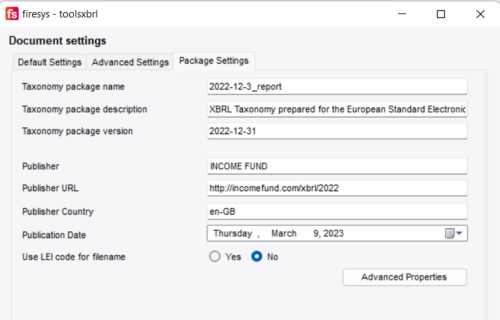
===Package Settings Dialog=== | |||
[[Datei:Package Settings Dialog.png|center|500px]] | |||
This dialog configures the package settings for the current report. The dialogue fields are pre-populated, depending on the selected document settings. | |||
* Taxonomy package name: Displays the taxonomy package name (generated automatically). It includes the reporting entity name and reporting period end date selected in Default Settings. | |||
* Taxonomy package description: A brief description of the taxonomy package. | |||
* Taxonomy package version: Reporting period end date selected in the Default Settings. | |||
* Publisher: Displays the reporting entity name provided in the Default Settings tab. | |||
* Publisher URL: Displays the reporting entity URL provided in the Default Settings tab. | |||
* Publisher Country: The country, depending on the selected report language. Please use two uppercase letters, like DE, EN, FR. | |||
* Publication Date: Taxonomy creation date or the report publication date. | |||
* Use LEI code for file name: in some countries LEI should be used for the ESEF package name instead of a company name. | |||
* The "Advanced Properties" dialog opens the configuration of parameters in the external Json files. This dialog should be used only for support cases, where the user needs specific parameters for their document. | |||
[[Datei:Advanced properties button.png]] | |||
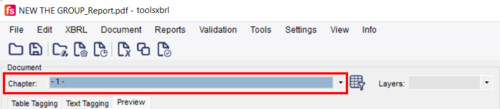
After the document has been loaded, the available chapters and tables can be selected from the respective dropdown menu. Furthermore, a chapter tree is available in the displayed tabs. | |||
[[Datei:Chapter Tree.png|center|500px]] | |||
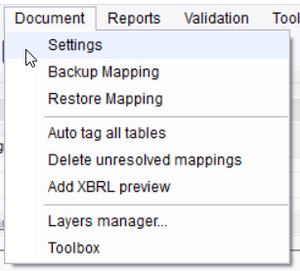
Report Settings can also be opened and changed after the file is loaded. To do so, click on Document → Settings or on the Settings Icon. [[Datei:Settings icon.png | 32px]]. | |||
[[Datei:Settings menu.png|center|300px]]]] | |||
==Open/Load Taxonomy== | |||
Now that the document is loaded and the Document Settings are adjusted, a taxonomy for tagging the values needs to be selected and loaded, if not previously done in the Configuration Wizard. | |||
Taxonomies are defined by entry points in the format of URIs. The entry point references a collection of schema files which determine the available elements to be used for tagging. | |||
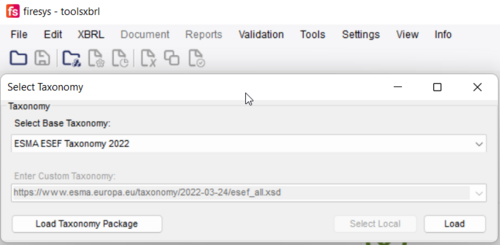
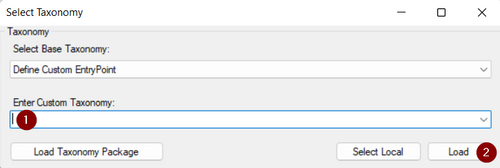
To open a taxonomy click on XBRL → Open/Load Taxonomy. toolsxbrl offers a selection of base taxonomies to load. You can view these taxonomies by clicking the drop down arrow. Once you have selected the desired taxonomy, click on "Load". If you need to report ESEF, but want to load another taxonomy, click "Load Taxonomy Package". | |||
[[Datei:Load Taxonomy Package.png|center|500px]] | |||
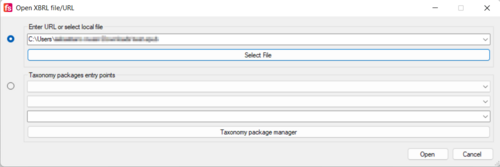
Once you click "Load Taxonomy Package", another dialog opens: insert the entry point URI of the desired taxonomy into the first text field, then click open. The desired taxonomy will be loaded. | |||
[[Datei:Load Taxonomy Package 2.png|center|500px]] | |||
Continue reading about [https://hilfe.firesys.de/wiki/Understanding_Taxonomies_and_Reports XBRL Taxonomies here] or get started to [https://hilfe.firesys.de/wiki/Tagging_of_Tables tag your report here]. | |||
===Change Taxonomy Language=== | |||
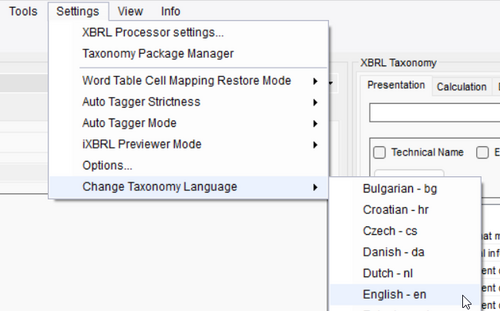
To change the taxonomy language, go to "Settings→ Change Taxonomy Language" and select one of the available languages: | |||
[[Datei:Change Taxonomy Language.png|center|500px]] | |||
===Multi-Taxonomy Tagging=== | |||
In some jurisdictions (for example Denmark) the local authorities require ESEF reports not only to be tagged with elements from the ESEF-taxonomy, but also with additional elements from a local taxonomy. The taxonomy extension is still only being done on the ESEF-taxonomy, but the report itself contains tags from more than one entry-point. These multi-taxonomy-requirements might become more common in the future. toolsxbrl supports the tagging of reports with two or more taxonomies. | |||
# To get started just load the report and the ESEF taxonomy. | |||
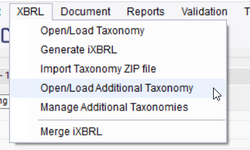
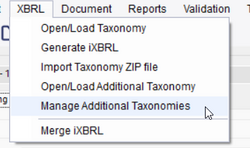
# Then click on XBRL → Open/Load Additional Taxonomy | |||
[[Datei:Multi-Taxonomy Tagging.png|center|250px]] | |||
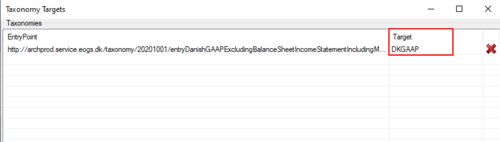
# In the taxonomy selection window just add the entry point of the additional taxonomy, for example: http://archprod.service.eogs.dk/taxonomy/20201001/entryDanishGAAPExcludingBalanceSheetIncomeStatementIncludingManagementsReview20201001.xsd | |||
[[Datei:Multi-Taxonomy Tagging 2.png|center|500px]] | |||
[[Datei:Multi-Taxonomy Tagging 3.png|center|500px]] | |||
# If you click on XBRL → Manage Additional Taxonomies, you will see the Taxonomy that has been added. | |||
[[Datei:Multi-Taxonomy Tagging 4.png|center|250px]] | |||
[[Datei:Multi-Taxonomy Tagging 5.png|center|500px]] | |||
# If you generate a result document, the tags of each taxonomy will be validated according to the validations that are part of the source taxonomy. You will also find two XBRL instances in the reports folder, one for each target. | |||
== Overview of toolsxbrl == | |||
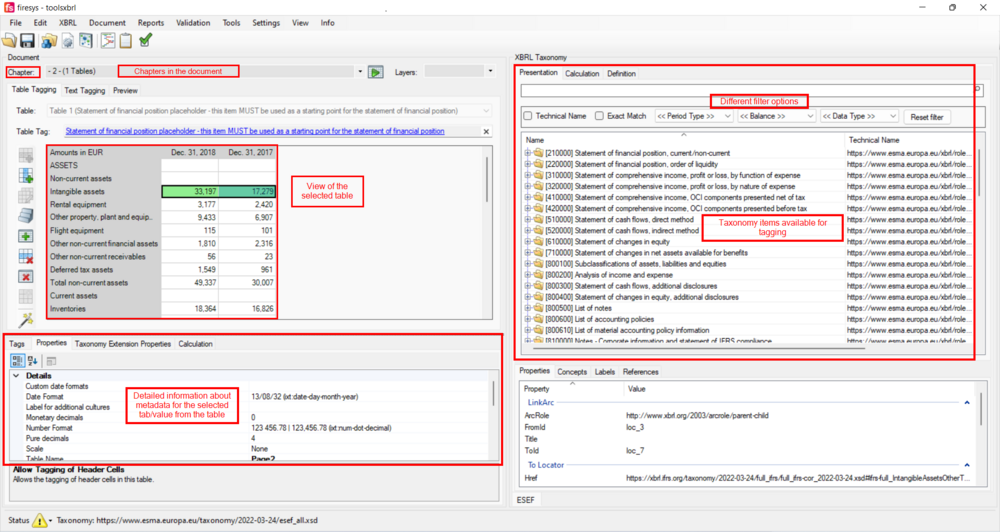
Everything is set up for tagging values and notes in a document. In the screenshot below the different areas of toolsxbrl are highlighted. | |||
[[Datei:Overview of the Tagger.png|center|1000px]] | |||
Overview of the Tagger | |||
== Siehe auch == | |||
[[Datei:Navigation_hoch.svg|link=]] [[Using_toolsxbrl|Using toolsxbrl]] <br> | |||
[[Datei:Navigation_rechts.svg|link=]] [[Tagging_of_Tables | Tagging of Tables]] <br> | |||
[[Datei:Navigation_rechts.svg|link=]] [[Tagging_of_Textblocks_(Notes)_and_Mandatory_Items | Tagging of Textblocks (Notes) and Mandatory Items]] <br> | |||
{{WeitereInhalte}} | |||
[[Kategorie:Word_Inhalte-veröffentlichen-toolsxbrl-Using_toolsxbrl]] | |||
Aktuelle Version vom 1. Februar 2024, 15:29 Uhr
Open a document
To open a document with toolsxbrl there are two different ways:
- Click on the "*Publish" ribbon in firesys in Word and click on "Prepare Document" in the "XBRL Export" group or.
- Click on "File" and "Open" in the toolsxbrl menu and select the desired Word document.
A dialogue will then appear showing you all the configuration settings of your currently open XBRL document.
Configuration Wizard
When you start toolsxbrl, the Configuration Wizard is displayed. It checks the validity of the license or helps you to activate it when used for the very first time. In addition, it helps to load a document and the current taxonomy version and it checks the document settings.

Load Document
Click on Load Document in the Configuration Wizard. Alternatively, you can load the document without the Configuration Wizard: click on File in the main toolsxbrl window → Open... → Then select the desired file. Either way, after confirming your selection, the Document Settings dialog will appear, where you can set the Default Settings, the Advanced Settings, and the Package Settings. You can find below and explanation on how to adjust the different Document Settings.

Document Settings
Default Settings Dialog

This dialog configures the default settings for each tagged value as well as the whole report.
- Company name: Short company name, which will be part of the reporting entity URL. Please write the name without spaces or special characters in lower case letters. This name will be used as file name, when extensions are created.
- Extension prefix: Prefix for the taxonomy extensions. Please note, that only Basic Latin Unicode Elements will be added to the Extension prefix. Characters like Ä, Ü or Ø cannot be added and have to be manually replaced.
- Reporting Entity Identifier: The ID of the reporting entity regarding the Context Identifier Schema. You can look up LEI by clicking on the "Lookup LEI" button. In the opening window you can modify the search query and look up again.
- Reporting Entity URL: Is generated automatically and includes the value from "Company name" added above. Please write the URL without spaces or special characters in lower case letters.
- Reporting Period Start/End Date: Start and end date of the reporting period
- Roll Forward: toolsxbrl usually detects changes in table headers during a roll forward and adjusts the mapping periods accordingly. For tables that don't have the date explicitly in the header, for example Statement of Changes in Equity, this option moves the mapping periods forward according to the date set in the document settings. Just click the button once and click on OK for a roll forward. This option will not be executed by default, only if clicked.
![]()
- Report Language: The language of the report. It changes number format and date format representation.
- Report Default Monetary Currency (ISO): Select the currency of the report.
- Report Default Monetary Number Scale: Sets the default scale for all numbers unless stated otherwise in the respective table or individual value. There are four options available: none, thousand, million and billion.
- Sample Date Format Representation: Changes automatically, depending on the report language selected above.
- Create Taxonomy Extensions: Allow this feature if you plan to add your specific company extentions to the taxonomy.
- Tagging
- Auto SignLogic: If "True" is selected, toolsxbrl will automatically assign the best SignLogic based on an algorithm. If "False" all SignLogic is set to None.
- Create tag for tagged tables: if "True" is selected, toolsxbrl will allow to include HTML tags automatically. This, however, only applies to PDF files.
- Preferred Transformation Registry Version: Select the transformation registry for value conversion.
- References to Check: Allows to select the references for text block tagging the validation checks against.
- Taxonomy
- Label Handling Option:
- Extension Label Only: use the labels from the Taxonomy and only create your own labels for the extensions you created.
- Standard Role with Priority: uses standard labels for all elements and overwrites taxonomy labels. We do not recommend to use this.
- Verbose Role: use the specific labels from your report for both, the labels from the Taxonomy and your Extensions. You have the label role Verbose for new labels for existing elements and the label role Standard for Extensions.
- Notes and Mandatory Items Role Name: Change the name for the role (e.g. if the report language is not English).
- Use Taxonomy Table Order: Usually the table order in the extension taxonomy should resemble the order of tables in the actual report. In some jurisdictions or auditors' opinions it has to exactly resemble the order in the original taxonomy. To achieve this just enable this option.
- Label Handling Option:
- Tool
- Enable Information: Information level messages will also be shown.
- Hide Note Columns: Option to hide the note column in the tables (optional, may not work if the header of the notes column is not "Note").
- Use Hidden Elements: Option to show a tab where hidden items can be tagged.
- Settings
- Context Identifier: The ID of the reporting entity regarding the Context Identifier Schema, e.g. LEI.
- Context Identifier Schema: Specified by the supervising authority, e.g. http://standards.iso.org/iso/17442 if LEI codes are used.
- Period Start/Instant/End Date: The default period for all tagged values. If the tagged element is defined as instant rather than duration, the end date will be used (the same as in the Default Settings tab; changed automatically).
- Fact Settings
- Default Monetary Decimals: Defines the accuracy of the tagged element if it is a monetary value. A value of -3 states that the tagged value is accurate three places before (-) the decimal separator (thousands); changes automatically, when monetary number scale is selected in the "Default Settings" tab.
- Default Percentage Decimals: Defines the accuracy of the tagged element if it is a percentage value. A value of 4 states that the tagged value is accurate four places after the decimal separator (e.g. 0.2355).
- Apply maximum allowed monetary decimals: If the supervising authority is the EIOPA, this checkbox automatically sets the maximum allowed decimals per value.
- Default Monetary Unit: Sets the default monetary unit for all monetary values unless stated otherwise in the respective or individual value (changes automatically, depending on the monetary currency selected in the Default Settings tab).
- Inline XBRL Settings
- Report Language: Defines the language of the Report (e.g. DE, EN). Changes automatically depending on the report language selected in the Default Settings tab.
- Default Scale: Sets the default scale for all numbers unless stated otherwise in the respective table or individual value. The scale indicates the number of digits to be added to a value to represent its real number. For example: If values are stated in millions 450 with a scale of 6 would represent 450 000 000. Changes automatically, when monetary number scale is selected in the Default Settings tab.
- Default Date Format: If the tagged value represents a date, the format specifies the exact format of that date.
- Default Monetary Format: If the tagged value represents a monetary value, the format specifies the exact format of that value.
- Taxonomy Extension Settings
- Create Taxonomy Extension: If the checkbox is activated, taxonomy extensions will be created. It changes automatically, when one of the Taxonomy Extension options is selected in the Default Settings tab.
- Namespace Prefix: The company name, which will be part of the reporting entity URL. Changes automatically depending on the Reporting Entity Ticket Symbol/Name in the Default Settings tab.
- Target Namespace: It is the same as the Reporting Entity URL in the Default Settings tab.
- XBRL Generator Settings
- Embed XML Document Type to the output document: is a requirement in some countries. In Germany, it is currently not applicable, so it can be left deactivated.
- Taxonomy package name: Displays the taxonomy package name (generated automatically). It includes the reporting entity name and reporting period end date selected in Default Settings.
- Taxonomy package description: A brief description of the taxonomy package.
- Taxonomy package version: Reporting period end date selected in the Default Settings.
- Publisher: Displays the reporting entity name provided in the Default Settings tab.
- Publisher URL: Displays the reporting entity URL provided in the Default Settings tab.
- Publisher Country: The country, depending on the selected report language. Please use two uppercase letters, like DE, EN, FR.
- Publication Date: Taxonomy creation date or the report publication date.
- Use LEI code for file name: in some countries LEI should be used for the ESEF package name instead of a company name.
- The "Advanced Properties" dialog opens the configuration of parameters in the external Json files. This dialog should be used only for support cases, where the user needs specific parameters for their document.
- To get started just load the report and the ESEF taxonomy.
- Then click on XBRL → Open/Load Additional Taxonomy
- In the taxonomy selection window just add the entry point of the additional taxonomy, for example: http://archprod.service.eogs.dk/taxonomy/20201001/entryDanishGAAPExcludingBalanceSheetIncomeStatementIncludingManagementsReview20201001.xsd
- If you click on XBRL → Manage Additional Taxonomies, you will see the Taxonomy that has been added.
- If you generate a result document, the tags of each taxonomy will be validated according to the validations that are part of the source taxonomy. You will also find two XBRL instances in the reports folder, one for each target.
Advanced Settings Dialog
This dialog configures the advanced settings for the report. Some of the fields are pre-populated, depending on the settings in the "Default Settings" dialog.
Package Settings Dialog
This dialog configures the package settings for the current report. The dialogue fields are pre-populated, depending on the selected document settings.

After the document has been loaded, the available chapters and tables can be selected from the respective dropdown menu. Furthermore, a chapter tree is available in the displayed tabs.
Report Settings can also be opened and changed after the file is loaded. To do so, click on Document → Settings or on the Settings Icon.
 .
.
]]
Open/Load Taxonomy
Now that the document is loaded and the Document Settings are adjusted, a taxonomy for tagging the values needs to be selected and loaded, if not previously done in the Configuration Wizard.
Taxonomies are defined by entry points in the format of URIs. The entry point references a collection of schema files which determine the available elements to be used for tagging.
To open a taxonomy click on XBRL → Open/Load Taxonomy. toolsxbrl offers a selection of base taxonomies to load. You can view these taxonomies by clicking the drop down arrow. Once you have selected the desired taxonomy, click on "Load". If you need to report ESEF, but want to load another taxonomy, click "Load Taxonomy Package".
Once you click "Load Taxonomy Package", another dialog opens: insert the entry point URI of the desired taxonomy into the first text field, then click open. The desired taxonomy will be loaded.
Continue reading about XBRL Taxonomies here or get started to tag your report here.
Change Taxonomy Language
To change the taxonomy language, go to "Settings→ Change Taxonomy Language" and select one of the available languages:
Multi-Taxonomy Tagging
In some jurisdictions (for example Denmark) the local authorities require ESEF reports not only to be tagged with elements from the ESEF-taxonomy, but also with additional elements from a local taxonomy. The taxonomy extension is still only being done on the ESEF-taxonomy, but the report itself contains tags from more than one entry-point. These multi-taxonomy-requirements might become more common in the future. toolsxbrl supports the tagging of reports with two or more taxonomies.

Overview of toolsxbrl
Everything is set up for tagging values and notes in a document. In the screenshot below the different areas of toolsxbrl are highlighted.
Siehe auch
 Using toolsxbrl
 Tagging of Tables
Tagging of Textblocks (Notes) and Mandatory Items
Weitere Inhalte
→ Webseite
→ Kundenbereich
→ YouTube


