Settings in Excel – set highlighting: Unterschied zwischen den Versionen
Zur Navigation springen
Zur Suche springen
(Die Seite wurde neu angelegt: „== Highlight the following changes made by the translator == Datei:Excel_Einstellungen_Hervorhebung-setzen.jpg|mini|upright=2.0|The view of highlighting sett…“) |
Keine Bearbeitungszusammenfassung |
||
| Zeile 25: | Zeile 25: | ||
{{MoreContent}} | {{MoreContent}} | ||
[[Kategorie: | [[Kategorie:The firesys basic functions-Einstellungen in Excel]] | ||
Version vom 16. Dezember 2019, 08:53 Uhr
Highlight the following changes made by the translator
TBD
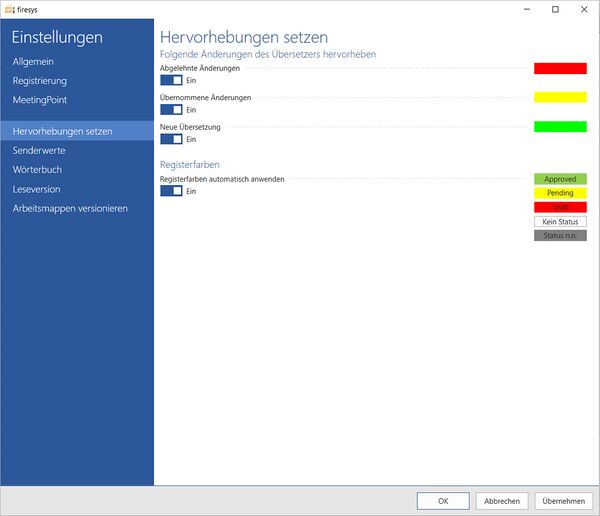
Here you will find options that will support you visually when working with a translator (see Import and export translations). Select whether you want to highlight the below-listed cases in colour. TBD
- Highlight rejected translation in red
- Highlight accepted translation in yellow
- Highlight new translation in green
Tab colours
Automatically apply tab colours
Individual worksheets can be assigned a status with toolsvalidation (see Set status). Activate this function to highlight the status in colour.
- If you have already defined a status on your worksheets, all tabs will be highlighted in colour with the next assigned status.
- If you have already defined a status on your worksheets, you can select “Set tab colours” under “Update” in the “StatusCockpit” group on the “Status” ribbon, in order to highlight all tabs in colour.
See also
![]() The setting menus in firesys
The setting menus in firesys
![]() The firesys settings in Excel
The firesys settings in Excel
![]() The MeetingPoint settings in firesys
The MeetingPoint settings in firesys
![]() The transmitter settings in Excel
The transmitter settings in Excel
