Import and export translations
You can provide your translator with the dictionary for editing. At the same time, you can contin-ue working on your Excel file while the translator is using the dictionary.
<imagemap>Image:EN_Excel_Menüband_Übersetzung_Export&Import.jpg|1200px|center
rect 3 80 208 194 The_basic_functions_of_firesys
rect 214 82 296 196 The_translation_manager
rect 299 79 569 195 The_dictionaries_in_firesys
rect 571 78 818 196 The_synopses_worksheet_and_hits
rect 825 78 984 196 Import_and_export_translations
rect 990 77 1202 193 Additional_export_functions
desc none
</imagemap>
Your translator can translate the terms and then send the document back to you. You can import the translations with a click. languagewords matches the translations to the correct terms, even if the dictionary has been sorted or new terms have been added in the meantime. When exporting, a new Excel file with a single worksheet is created, which contains all of the terms in your tables but no numbers.
Good to know
| |
|---|---|
Since the export file for the translator does not contain any numbers, a high level of confidentiality is ensured. |
Export dictionary for the translator
 The standard export
To export the dictionary for your translator, proceed as follows:
- On the “*Translation” tab in the “Translation” group, click “Export for translator”.
- The export dialogue will open.
- Select “Standard” and click “OK”.
- A new Excel file with the worksheet “Synopsis_Tr” is created. It contains the languages that are configured in “Visible languages” (see “Dictionary” on page 149TBD), missing translations are left out.
- Save the Excel file under the name of your choice and send it to your translator.
 The SDL Trados Studio-Export
To export the dictionary for your translator, proceed as follows:
- On the “*Translation” tab in the “Translation” group, click “Export for translator”.
- The export dialogue will open.
- Select “SDL Trados Studio”.
- Decide which sub-languages should be exported and select them. Confirm the dialogue with “OK”.
- A new Excel file with the worksheet “Synopsis_Tr” is created. It contains the languages that were configured in the previous dialogue, missing translations are left out.
- Save the Excel file under the name of your choice and send it to your translator.
Options
Select this option to export only those terms for which there is no translation.
Importing the translated dictionary
To import the completed translation, please proceed as follows:
- Ensure that both your Excel file and the returned dictionary from your translator are open.
- In your Excel file on the “*Translation” tab in the “*Translation” group, click “Import translation”. The translated dictionary is automatically recognized and the import is prepared.
- If colour highlighting is activated in the settings (see “Dictionary Settings“ on page 137TBD), you will receive a note saying that the existing background colours of the translations in the dictionary will be removed. Confirm with “yes” to continue.
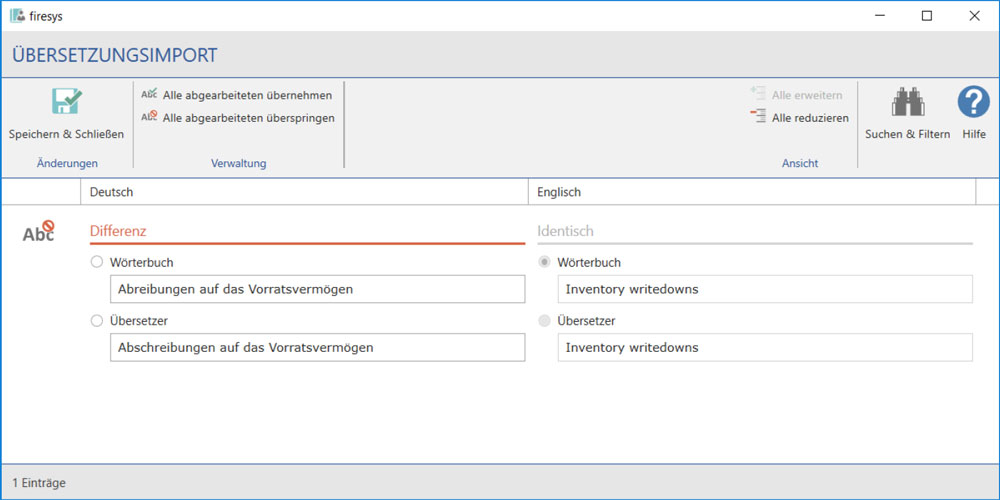
The translations that are perfectly allocated without deviations are added to your dictionary (green highlighting); if there are any deviations, “Translation import” will open:
In this dialogue, each column represents a language. Colours indicate the respective status in comparison to the cell content between the dictionary and the translator:
Grey / Identical: There are no deviations between the imported data and the dictionary entry: No action required
Green / No problems: The content of the cell in the original is empty and the translation could be added with no problems: No action required
Red / Difference: There is a difference between the dictionary entry and the translator’s term in this cell. Select:
- “Dictionary” to keep the term in your dictionary (highlighted in red in the dictionary)
- “Translator” to accept the translator’s suggestion (highlighted in yellow in the dictionary)
- After selecting, you can click “Accept term” to import the term
- After selecting, you can click “Reject term” to ignore the term
- If you wish, you can also save or skip all selections in the “Administration” area.
- Clicking “Save & close” saves all settings and closes the dialogue.
Open last imported workbook
Opens the most recently imported Excel file from the translator.
See also
![]() The translation basic functions in Excel
The translation basic functions in Excel
![]() An overview of the translation manager functions
An overview of the translation manager functions
![]() An overview of the firesys dictionaries
An overview of the firesys dictionaries
![]() The translation basic functions
The translation basic functions
![]() Import and export translations
Import and export translations
![]() The translation export functions in Excel
The translation export functions in Excel
