Configure roll forward
When you work with firesys, you should ideally be able to work on your business reports on a long-term basis, and in doing so, prepare your report for the next quarter or financial year. The “roll forward” function can support you with this. You can use it to automatically transfer values that are located in one column in an Excel workbook to a different column after the setup process.
The roll forward function
In the “*Content” menu ribbon, the "Roll forward" group contains all functions that you need for setting up and executing the roll forward function. The central working environment is the roll forward work area. You open and close the work area by clicking on the “Work area” button.
Task pane „Configure “
 Changes
![]() Save and close
Save and close
Saves the changes and closes the roll forward task pane.
 Columns
![]() Display columns
Display columns
Marks on the worksheet all columns defined for roll forward.
![]() Add column
Add column
The selected column will be added to the configuration.
![]() Change column
Change column
Replaces the column selected in the list with the selected column on the worksheet.
![]() Remove column
Remove column
Removes the column from the configuration.
![]() Move column up
Move column up
Moves the selected column into the future.
![]() Move column down
Move column down
Moves the selected column into the past.
 Groups
![]() Create group
Create group
Creates a group for roll forward at the selected location.
![]() Disband group
Disband group
Detaches the roll forward group at the selected location.
 Other
Other
Worksheet
Displays the title of the currently selected worksheet.
Account group
If you have not yet assigned an account group to a worksheet for which you want to use the "Roll forward" function, the "Account group" drop-down list will have the entry "No account group".
Only after you make a click in the field and the dropdown list opens, the MeetingPoint is accessed and all available account groups are displayed in the dropdown list.
Direction
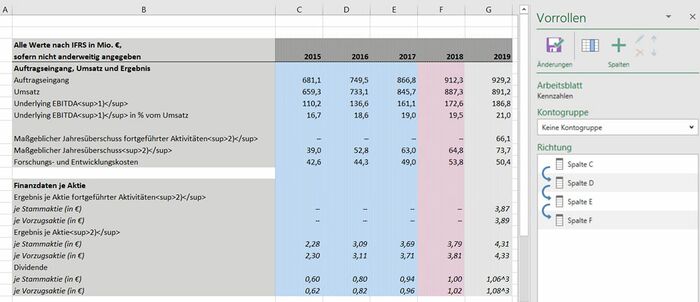
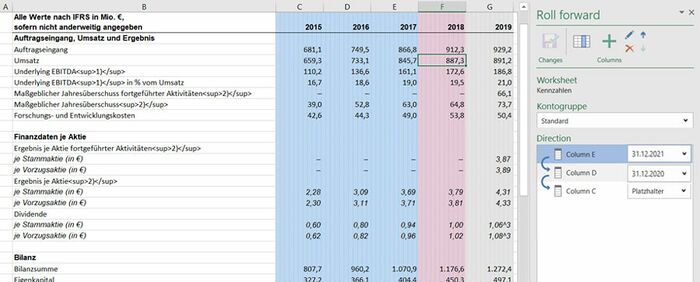
Shows an overview of the direction in which the selected columns are rolled forward. Furthermore, the key dates for the roll forward can be selected here via drop-down list.
Video: Prepare a new or existing table for roll forward
Setting up the roll forward function
-
Open the worksheet containing the table that should be set up for using the “roll forward” function.
-
In the *Content“ menu ribbon, in the “Roll forward” group, click on the upper part of the “Work area” split button.
→the “Roll forward” work area opens. -
Use the mouse to navigate to the table column in which the values from a different column should be rolled forward. Then click on the green “Add” icon in the “Columns” group in the “Roll forward” work area.
→The selected column is now displayed in the list area. -
Navigate with the mouse to the table column from which values should be rolled forward in a different column. Then click on the green “Add” icon in the “Columns” group in the “Roll forward” work area.
→ The list area now also displays the selected column - and a blue arrow points in the direction of the values to be rolled forward. -
Then click on the “Save” icon in the “Changes” group in the “Roll forward” work area.
→ The work area closes automatically.
Executing the “Roll forward” function
-
In the “*Content” menu ribbon, in the “Roll forward” group, click on the “Execute” button.
→ A dialogue opens. -
displaying information about the last successful “roll forward” process and optionally enables you to specify a free text that is used in the “roll forward” history. Before executing the “roll forward” process, if you want to obtain information about which worksheets are being rolled forward, click on the “Status update“ button.
-
Clicking on “Start” starts the “roll forward” process.
Note: Any changes that were not saved must be saved beforehand – furthermore, firesys creates a backup copy of your workbook which you must also consent to.
→ Your workbook is rolled forward.
Video: Roll forward with multiple same key dates
How to prepare the roll forward of a table with several equal key dates:
-
In Excel, click the "Configure" button in the "*Content" ribbon in the "Roll forwards" group.
→ The "Roll forwards" task pane opens on the right-hand side. -
In the task pane, under "Account group", select the account group for which the values exist.
-
Select one cell at a time in the columns you want to roll forward and click the green "Add" plus in the "Columns" group in the "Roll Forward" task pane.
→ The selected columns will be displayed in the list area. A blue arrow indicates in which direction is rolled forward. -
Assign the appropriate key date to each column in the list area on the right.
-
To configure groups for roll forward, select the last element of the group you want to create and click the left icon "Create group" in the "Roll forward" task pane in the "Groups" group.
→ A separation will now appear below the selected line so that the blue arrows are interrupted at this point. -
Click the "Save" icon in the "Changes" group in the "Roll forwards" task pane to save the defined groups and automatically close the task pane.
→ The task pane is closed automatically.
Key date-independent and key date-dependent worksheets
In general, we distinguish between a key date independent and a key date dependent worksheet when rolling forward.
These different value types are divided into the so-called key date-dependent and key date-independent worksheets with the following assignment:
| Key date independent worksheets | Key date dependent worksheets |
|---|---|
| Values inserted manually | Account values |
| Formula cells (references/firesys formulas) | Account calculations, account aggregates |
| References in the workbook | |
| Transmitter values | |
| Manual values |
Key date independent worksheet
A key date independent worksheet is defined by inserting only values that have been
- were inserted manually
- contain local references
- contain references in the document
- contain Transmitter values or Manual values from the MeetingPoint
Key date dependent worksheet
A key date dependent worksheet is defined by inserting account values, or account calculations or account aggregates from the MeetingPoint in addition to the types of values listed under "Key date independent worksheet".
Definition
| |
|---|---|
The "roll forward" of worksheets can only be executed for key date-dependent worksheets if
|
Good to know
| |
|---|---|
The key dates used for the table columns to be rolled forward for account values, account calculations or aggregates must be sorted chronologically in ascending order. |
The placeholder function in the "Roll forward" task pane
In order to be able to roll forward a table that contains key date-dependent account values with key date-independent values (that are not stored in MeetingPoint), so-called placeholders are used for the key date-independent values. These are used if no account values are stored in a column, but the column is to be rolled forward anyway.
To do this, assign the key date "Placeholder" to the column without account values in the "Roll forward" task pane. Assign the corresponding key date to the columns with account values.
In this way, you can roll forward worksheets that contain two different types of values.
Video: Prepare a new or existing table containing key date-dependent values for roll forward.
Setting up the roll forward function
-
Open the worksheet containing the table that should be set up for using the “roll forward” function.
-
In the “*Content” menu ribbon, in the “Roll forward” group, click on the upper part of the “Work area” split area to open the “Roll forward” work area.
-
In the “Account group” drop-down menu, select the account group from which the account values or calculations originate that are located in the column to be rolled forward.
-
Use the mouse to navigate to the table column from which the values should be rolled forward in a different column. Then click on the green “Add” icon in the “Columns” group in the “Roll forward” work area.
→ The selected column is now displayed in the list area. -
In the “Roll forward” work area in the list area, select the entry that you previously created and assign the correct key date to the entry in the drop-down menu.
-
Use the mouse to navigate to the table column in which the values from a different column should be rolled forward. Then click on the green “Add” icon in the “Columns” group in the “Roll forward” work area.
→ The list area now also displays the selected column – and a blue arrow displays the direction of the values to be rolled forward. -
In the “Roll forward” work area in the list area, select the previously created entry and assign the correct key date to the entry in the drop-down menu.
-
Then click on the “Save” icon in the “Changes” group in the “Roll forward” work area.
→ the work area closes automatically.
Executing the “Roll forward” function
-
In the “*Content” menu ribbon, in the “Roll forward” group, click on the “Execute” button.
→ A dialogue opens that displays information about the last successful “roll forward” process and optionally enables you to enter a free text which is transferred to the “Roll forward” history. -
In the “Key dates” area in the list view, check the information that is listed for the individual “roll forward” operations to see whether the key date to be rolled forward is always correct.
-
Before executing the “roll forward” process, if you want to obtain information about which worksheets are being rolled forward, click on the “Status update” button.
-
Clicking on “Start” starts the “roll forward” process.
Note: Any changes that were not saved must be saved beforehand – furthermore, firesys creates a backup copy of your workbook which you must also consent to.
→ Your workbook is rolled forward.
Video: Edit a table that has already been rolled forward
Processing the roll forward function
-
Open the worksheet containing the table with already defined roll columns.
-
In the “*Content” menu ribbon, in the “Roll forward” group, click on the upper part of the “Work area” split area to open the “Roll forward” work area. You will find an overview of the roll columns that were already defined in the “Roll forward” work area in the list view in the “Direction” group. You can tell the direction from the blue arrow.
-
The “Columns” group contains the following functions:
-
 Display columns:
 -
 Add column:
 -
 Change column:
 -
 Remove column:
 -
 /
/  Move column up/down:
 -
Once you have made your changes, then click on the “Save” icon in the “Changes” group in the “Roll forward” work area.
→ the work area closes automatically.
See also
![]() Insert values in Excel
Insert values in Excel
![]() Rolling forward case studies
Rolling forward case studies


