Rolling forward case studies
When you use the “roll forward” function in firesys, various statuses can exist when you execute it. Users have to take various actions so they can work with the different combinations.
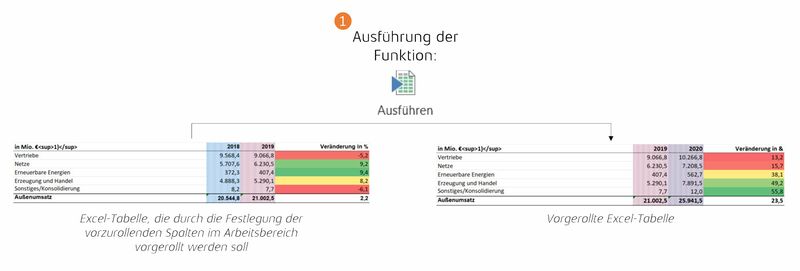
The "Roll forward" function is a tool with which you can continue to use values that are located in tables. Thus, the values can be used as a starting value for a following quarter, or fiscal year. The values can be inserted by manual entries, by local references or cross-file, by the connection to the MeetingPoint. When the "Roll forward" function is executed, all worksheets for which roll columns have been defined are rolled forward. It is not possible to roll forward individual worksheets. → For a detailed description
Before the "Roll forward" function can be executed, all unsaved changes must first be saved - and it must be ensured that the content and structural consistency of your data is given. This check is performed automatically by firesys. If content or structural problems occur, these must first be detached before the function can be executed. In addition, a key date must exist for the current year in order to be able to roll forward the worksheets. This can be created using Data import or the "Copy key date" function in the Master value manager.
General information about rolling forward
→ Go to the detailed description
The “roll forward” function is a tool with which you can continue using values that are located in tables. In this way, you can use the values as the initial value for a subsequent quarter or financial year. The values can be inserted by means of manual entries, local references or cross-file data through the connection to the MeetingPoint.
Definition
| |
|---|---|
When the “roll forward” function is executed, all worksheets that were defined for the roll columns are rolled forward. You cannot roll forward individual worksheets. |
Before the “roll forward” function can be executed, all changes that were not saved must first be saved - and the content-related and structural consistency of your data must be ensured. firesys performs this check automatically. If any content-related or structural problems occur, they must be resolved before the function can be executed.
Good to know
| |
|---|---|
So that the “roll forward” function can be executed, firesys also automatically executes the “synchronise values” function to ensure the integrity of your data. |
Execute the “roll forward” function
After you have prepared your workbook in the "Pre-roll" task pane, you can use the "Start" function in the "*Content" ribbon in the "Pre-roll" group to perform the roll forward.
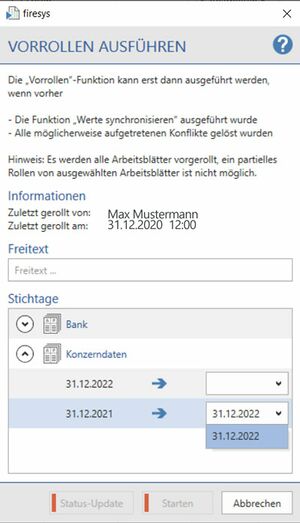
When you click on the button, the “roll forward” operations that you defined are checked for integrity. Provided that no content-related or structural problems occur, the “roll forward” function is executed automatically. Otherwise, the following dialogue box is displayed:
Here you can subsequently enter the missing key dates in the list area under “Key dates”. You can then use the “Status update” function to check whether the key dates that were assigned are correct. Click on the “Start” button to start the “roll forward” process.
Good to know
| |
|---|---|
The workbook must always be saved before the “roll forward” process can be started. |
Video: Prepare a new or existing table for rolling forward
Setting up the roll forward function
-
Open the worksheet containing the table that should be set up for using the “roll forward” function.
-
In the *Content“ menu ribbon, in the “Roll forward” group, click on the upper part of the “Work area” split button.
→the “Roll forward” work area opens. -
Use the mouse to navigate to the table column in which the values from a different column should be rolled forward. Then click on the green “Add” icon in the “Columns” group in the “Roll forward” work area.
→The selected column is now displayed in the list area. -
Navigate with the mouse to the table column from which values should be rolled forward in a different column. Then click on the green “Add” icon in the “Columns” group in the “Roll forward” work area.
→ The list area now also displays the selected column - and a blue arrow points in the direction of the values to be rolled forward. -
Then click on the “Save” icon in the “Changes” group in the “Roll forward” work area.
→ The work area closes automatically.
Executing the “Roll forward” function
-
In the “*Content” menu ribbon, in the “Roll forward” group, click on the “Execute” button.
→ A dialogue opens. -
displaying information about the last successful “roll forward” process and optionally enables you to specify a free text that is used in the “roll forward” history. Before executing the “roll forward” process, if you want to obtain information about which worksheets are being rolled forward, click on the “Status update“ button.
-
Clicking on “Start” starts the “roll forward” process.
Note: Any changes that were not saved must be saved beforehand – furthermore, firesys creates a backup copy of your workbook which you must also consent to.
→ Your workbook is rolled forward.
Video: Prepare a new or existing table that contains values that are dependent on key dates for rolling forward
Setting up the roll forward function
-
Open the worksheet containing the table that should be set up for using the “roll forward” function.
-
In the “*Content” menu ribbon, in the “Roll forward” group, click on the upper part of the “Work area” split area to open the “Roll forward” work area.
-
In the “Account group” drop-down menu, select the account group from which the account values or calculations originate that are located in the column to be rolled forward.
-
Use the mouse to navigate to the table column from which the values should be rolled forward in a different column. Then click on the green “Add” icon in the “Columns” group in the “Roll forward” work area.
→ The selected column is now displayed in the list area. -
In the “Roll forward” work area in the list area, select the entry that you previously created and assign the correct key date to the entry in the drop-down menu.
-
Use the mouse to navigate to the table column in which the values from a different column should be rolled forward. Then click on the green “Add” icon in the “Columns” group in the “Roll forward” work area.
→ The list area now also displays the selected column – and a blue arrow displays the direction of the values to be rolled forward. -
In the “Roll forward” work area in the list area, select the previously created entry and assign the correct key date to the entry in the drop-down menu.
-
Then click on the “Save” icon in the “Changes” group in the “Roll forward” work area.
→ the work area closes automatically.
Executing the “Roll forward” function
-
In the “*Content” menu ribbon, in the “Roll forward” group, click on the “Execute” button.
→ A dialogue opens that displays information about the last successful “roll forward” process and optionally enables you to enter a free text which is transferred to the “Roll forward” history. -
In the “Key dates” area in the list view, check the information that is listed for the individual “roll forward” operations to see whether the key date to be rolled forward is always correct.
-
Before executing the “roll forward” process, if you want to obtain information about which worksheets are being rolled forward, click on the “Status update” button.
-
Clicking on “Start” starts the “roll forward” process.
Note: Any changes that were not saved must be saved beforehand – furthermore, firesys creates a backup copy of your workbook which you must also consent to.
→ Your workbook is rolled forward.
Video: Edit a table that was rolled forward already
Processing the roll forward function
-
Open the worksheet containing the table with already defined roll columns.
-
In the “*Content” menu ribbon, in the “Roll forward” group, click on the upper part of the “Work area” split area to open the “Roll forward” work area. You will find an overview of the roll columns that were already defined in the “Roll forward” work area in the list view in the “Direction” group. You can tell the direction from the blue arrow.
-
The “Columns” group contains the following functions:
-
 Display columns:
 -
 Add column:
 -
 Change column:
 -
 Remove column:
 -
 /
/  Move column up/down:
 -
Once you have made your changes, then click on the “Save” icon in the “Changes” group in the “Roll forward” work area.
→ the work area closes automatically.
See also
![]() An overview of the rolling forward function
An overview of the rolling forward function
![]() General information about the roll forward function
General information about the roll forward function
![]() Rolling forward values from the MeetingPoint
Rolling forward values from the MeetingPoint


