The account workbook
Use the firesys account workbook to integrate data from your consolidation software easily into firesys and to validate it across several files. The account workbook is a convenient way of making a large amount of data to be validated available to all firesys users in the MeetingPoint. Based on an Excel file, it is easy to link data from the consolidation system with the firesys world.
Create an account workbook
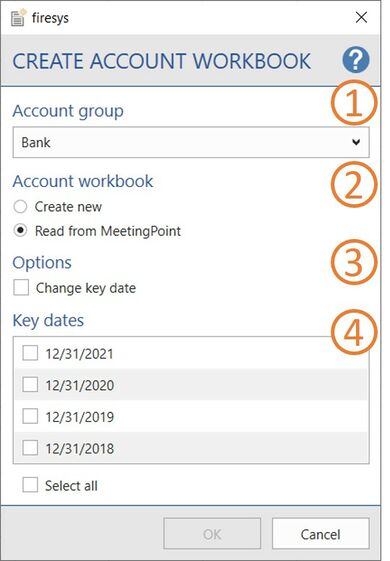
In the “*Validation” ribbon, in the “Cross-file validation” group, create an account workbook by using the “Create account workbook” function. The following dialog appears:
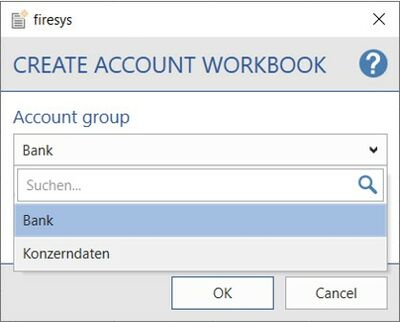
 Account group
In the drop-down menu you see all account groups that were created previously in the master value manager.
 Account workbook
Video: Create new
Here you can select whether additional account values should be assigned to the previously selected account group. If you confirm this selection with “OK”, a new Excel document opens with an empty account workbook.
How to create an account value:
-
Open an Excel workbook and activate firesys.
Note: A prerequisite is that a compatible MeetingPoint was already connected. -
In the “*Content” menu ribbon, in the “Master values” group,
→ open the master value manager. -
In the “Management” group, click on the “Add” button.
→ A selection dialogue box opens. -
Select the “Account group” option and in the input dialogue box that opens, enter the name you require.
-
Then close the master value manager and in the “Account workbook” group, click on the “Create” button.
→ This opens a dialogue box -
which you can select the account workbook to which the account values should be written, and also whether you want to create a new account workbook or load an existing one from the MeetingPoint.
-
This opens a new Excel worksheet in which you can define the components of the individual account values.
-
By using the “Transfer” function (in the “Account workbook” group), you can transfer all of the account values that exist in the account workbook into the MeetingPoint.
→ You have created an account value.
Read out from MeetingPoint
If you have selected an account workbook from the drop-down menu under “Account group” that already contains account values, you can activate the “Read out from MeetingPoint” function. The dialog expands to the maximum example shown on the right.
 Options
Change key date
You can select this option if you want to change a key date of an account value in the previously selected account group. If you confirm this selection with “OK”, an Excel document opens containing all entries of this account value. Here the entry in the “Key date” column is missing, which you can now enter. To apply this key date, in the “*Content” menu ribbon, in the “Data-Import” group, click on the “Transfer account workbook” button or “Status update” to check whether the changes made can be applied.
 Key dates
This list area displays all existing key dates from the account group that was selected beforehand in the drop-down menu. You can select the individual key dates or use the “Select all” function to select the entire list and then click on “OK” to open a new Excel document. This document displays the account values corresponding to the key dates that were previously selected. You can assign a new status, new values and/or free text to these account values. To apply these new contents, in the “*Content” menu ribbon, in the “Data-Import” group, click on the “Transfer account workbok” button or “Status update” to check whether the changes made can be applied.
Good to know
| |
|---|---|
Account values that were already applied to the MeetingPoint can be updated individually in the master value manager or else multiple values can be updated via a new account workbook. |
 Sort account workbook
You can sort the contents of your account workbooks at any time according to your individual preferences. firesys enables you to sort in ascending or descending order according to the examples shown on the right.
Good to know
| |
|---|---|
You can use the “Sort account workbook” and “Delete rows” functions only in an opened account workbook. |
 Delete rows
You can delete the contents of your account workbook. Select the rows you require in your account workbook and press “Delete rows”. Multiple selection is also possible here.
 Master value history
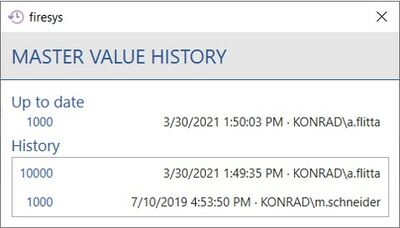
You can select a cell in your account workbook and use the “Master value history” function to display a history dialog. From the cell you selected, you see which numerical values this cell already contains. In additional, a change date and information is displayed about who made the changes.
Archive account values and restore them if necessary
→ Go to the main article on the master value manager
To archive a certain status of the account values, you can use the “Create archive workbook” in the central master manager.
 Transfer account workbook
In firesys you can use the “Transfer master values” function to transfer account/master values out of the account workbook to your MeetingPoint.
Good to know
| |
|---|---|
The “Working with master values” function can only be executed on an account workbook. |
Once you have created an account workbook, you can add contents. To do this, enter information in the “Account”/“Description”/“Key date” and “Value” fields. You can then click on the “Transfer master values” function to transfer all entries in the account workbook to the MeetingPoint. You have two different selection options here:
Status update
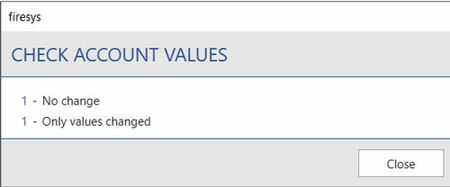
The software checks which changes were made in the MeetingPoint when the values that are currently located in the account workbook are transferred. You then see a result report showing which changes you can expect when you execute the “Transfer” function.
Transfer
The existing account/master values are transferred to the MeetingPoint.
Special features when handling special characters
When working with firesys you have to take into account that some special characters are automatically replaced during the file import as well as during the import of account workbooks. This information is stored in the MeetingPoint - and here it could come to structural difficulties with the below mentioned special characters:
| ASCII-Code | Special character |
|---|---|
| ALT + 033 | ! |
| ALT + 034 | " |
| ALT + 035 | # |
| ALT + 039 | ' |
| ALT + 042 | * |
| ALT + 047 | / |
| ALT + 058 | : |
| ALT + 060 | < |
| ALT + 062 | > |
| ALT + 063 | ? |
| ALT + 091 | [ |
| ALT + 092 | \ |
| ALT + 093 | ] |
| ALT + 0124 | | |
| ALT + 0132 | „ |
| ALT + 0147 | “ |
| ALT + 0148 | ” |
Additionally, the following characters (the so-called control characters) are removed:
| ASCII-Code | Description |
|---|---|
| ALT + 000 | The null character prompts the device to do nothing |
| ALT + 001 | Initiates a header (Start of Heading) |
| ALT + 002 | Ends the header and marks the beginning of a message. (start of text) |
| ALT + 003 | Indicates the end of the message (end of text) |
| ALT + 004 | Marks the end of a completes transmission (End of Transmission) |
| ALT + 005 | A request that requires a response (Enquiry) |
| ALT + 006 | Gives a positive answer to the request (Acknowledge) |
| ALT + 007 | Triggers a beep (Bell) |
| ALT + 008 | Lets the cursor move back one step (Backspace) |
| ALT + 009 | A horizontal tab that moves the cursor within a row to the next predefined position (Horizontal Tab) |
| ALT + 010 | Causes the cursor to jump to the next line (Line Feed) |
| ALT + 011 | The vertical tab lets the cursor jump to a predefined line (Vertical Tab) |
| ALT + 012 | Requests a page break (Form Feed) |
| ALT + 013 | Moves the cursor back to the first position of the line (Carriage Return) |
| ALT + 014 | Switches to a special presentation (Shift Out) |
| ALT + 015 | Switches the display back to the normal state (Shift In) |
| ALT + 016 | Changes the meaning of the following characters (Data Link Escape) |
| ALT + 017 | Control Character |
| ALT + 018 | Control Character |
| ALT + 019 | Control Character |
| ALT + 020 | Control Character |
| ALT + 021 | Negative response to a request (Negative Acknowledge) |
| ALT + 022 | Synchronizes a data transfer, even if no signals are transmitted (Synchronous Idle) |
| ALT + 023 | Marks the end of a transmission block (End of Transmission Block) |
| ALT + 024 | Makes it clear that a transmission was faulty and the data must be discarded (Cancel) |
| ALT + 025 | Indicates the end of the storage medium (End of Medium) |
| ALT + 026 | Replacement for a faulty sign (Substitute) |
| ALT + 027 | Initiates an escape sequence and thus gives the following characters a special meaning (Escape) |
| ALT + 028 | Marks the separation of logical data blocks and is hierarchically ordered: file as the largest unit, file as the smallest unit.(File Separator, Group Separator, Record Separator, Unit Separator) |
| ALT + 029 | Control Character |
| ALT + 030 | Control Character |
| ALT + 031 | Control Character |
See also
![]() Data import
Data import
![]() An overview of the data import manager
An overview of the data import manager


