Configure roll forward: Unterschied zwischen den Versionen
K (M.schneider verschob die Seite General information about the roll forward function nach Configure roll forward: Anpassung für 21.1.0) |
Keine Bearbeitungszusammenfassung |
||
| Zeile 11: | Zeile 11: | ||
In the “*Content” menu ribbon, the "Roll forward" group contains all functions that you need for setting up and executing the roll forward function. The central working environment is the roll forward work area. You open and close the work area by clicking on the “Work area” button. | In the “*Content” menu ribbon, the "Roll forward" group contains all functions that you need for setting up and executing the roll forward function. The central working environment is the roll forward work area. You open and close the work area by clicking on the “Work area” button. | ||
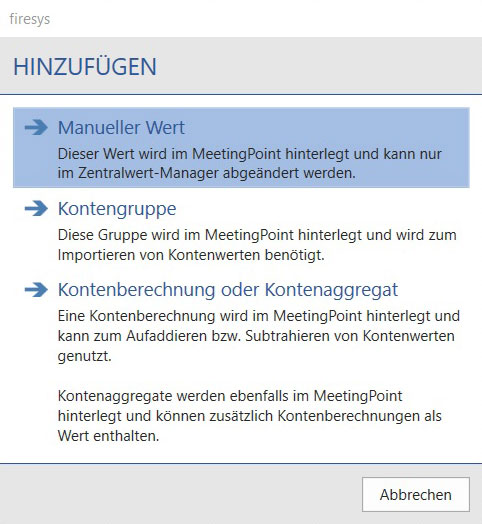
[[Datei: Excel Validierung Zentralwert-Manager Hinzufügen.jpg |mini|upright=2.0|Configure]] | |||
== Task pane „Configure “== | |||
=== [[File:Firesys Icons BubbleTransparent 1 white background.png|link=|24px]] Changes === | |||
<b>Save and close</b><br> | |||
Saves the changes and closes the roll forward task pane. | |||
=== [[File:Firesys Icons BubbleTransparent 2 white background.png|link=|24px]] Columns === | |||
<b>Display columns</b> <br> | |||
Marks on the worksheet all columns defined for roll forward.<br> | |||
<b>Add column</b><br> | |||
The selected column will be added to the configuration.<br> | |||
<b>Change column</b><br> | |||
Replaces the column selected in the list with the selected column on the worksheet.<br> | |||
<b>Remove column</b><br> | |||
Removes the column from the configuration.<br> | |||
<b>Move column up</b><br> | |||
Moves the selected column into the future.<br> | |||
<b>Move column down</b><br> | |||
Moves the selected column into the past.<br><br> | |||
=== [[File:Firesys Icons BubbleTransparent 3 white background.png|link=|24px]] Groups === | |||
<b> Create group </b><br> | |||
Creates a group for roll forward at the selected location. | |||
<b> Disband group </b><br> | |||
Detaches the roll forward group at the selected location. | |||
=== [[File:Firesys Icons BubbleTransparent 4 white background.png|link=|24px]] Worksheet === | |||
Displays the title of the currently selected worksheet. | |||
=== [[File:Firesys Icons BubbleTransparent 5 white background.png|link=|24px]] Account group === | |||
If you have not yet assigned an account group to a worksheet for which you want to use the "Roll forward" function, the "Account group" drop-down list will have the entry "No account group". | |||
Only after you make a click in the field and the dropdown list opens, the MeetingPoint is accessed and all available account groups are displayed in the dropdown list. | |||
=== [[File:Firesys Icons BubbleTransparent 6 white background.png|link=|24px]]Direction === | |||
Shows an overview of the direction in which the selected columns are rolled forward. | |||
== Video: Prepare a new or existing table for roll forward == | |||
{{Vorlage:Video-Tabellen_vorrollen}} | |||
==Key date-independent and key date-dependent worksheets== | |||
In general, we distinguish between a key date independent and a key date dependent worksheet when rolling forward. | |||
These different value types are divided into the so-called key date-dependent and key date-independent worksheets with the following assignment: | |||
{| class="wikitable" | |||
! style="text-align: center; font-weight:bold;" | Key date independent worksheets | |||
! style="font-weight:bold;" | Key date dependent worksheets | |||
|- | |||
| Values inserted manually | |||
| Account values | |||
|- | |||
| Formula cells (references/firesys formulas) | |||
| Account calculations, account aggregates | |||
|- | |||
| References in the workbook | |||
| | |||
|- | |||
| Transmitter values | |||
| | |||
|- | |||
| Manual values | |||
| | |||
|} | |||
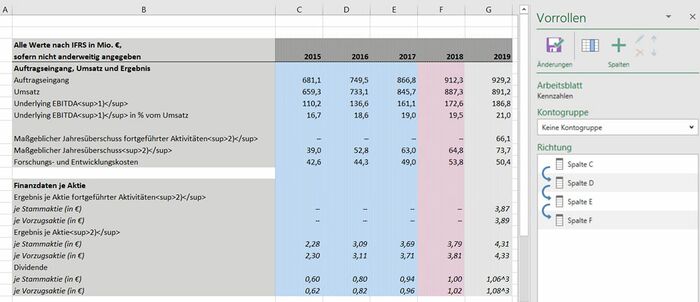
=== Key date independent worksheet === | |||
A key date independent worksheet is defined by inserting only values that have been | |||
* were inserted manually | |||
* contain local references | |||
* contain references in the document | |||
* contain Transmitter values or Manual values from the MeetingPoint | |||
[[Datei:Excel_Werte_einfügen_Stichtagunabhängig.jpg|center|700px]] | |||
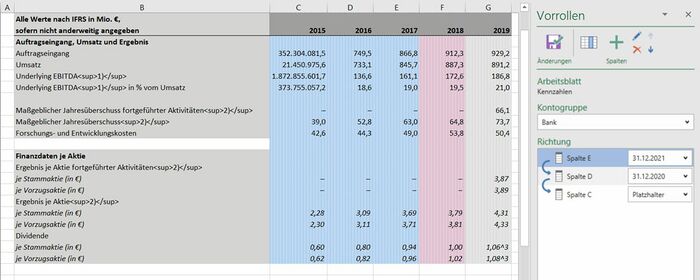
=== Key date dependent worksheet === | |||
A key date dependent worksheet is defined by inserting account values, or account calculations or account aggregates from the MeetingPoint in addition to the types of values listed under "Key date independent worksheet". | |||
[[Datei:Excel_Werte_einfügen_Stichtagabhängig.jpg|center|700px]] | |||
{{ | |||
Vorlage:Definition | |||
|Definition = The "roll forward" of worksheets can only be executed for key date-dependent worksheets if | |||
* An account group has been created in MeetingPoint. | |||
* At least two key dates exist in this account group | |||
}} | |||
{{ | |||
Vorlage:GoodtoKnow | |||
|Gutzuwissen = The key dates used for the table columns to be rolled forward for account values, account calculations or aggregates must be sorted chronologically in ascending order. | |||
}} | |||
== Video:Prepare a new or existing table containing key date-dependent values for roll forward. == | |||
{{Vorlage:Video-Tabelle vorrollen Zentralwerte}} | |||
== Edit a table that has already been rolled forward == | |||
{{Vorlage:Video-Vorgerollte Tabelle bearbeiten}} | |||
<!-- | |||
[[Datei:EN_Excel_Werte_einfügen_Schaubild7.jpg|center|800px]] | [[Datei:EN_Excel_Werte_einfügen_Schaubild7.jpg|center|800px]] | ||
| Zeile 99: | Zeile 226: | ||
[[Datei:EN_Excel_Werte_einfügen_Schaubild12.jpg|center|800px]] | [[Datei:EN_Excel_Werte_einfügen_Schaubild12.jpg|center|800px]] | ||
--> | |||
== See also == | == See also == | ||
Version vom 24. März 2021, 13:39 Uhr
When you work with firesys, you should ideally be able to work on your business reports on a long-term basis, and in doing so, prepare your report for the next quarter or financial year. The “roll forward” function can support you with this. You can use it to automatically transfer values that are located in one column in an Excel workbook to a different column after the setup process. You can use this master data to quickly and easily create a basis for additional reports.
<imagemap>Image:EN_Excel_Menüband_Inhalt_Vorrollen.jpg|1200px|center
desc none </imagemap>
The roll forward function
In the “*Content” menu ribbon, the "Roll forward" group contains all functions that you need for setting up and executing the roll forward function. The central working environment is the roll forward work area. You open and close the work area by clicking on the “Work area” button.
Task pane „Configure “
 Changes
Save and close
Saves the changes and closes the roll forward task pane.
 Columns
Display columns
Marks on the worksheet all columns defined for roll forward.
Add column
The selected column will be added to the configuration.
Change column
Replaces the column selected in the list with the selected column on the worksheet.
Remove column
Removes the column from the configuration.
Move column up
Moves the selected column into the future.
Move column down
Moves the selected column into the past.
 Groups
Create group
Creates a group for roll forward at the selected location.
Disband group
Detaches the roll forward group at the selected location.
 Worksheet
Displays the title of the currently selected worksheet.
 Account group
If you have not yet assigned an account group to a worksheet for which you want to use the "Roll forward" function, the "Account group" drop-down list will have the entry "No account group". Only after you make a click in the field and the dropdown list opens, the MeetingPoint is accessed and all available account groups are displayed in the dropdown list.
 Direction
Shows an overview of the direction in which the selected columns are rolled forward.
Video: Prepare a new or existing table for roll forward
Einrichtung der Vorrollen-Funktion
-
Öffnen Sie das Arbeitsblatt, das die Tabelle, die für die Verwendung mit der „Vorrollen“-Funktion eingerichtet werden soll, enthält.
-
Klicken Sie im Menüband „*Inhalt“ in der Gruppe „Vorollen“ auf den oberen Teil des Split-Buttons „Arbeitsbereich“.
→ Der „Vorrollen“-Arbeitsbereich öffnet sich. -
Navigieren Sie mit der Maus in die Tabellenspalte, in die Werte aus einer anderen Spalte vorgerollt werden sollen. Klicken Sie auf das grüne „Hinzufügen“-Symbol in der Gruppe „Spalten“ im „Vorrollen“-Arbeitsbereich.
→ Im Listenbereich wird Ihnen nun die ausgewählte Spalte angezeigt. -
Navigieren Sie mit der Maus in die Tabellenspalte, aus der Werte in eine anderen Spalte vorgerollt werden sollen. Klicken Sie auf das grüne „Hinzufügen“-Symbol in der Gruppe „Spalten“ im „Vorrollen“-Arbeitsbereich.
→ Im Listenbereich wird Ihnen nun ebenfalls die ausgewählte Spalte angezeigt - und ein blauer Richtungspfeil zeigt Ihnen die Richtung der vorzurollenden Werte an. -
Klicken Sie abschließend auf das „Speichern“-Symbol in der Gruppe „Änderungen“ im „Vorrollen“-Arbeitsbereich.
→ Der Arbeitsbereich wird automatisch geschlossen.
Das Ausführen der Funktion „Vorrollen“
-
Klicken Sie im Menüband „*Inhalt“ in der Gruppe „Vorrollen“ auf den Knopf „Ausführen“.
→ Ein Dialog öffnet sich. -
Der Dialog zeigt Ihnen Informationen zum letzten erfolgreichen „Vorrollen“-Vorgang an und ermöglicht optional, einen Freitext anzugeben, der in die „Vorrollen“-Historie übernommen wird. Möchten Sie vor dem Ausführen des „Vorrollen“-Vorgangs Informationen darüber erhalten, welche Arbeitsblätter vorgerollt werden, können Sie auf den Knopf „Statusupdate klicken“.
-
Mit einem Klick auf „Starten“ wird der „Vorrollen“-Vorgang gestartet.
Hinweis: Ungespeicherte Änderungen müssen vorher unbedingt gespeichert werden - und zusätzlich legt firesys eine Sicherheitskopie Ihrer Arbeitsmappe an, der Sie ebenfalls zustimmen müssen.
→ Ihre Arbeitsmappe wird vorgerollt.
Key date-independent and key date-dependent worksheets
In general, we distinguish between a key date independent and a key date dependent worksheet when rolling forward.
These different value types are divided into the so-called key date-dependent and key date-independent worksheets with the following assignment:
| Key date independent worksheets | Key date dependent worksheets |
|---|---|
| Values inserted manually | Account values |
| Formula cells (references/firesys formulas) | Account calculations, account aggregates |
| References in the workbook | |
| Transmitter values | |
| Manual values |
Key date independent worksheet
A key date independent worksheet is defined by inserting only values that have been
- were inserted manually
- contain local references
- contain references in the document
- contain Transmitter values or Manual values from the MeetingPoint
Key date dependent worksheet
A key date dependent worksheet is defined by inserting account values, or account calculations or account aggregates from the MeetingPoint in addition to the types of values listed under "Key date independent worksheet".
Definition
| |
|---|---|
The "roll forward" of worksheets can only be executed for key date-dependent worksheets if
|
Good to know
| |
|---|---|
The key dates used for the table columns to be rolled forward for account values, account calculations or aggregates must be sorted chronologically in ascending order. |
Video:Prepare a new or existing table containing key date-dependent values for roll forward.
Einrichtung der Vorrollen-Funktion
-
Öffnen Sie das Arbeitsblatt, das die Tabelle, die für die Verwendung mit der „Vorrollen“-Funktion eingerichtet werden soll, enthält.
-
Klicken Sie im Menüband „*Inhalt“ in der Gruppe „Vorollen“ auf den oberen Teil des Split-Buttons „Arbeitsbereich“. Der „Vorrollen“-Arbeitsbereich öffnet sich.
-
Wählen Sie im Drop-Down-Menü „Kontogruppe“ die betreffende Kontogruppe aus, aus der die Kontenwerte, bzw. -berechnungen stammen, die in sich in der vorzurollenden Spalte befinden.
-
Navigieren Sie mit der Maus in die Tabellenspalte, aus der die Werte in eine andere Spalte vorgerollt werden sollen. Klicken Sie auf das grüne „Hinzufügen“-Symbol in der Gruppe „Spalten“ im „Vorrollen“-Arbeitsbereich.
→ Im Listenbereich wird Ihnen nun die ausgewählte Spalte angezeigt. -
Wählen Sie im „Vorrollen“-Arbeitsbereich im Listenbereich den vorher angelegten Eintrag aus und weisen Sie im Drop-Down-Menü dem Eintrag den korrekten Stichtag zu.
-
Navigieren Sie mit der Maus in die Tabellenspalte, in die die Werte aus einer anderen Spalte vorgerollt werden sollen. Klicken Sie auf das grüne „Hinzufügen“-Symbol in der Gruppe „Spalten“ im „Vorrollen“-Arbeitsbereich.
→ Im Listenbereich wird Ihnen nun die ausgewählte Spalte angezeigt - und ein blauer Richtungspfeil zeigt Ihnen die Richtung der vorzurollenden Werte an. -
Wählen Sie im „Vorrollen“-Arbeitsbereich im Listenbereich den vorher angelegten Eintrag aus und weisen Sie im Drop-Down-Menü dem Eintrag den korrekten Stichtag zu.
-
Klicken Sie auf das „Speichern“-Symbol in der Gruppe „Änderungen“ im „Vorrollen“-Arbeitsbereich.
→ Der Arbeitsbereich wird automatisch geschlossen.
Das Ausführen der Funktion „Vorrollen“
-
Klicken Sie im Menüband „*Inhalt“ in der Gruppe „Vorrollen“ auf den Knopf „Ausführen“.
→ Ein Dialog öffnet sich, der Ihnen Informationen zum letzten erfolgreichen „Vorrollen“-Vorgang anzeigt und optional ermöglicht, einen Freitext anzugeben, der in „Vorrollen“-Historie übernommen wird. -
Überprüfen Sie im Bereich „Stichtage“ in der Listenansicht die aufgeführten Informationen der einzelnen „Vorrollen“-Vorgänge, ob stets der vorzurrollende Stichtag korrekt ist.
-
Möchten Sie vor dem Ausführen des „Vorrollen“-Vorgangs Informationen darüber erhalten, welche Arbeitsblätter vorgerollt werden, können Sie auf den Knopf „Statusupdate klicken“.
-
Mit einem Klick auf „Starten“ wird der „Vorrollen“-Vorgang gestartet.
Hinweis: Ungespeicherte Änderungen müssen vorher unbedingt gespeichert werden - und zusätzlich legt firesys eine Sicherheitskopie Ihrer Arbeitsmappe an, der Sie ebenfalls zustimmen müssen.
→ Ihre Arbeitsmappe wird vorgerollt.
Edit a table that has already been rolled forward
Bearbeiten der Vorrollen-Funktion
-
Öffnen Sie das Arbeitsblatt, das die Tabelle mit bereits definierten Rollspalten enthält.
-
Klicken Sie im Menüband „*Inhalt“ in der Gruppe „Vorollen“ auf den oberen Teil des Split-Buttons „Arbeitsbereich“. Der Arbeitsbereich „Vorrollen“ öffnet sich. Sie finden im „Vorrollen“-Arbeitsbereich in der Listenansicht in der Gruppe „Richtung“ eine Übersicht der bereits definierten Rollspalten. Anhand des blauen Pfeils können Sie die Richtung erkennen.
-
Folgende Funktionen finden Sie in der Gruppe „Spalten“:
-
 Spalten anzeigen:
 -
 Spalte hinzufügen:
 -
 Spalte ändern:
 -
 Spalte entfernen:
 -
 /
/  Spalte nach unten/oben verschieben:
 -
Klicken Sie, nachdem Sie Ihre Änderungen durchgeführt haben, auf das „Speichern“-Symbol in der Gruppe „Änderungen“ im „Vorrollen“-Arbeitsbereich.
→ Der Arbeitsbereich wird automatisch geschlossen.
See also
![]() Insert values in Excel
Insert values in Excel
![]() Rolling forward values from the MeetingPoint
Rolling forward values from the MeetingPoint
![]() Rolling forward case studies
Rolling forward case studies


