XBRL File Generation: Unterschied zwischen den Versionen
Keine Bearbeitungszusammenfassung |
Keine Bearbeitungszusammenfassung |
||
| (7 dazwischenliegende Versionen desselben Benutzers werden nicht angezeigt) | |||
| Zeile 5: | Zeile 5: | ||
To do so, click on the Validation icon or on Validation in the Menu bar→ Validate Document. | To do so, click on the Validation icon or on Validation in the Menu bar→ Validate Document. | ||
[[Datei:Validation1.png|center|400px]] | |||
<br> | |||
[[Datei:Generate Inline XBRL File2.png|center|400px]] | |||
After that, click on the "Status" button in the lower left corner of toolsxbrl to view validation results. Correct errors/warnings if there are any. | After that, click on the "Status" button in the lower left corner of toolsxbrl to view validation results. Correct errors/warnings if there are any. | ||
[[Datei:Generate Inline XBRL File3.png|center|1000px]] | |||
To create a valid InlineXBRL document with all tagged data, click on the Generate iXBRL icon or on XBRL in the Menu bar → Generate iXBRL: | To create a valid InlineXBRL document with all tagged data, click on the Generate iXBRL icon or on XBRL in the Menu bar → Generate iXBRL: | ||
[[Datei:Validation4.png|center|300px]] <br> | |||
[[Datei:Validation5.png|center|300px]] | |||
The following window will open: | The following window will open: | ||
[[Datei:Generate Inline XBRL File6.png|center|1000px]] | |||
This option can be activated to keep A4 Layout when converting Word files to HTML (which is rather unnatural for HTML and this may result in some Layout issues, like shifted texts and pictures). This option can be deactivated, so that the created HTML looks like a web page, without A4 pages. | [[Datei:Generate Inline XBRL File7.png|link=|100px]] This option can be activated to keep A4 Layout when converting Word files to HTML (which is rather unnatural for HTML and this may result in some Layout issues, like shifted texts and pictures). This option can be deactivated, so that the created HTML looks like a web page, without A4 pages. | ||
This option can be activated to remove external links out of the report package. | [[Datei:Generate Inline XBRL File8.png|link=|100px]] This option can be activated to remove external links out of the report package. | ||
This should be done to avoid the following error message, when loading the report to e.g. Bundesanzeiger: | This should be done to avoid the following error message, when loading the report to e.g. Bundesanzeiger: | ||
[[Datei:Generate Inline XBRL File9.png|center|750px]] | |||
You can also remove all hyperlinks in your file before loading it into toolsxbrl: | You can also remove all hyperlinks in your file before loading it into toolsxbrl: | ||
| Zeile 23: | Zeile 38: | ||
# Press Ctrl+Shift+F9 | # Press Ctrl+Shift+F9 | ||
With this option, all detailed layout information from tagged numeric facts will be removed to reduce the number of hidden facts significantly. '''This option requires the Transformation Registry to be set to TR4!''' | [[Datei:Generate Inline XBRL File10.png|link=|100x]] With this option, all detailed layout information from tagged numeric facts will be removed to reduce the number of hidden facts significantly. '''This option requires the Transformation Registry to be set to TR4!''' | ||
For some background information about hidden facts please refer to [https://hilfe.firesys.de/wiki/Requirements_for_Source_Documents#What_Are_Hidden_Facts? this section] of the Documentation. | For some background information about hidden facts please refer to [https://hilfe.firesys.de/wiki/Requirements_for_Source_Documents#What_Are_Hidden_Facts? this section] of the Documentation. | ||
Select the required settings and click on "Generate and validate XBRL report". | Select the required settings and click on "Generate and validate XBRL report". | ||
[[Datei:Generate Inline XBRL File11.png|center|500px]] | |||
<br> | |||
[[Datei:Generate Inline XBRL File12.png|center|500px]] | |||
If you get the following error message, “Your report is not valid, …”, click on the "Status" button on the bottom left corner of toolsxbrl. | If you get the following error message, “Your report is not valid, …”, click on the "Status" button on the bottom left corner of toolsxbrl. | ||
[[Datei:Generate Inline XBRL File13.png|center|500px]] | |||
Correct all errors and then generate the report again. Results will be saved in the selected folder. | Correct all errors and then generate the report again. Results will be saved in the selected folder. | ||
If the XBRL Generations fails, as indicated by the red icon in the following screenshot, please continue reading on [https://hilfe.firesys.de/wiki/Validation_Messages#Validation_Messages validation messages]. All errors [https://hilfe.firesys.de/wiki/Packaging_and_Publishing_of_ESEF_iXBRL_Reports must be fixed before an ESEF report is considered to be valid]. Invalid reports can be rejected. | If the XBRL Generations fails, as indicated by the red icon in the following screenshot, please continue reading on [https://hilfe.firesys.de/wiki/Validation_Messages#Validation_Messages validation messages]. All errors [https://hilfe.firesys.de/wiki/Packaging_and_Publishing_of_ESEF_iXBRL_Reports must be fixed before an ESEF report is considered to be valid]. Invalid reports can be rejected. | ||
[[Datei:Generate Inline XBRL File11.png|center|500px]] | |||
==iXBRL Previewer Mode== | ==iXBRL Previewer Mode== | ||
To visualise the InlineXBRL content and information, it is possible to create a preview file. Once the file is created, a script allows the browser to display and highlight the XBRL information stored in the file. The preview file is not valid InlineXBRL and should not be forwarded to supervising authorities. To generate a preview, select the iXBRL Previewer Mode under Settings → iXBRL Previewer Mode. | To visualise the InlineXBRL content and information, it is possible to create a preview file. Once the file is created, a script allows the browser to display and highlight the XBRL information stored in the file. The preview file is not valid InlineXBRL and should not be forwarded to supervising authorities. To generate a preview, select the iXBRL Previewer Mode under Settings → iXBRL Previewer Mode. | ||
[[Datei:IXBRL Previewer Mode1.png|center|500px]] | |||
An additional .xhtml file will be displayed in the folder containing the resultant documents, after the generation of the XBRL report (Reports → Preview). This file allows you to preview the created report: | An additional .xhtml file will be displayed in the folder containing the resultant documents, after the generation of the XBRL report (Reports → Preview). This file allows you to preview the created report: | ||
[[Datei:IXBRL Previewer Mode2.png|center|500px]] | |||
The "Full" version contains a lot of details and offers additional functions: | The "Full" version contains a lot of details and offers additional functions: | ||
[[Datei:IXBRL Previewer Mode3.png|center|1000px]] | |||
The "Internet" option adds the same Viewer as the "Full" option, but does not need the additional script folder to be in the same location. Instead, the file refers to the script hosted at an "Internet" location, so it is accessible and up to date for everyone. This option does require an internet connection; however, it also enables more convention sharing and publishing of the document. | The "Internet" option adds the same Viewer as the "Full" option, but does not need the additional script folder to be in the same location. Instead, the file refers to the script hosted at an "Internet" location, so it is accessible and up to date for everyone. This option does require an internet connection; however, it also enables more convention sharing and publishing of the document. | ||
| Zeile 48: | Zeile 76: | ||
By using the option "Sign Logic", it is possible to adjust the sign of certain elements. | By using the option "Sign Logic", it is possible to adjust the sign of certain elements. | ||
[[Datei:Sign Logic for iXBRL1.png|center|1000px]] | |||
This can be necessary if the report's sign logic differs from the regulator's requirements. For example, in the report all credit positions have a negative sign, but the regulator expects those values to be reported with a positive sign. The following sign logic options can be set: | This can be necessary if the report's sign logic differs from the regulator's requirements. For example, in the report all credit positions have a negative sign, but the regulator expects those values to be reported with a positive sign. The following sign logic options can be set: | ||
| Zeile 68: | Zeile 98: | ||
== Siehe auch == | == Siehe auch == | ||
[[Datei:Navigation_hoch.svg|link=]] [[Using_toolsxbrl|Using toolsxbrl]] | [[Datei:Navigation_hoch.svg|link=]] [[Using_toolsxbrl|Using toolsxbrl]] <br> | ||
[[Datei:Navigation_rechts.svg|link=]] [[Getting_Started | Getting Started]] <br> | |||
[[Datei:Navigation_rechts.svg|link=]] [[Validation| Validation]] <br> | |||
[[Datei:Navigation_rechts.svg|link=]] [[Status| Status]] <br> | |||
{{WeitereInhalte}} | {{WeitereInhalte}} | ||
[[Kategorie:Word_Inhalte-veröffentlichen-toolsxbrl-Using_toolsxbrl]] | |||
Aktuelle Version vom 26. Oktober 2023, 13:40 Uhr
Generate Inline XBRL File
Before creating the report, it is necessary to perform a validation check and make sure that the file contains no critical errors.
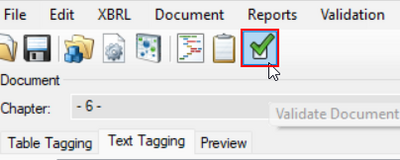
To do so, click on the Validation icon or on Validation in the Menu bar→ Validate Document.
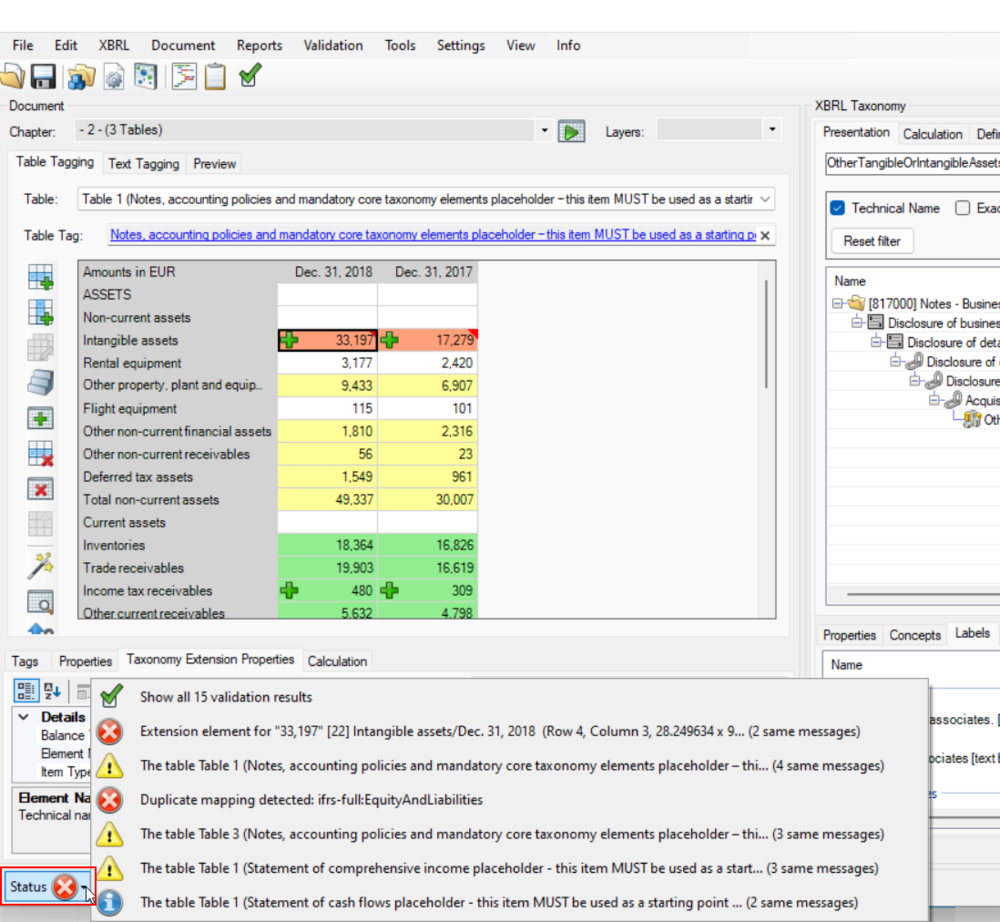
After that, click on the "Status" button in the lower left corner of toolsxbrl to view validation results. Correct errors/warnings if there are any.
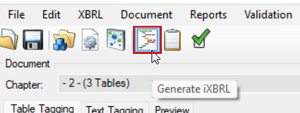
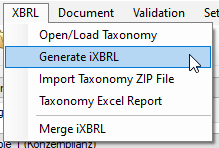
To create a valid InlineXBRL document with all tagged data, click on the Generate iXBRL icon or on XBRL in the Menu bar → Generate iXBRL:
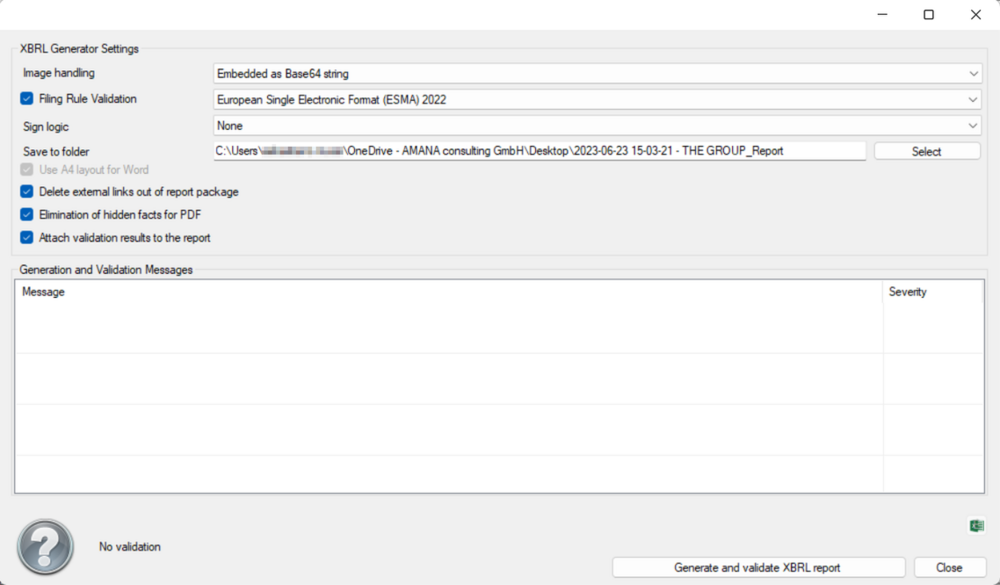
The following window will open:
![]() This option can be activated to keep A4 Layout when converting Word files to HTML (which is rather unnatural for HTML and this may result in some Layout issues, like shifted texts and pictures). This option can be deactivated, so that the created HTML looks like a web page, without A4 pages.
This option can be activated to keep A4 Layout when converting Word files to HTML (which is rather unnatural for HTML and this may result in some Layout issues, like shifted texts and pictures). This option can be deactivated, so that the created HTML looks like a web page, without A4 pages.
![]() This option can be activated to remove external links out of the report package.
This option can be activated to remove external links out of the report package.
This should be done to avoid the following error message, when loading the report to e.g. Bundesanzeiger:
You can also remove all hyperlinks in your file before loading it into toolsxbrl:
- Press Ctrl+A to select all text
- Press Ctrl+Shift+F9
![]() With this option, all detailed layout information from tagged numeric facts will be removed to reduce the number of hidden facts significantly. This option requires the Transformation Registry to be set to TR4!
With this option, all detailed layout information from tagged numeric facts will be removed to reduce the number of hidden facts significantly. This option requires the Transformation Registry to be set to TR4!
For some background information about hidden facts please refer to this section of the Documentation.
Select the required settings and click on "Generate and validate XBRL report".
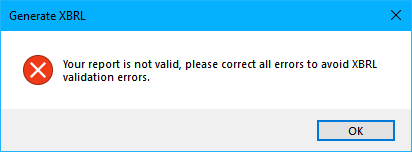
If you get the following error message, “Your report is not valid, …”, click on the "Status" button on the bottom left corner of toolsxbrl.
Correct all errors and then generate the report again. Results will be saved in the selected folder.
If the XBRL Generations fails, as indicated by the red icon in the following screenshot, please continue reading on validation messages. All errors must be fixed before an ESEF report is considered to be valid. Invalid reports can be rejected.
iXBRL Previewer Mode
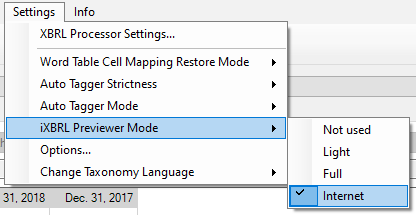
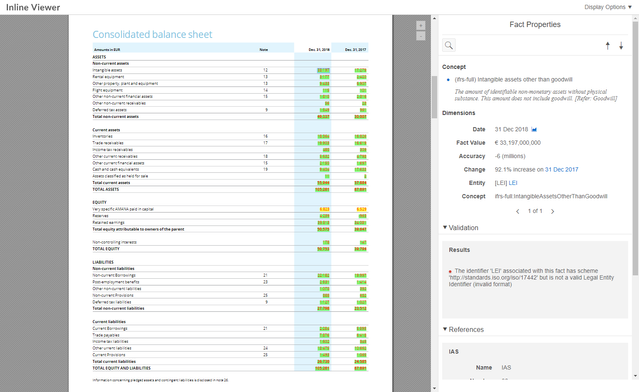
To visualise the InlineXBRL content and information, it is possible to create a preview file. Once the file is created, a script allows the browser to display and highlight the XBRL information stored in the file. The preview file is not valid InlineXBRL and should not be forwarded to supervising authorities. To generate a preview, select the iXBRL Previewer Mode under Settings → iXBRL Previewer Mode.
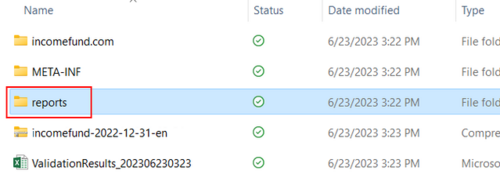
An additional .xhtml file will be displayed in the folder containing the resultant documents, after the generation of the XBRL report (Reports → Preview). This file allows you to preview the created report:
The "Full" version contains a lot of details and offers additional functions:
The "Internet" option adds the same Viewer as the "Full" option, but does not need the additional script folder to be in the same location. Instead, the file refers to the script hosted at an "Internet" location, so it is accessible and up to date for everyone. This option does require an internet connection; however, it also enables more convention sharing and publishing of the document.
Sign Logic for iXBRL
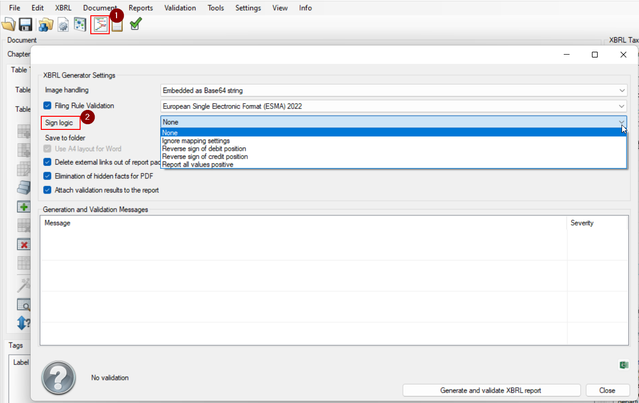
By using the option "Sign Logic", it is possible to adjust the sign of certain elements.
This can be necessary if the report's sign logic differs from the regulator's requirements. For example, in the report all credit positions have a negative sign, but the regulator expects those values to be reported with a positive sign. The following sign logic options can be set:
- None: No special sign logic is applied.
- Ignore mapping settings: It is also possible to define a sign logic for a single cell (for more information about this feature, please look at the Sign Logic section in the Documentation). If those mapping settings should not be applied, you can select this option.
- Reverse sign of debit position: Reverses the sign of all figures, whose tagged element has a debit balance.
- Reverse sign of credit position: Reverses the sign of all figures, whose tagged element has a credit balance.
- Report all values positive: All figures will be reported positive.
If a cell has a tagging with the assigned sign logic "As Reported", the settings mentioned above will not affect this cell.
Package and Publish an iXBRL Report Package
Continue reading on important steps to be performed before publishing the iXBRL file.
Siehe auch
![]() Using toolsxbrl
Using toolsxbrl
![]() Getting Started
Getting Started
![]() Validation
Validation
![]() Status
Status
Weitere Inhalte
→ Webseite
→ Kundenbereich
→ YouTube
