Other functions: Unterschied zwischen den Versionen
Keine Bearbeitungszusammenfassung |
Keine Bearbeitungszusammenfassung |
||
| (14 dazwischenliegende Versionen von 3 Benutzern werden nicht angezeigt) | |||
| Zeile 1: | Zeile 1: | ||
Premium Layout contains many useful functions for editing your data in this area of the software. | |||
| Zeile 6: | Zeile 6: | ||
== The functions == | == The functions == | ||
{{ | |||
Vorlage:GoodtoKnow | |||
|Gutzuwissen = The Premium Layout tab is displayed only if you are in Premium Layout. | |||
}} | |||
=== [[Datei:rxbtnGeneral_ColorSchemaEdit_16.png|link=|16px]] Layout-Manager === | === [[Datei:rxbtnGeneral_ColorSchemaEdit_16.png|link=|16px]] Layout-Manager === | ||
[[ | [[Overview_of_the_layout_manager|→ Main article about the Layout-Manager]] | ||
Create a new colour scheme or edit an existing one. | Create a new colour scheme or edit an existing one. | ||
=== [[Datei:rxbtnGeneral_ColorSchemaApply_16.png|link=|16px]] Apply === | |||
Select an existing colour scheme and apply it to | Select an existing colour scheme and apply it to all text, graphics and tables in your document. | ||
=== [[Datei: | === [[Datei:rxbtnGeneral_FontSize_16.png|link=|16px]] Change font size === | ||
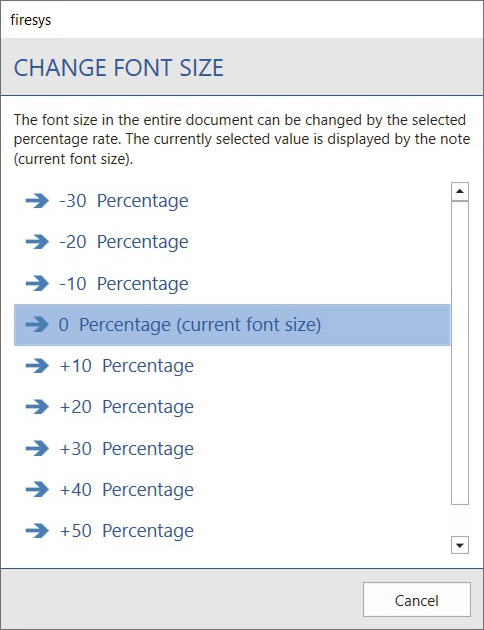
Change the font size of your entire document at the touch of a head. You can adjust the font size within a range of -30 per cent to +60 per cent. The resizing includes all text and table formats. Graphics are excluded from the resizing. The currently selected value is indicated by the note "current font size". | |||
[[Datei:EN Word Gestaltung Schriftgröße-anpassen.jpg|center]] | [[Datei:EN Word Gestaltung Schriftgröße-anpassen.jpg|center]] | ||
=== [[Datei:RxmnuSustainabilityImages 32.png|link=|16px]] ESG-Icons === | |||
firesys provides you with icons for your sustainability report. The following options are available in a gallery: | |||
*Icons of the Sustainable Development Goals (SDG) - standard | |||
*Icons of the Sustainable Development Goals (SDG) - inverted | |||
*Chapter icons for the ESRS standards | |||
To insert an icon into your report, proceed as follows: | |||
# Place your cursor where you want to insert the icon in the document. | |||
# Click on the "Sustainable Development Goals"/“Sustainable Development Goals inverted”/“Chapter Icons” button in the "ESG" group on the "*Premium Layout" ribbon. <br> → The respective gallery opens. | |||
# Click on the desired icon. <br> → The icon is inserted into the document at the position of your cursor. | |||
[[Datei:Menüband Word Premiumlayout ESG-Galerie.jpg|center|1000px|]] | |||
=== [[Datei:rxmnuGeneral_ListTemplates_16.png|link=|16px]] Numbered list === | |||
By clicking on the "Numbered" list button, you have two options for editing your existing lists. | |||
:<b> [[Datei:rxbtnGeneral_RestartList_16.png|link=|16px]] Restart </b> | |||
:Start an already existing numbering new. | |||
Continue | :<b> [[Datei:rxbtnGeneral_ContinueList_16.png|link=|16px]] Continue </b> | ||
:Here you can continue an already existing numbering. | |||
=== [[Datei:rxmnuGeneral_ColumnWidth_16.png|link=|16px]] Change column widths === | |||
In the Premium Layout you have the option of optimising the display of particularly detailed or extensive tables. Two options are available to you: | |||
:<b>[[Datei:rxbtnGeneral_RerangeTable_16.png|link=|16px]] To the largest number in the table </b> | |||
:The width of the number columns is determined depending on the "widest" number. The columns are then formatted with the same width according to this value. | |||
:<b>[[Datei:rxbtnGeneral_RerangeTable_forEachColumn_16.png|link=|16px]] To the largest number in the column </b> | |||
Each column of numbers is individually formatted according to the "widest" number. This results in an uneven column width, which, however, avoids any empty spaces. | |||
=== [[Datei:rxbtnGeneral_AlignTables_16.png|link=|16px]] Align elements === | |||
Click on the button "Align elements" to align wide tables and marginalia in the entire document to the set type area. | |||
=== [[Datei:RxbtnTableOfContents 32.png|link=|16px]] Table of Contents=== | |||
| | Click on the button "Table of contents" to insert a table of contents at the position of the insertion point. | ||
<div style="margin:0px; padding:0.7em 1em 0.7em 1em; background-color:#f6f4f2;border:1px solid #e67d05;width: 50%;"> | |||
{| | |||
|- | |||
! rowspan="2" |[[Datei:Glühbirne neu.png|left|link=|center|24px|]] | |||
!<div style="text-align:left; font-size:120%;">Good to know</div> | |||
|- | |||
|<div style="font-size:95%;text-align:left;margin-top:10px;"> | |||
Only one table of contents can be created per document. | |||
|} | |||
</div> | |||
</div> | |||
}} | {{Vorlage:Video-Word Premiumlayout Inhaltsverzeichnis erstellen-Englisch}} | ||
== See also == | |||
== | |||
[[Datei:Navigation_hoch.svg|link=]] [[Overview_of_the_Premium Layout|Overview of the Premium Layout]] <br> | |||
[[Datei:Navigation_rechts.svg|link=]] [[The_interface_of_the_layout_manager|The interface of the layout manager]] <br> | |||
[[Datei:Navigation_rechts.svg|link=]] [[Edit_texts|Edit texts]] <br> | |||
{{MoreContent}} | {{MoreContent}} | ||
[[ | [[Kategorie: Other functions]] | ||
Aktuelle Version vom 11. März 2024, 13:35 Uhr
Premium Layout contains many useful functions for editing your data in this area of the software.
The functions
Good to know
| |
|---|---|
The Premium Layout tab is displayed only if you are in Premium Layout. |
 Layout-Manager
→ Main article about the Layout-Manager
Create a new colour scheme or edit an existing one.
 Apply
Apply
Select an existing colour scheme and apply it to all text, graphics and tables in your document.
 Change font size
Change the font size of your entire document at the touch of a head. You can adjust the font size within a range of -30 per cent to +60 per cent. The resizing includes all text and table formats. Graphics are excluded from the resizing. The currently selected value is indicated by the note "current font size".
 ESG-Icons
firesys provides you with icons for your sustainability report. The following options are available in a gallery:
- Icons of the Sustainable Development Goals (SDG) - standard
- Icons of the Sustainable Development Goals (SDG) - inverted
- Chapter icons for the ESRS standards
To insert an icon into your report, proceed as follows:
- Place your cursor where you want to insert the icon in the document.
- Click on the "Sustainable Development Goals"/“Sustainable Development Goals inverted”/“Chapter Icons” button in the "ESG" group on the "*Premium Layout" ribbon.
→ The respective gallery opens. - Click on the desired icon.
→ The icon is inserted into the document at the position of your cursor.
 Numbered list
By clicking on the "Numbered" list button, you have two options for editing your existing lists.
-
 Restart
 - Start an already existing numbering new.
-
 Continue
- Here you can continue an already existing numbering.
 Change column widths
In the Premium Layout you have the option of optimising the display of particularly detailed or extensive tables. Two options are available to you:
 To the largest number in the table
- The width of the number columns is determined depending on the "widest" number. The columns are then formatted with the same width according to this value.
 To the largest number in the column
Each column of numbers is individually formatted according to the "widest" number. This results in an uneven column width, which, however, avoids any empty spaces.
 Align elements
Click on the button "Align elements" to align wide tables and marginalia in the entire document to the set type area.
 Table of Contents
Click on the button "Table of contents" to insert a table of contents at the position of the insertion point.
Good to know
| |
|---|---|
Only one table of contents can be created per document. |
Um ein Inhaltsverzeichnis einzufügen gehen Sie wie folgt vor:
Voraussetzungen:
-
The caret’s position is not within a table.
-
The caret’s position is not in the header or footer.
-
The caret’s position is not in a paragraph with a position frame.
-
The caret’s position is in an empty paragraph.
-
Place your caret at the point in the document where you want to create your table of contents. Note the prerequisites.
-
Click on the button "Table of contents" in the tab "*Premium Layout" in the group "Premium Layout".
→ The dialogue for creating a table of contents opens. -
Select how many levels of headings you want to display in your table of contents.
-
Under "Page number", place a tick in front of "Show" if you want to create a table of contents with page numbers displayed.
-
Under "Page number", place a tick in front of "Align right" if you want the page numbers to be displayed right-aligned.
-
Select a tap leader from the drop-down menu.
-
Click on "OK".
→ The table of contents is created. If you want to make changes to the table of contents, create a new table of contents at the same place, the old one will be deleted automatically.
See also
![]() Overview of the Premium Layout
Overview of the Premium Layout
![]() The interface of the layout manager
The interface of the layout manager
![]() Edit texts
Edit texts


