Edit texts
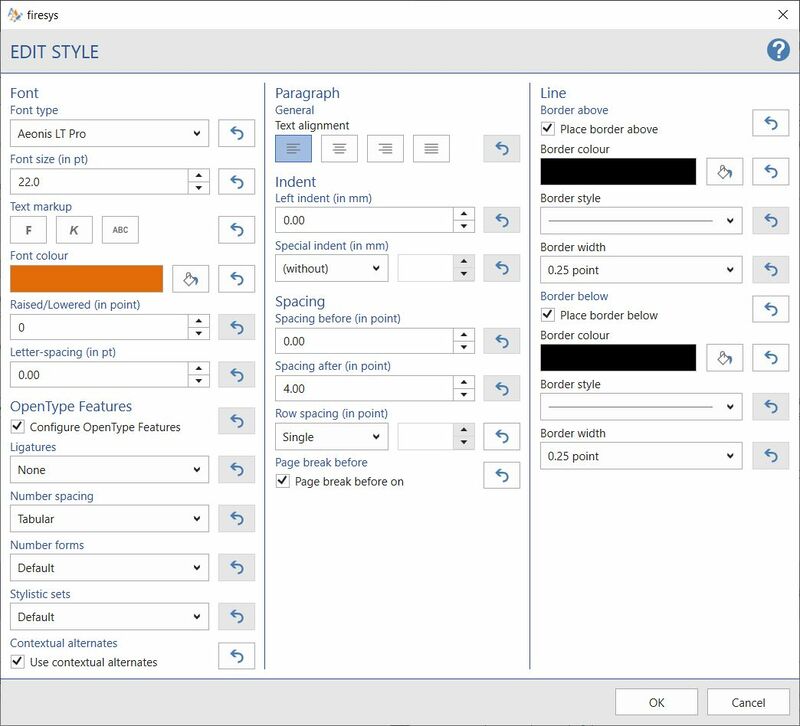
Adapt the standard report to your corporate design. You have the option of changing an extensive range of format templates. This includes all body text, heading and table format templates.
Functions
Adjustments can be made to the following parameters:
Font
Font type
You can select a font for your headings, continuous texts and table labels here.
Font size
Select the desired font size (in points) here.
Text mark-up
Here you can select the desired text mark-up. Bold, italic and capital letters are available.
Font colour
Select here the font colour in which your texts are to be formatted.
Raised/Lowered (in point)
Set whether and by what value the text should be moved up or down.
Letter-spacing
At this point you can determine the running width of the text (in point).
Bullets
Note: The options are only available for the formats "Bullet" and "Bullet 2".
For both formats, you can set the bullet, font, font size, text alignment and font colour individually in the Layout manager.
You can find additional information under the section Define bullets.
OpenType-Features
Make settings for advanced typographic functions here.
Ligatures
Ligatures are the connection of two or more symbols that make the text more readable or visually appealing.
Number spacing
Choose whether your numbers are all the same width or individual widths.
Number forms
Here you will find the selection about whether, for example, descenders should be used for numbers and other settings.
Stylistic sets
Stylistic sets offer you matching style sheets for simplified design.
Contextual alternates
Contextual alternates are ligatures that depend on the environment and are applied to individual characters or even entire words.
Paragraph
Text alignment
Here you can select the text alignment. You can choose between left-justified, right-justified, centred and justified.
Indent
Left indent (in mm)
Select an amount by which the indent will be set on the left side of the paragraph.
Special indent
Select from the option „Hanging” or „First line”.
- Hanging: The first line of a paragraph is positioned at the margin and all subsequent lines are indented by the amount entered.
- First line: The first line of a paragraph is indented by a certain value.
Spacing
Spacing before/spacing after (in point)
Select here how large spacing (in points) should be defined between text lines and paragraphs.
Row spacing (in point)
Select the row spacing (in points) of the text here.
Page break before
Determines whether a page break is automatically inserted above the current style sheet.
Line
Note: Both options are only available for headings.
Border above
Define a line here that is located above a heading. You can define both the line colour, type and thickness.
Border below
Define a line here that is below a heading. Here, too, you can define both the line colour, type and thickness.
The “Reset” function
With this function you can reset your set settings. When you click on the button “Reset” (![]() - Symbol ), the settings are displayed again in their original formatting.
- Symbol ), the settings are displayed again in their original formatting.
Change format templates
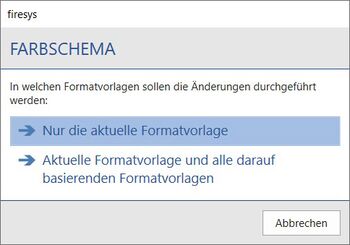
When you change a style sheet, a dialogue appears after you click on "OK". Here you can choose whether you want to change only the current style sheet or the current style sheet including all style sheets based on it.
The change of the style sheet is displayed in the list view of the Layout manager.
Change format templates
When you change a style sheet, a dialogue appears after you click on „OK”. Here you can choose whether you want to change only the current style or the current style including all styles based on it.
The change of the style is displayed in the list view of the Layout manager.
Define bullets
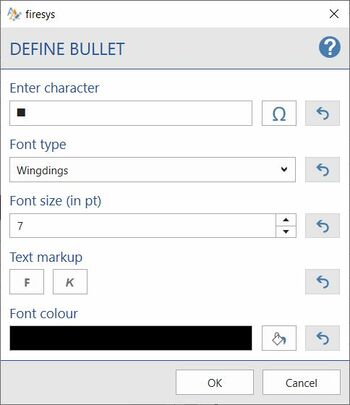
In the Layout manager, the bullet character can be defined for the "Bullet" and "Bullet 2" formats.
Enter character
Select the symbol and/or font to be used as the bullet character.
Font
Select the font to be used as the bullet.
Font size
Select the desired font size (in points) for the bullet here.
Text markup
Here you can select the desired text markup for the bullet. Bold and italics are available.
Font colour
Select the font colour in which the bullet is to be formatted.
Video: Define bullets
To edit bullets in Layout Manager:
-
Click the “Layout Manager” button in the ribbon under “*Premium Layout” in the “Premium Layout” group.
→The Layout Manager opens. -
Select the preferred colour scheme.
-
Click the arrow icon to the left of the colour scheme you want.
→A drop-down menu opens. -
In the drop-down menu, click the arrow icon next to “Texts”.
→Another drop-down menu opens with the “Standard” template. -
In the drop-down menu, click the arrow icon next to “Default”.
→Another drop-down menu opens. -
Click the arrow icon next to “Enumeration” in the drop-down menu and select the “Enumeration 2” style.
-
Then click on “Edit texts” at the top of the Layout manager.
→The “Edit style sheet” window opens. -
Click on the omega symbol under the “Bullets” item.
→The “Define bullets” window opens. -
Make the desired settings and then click “Ok”.
→The selected character is displayed under the “Bullet” item. -
To apply the settings in the style sheet, click “Ok”.<
→The changed settings are displayed in the Layout Manager.
Video: Edit texts
To edit texts in the Layout manager:
-
Click on the “Layout manager” button in the menu ribbon under “*Premium Layout” in the “Premium Layout” group.
→ The Layout manager opens. -
Select the desired colour scheme.
-
Click on the arrow symbol to the left of the desired colour scheme.
→ A drop-down menu opens. -
Click on the arrow symbol next to “Texts” in the drop-down menu.
→ Another drop-down menu opens with the template “Standard”. -
Select the standard template and click on “Edit” in the Layout manager in the “Texts” group.
→ The "Edit style sheet" window opens. -
Make the desired settings.
-
Click on “Ok”.
→ A dialogue appears in which you can select whether you want to change only the currently selected template or also all subsequent templates. -
Select the desired option.
→ The changes are saved and the style sheet is adjusted. To apply the changes to the document, the layout must be applied again ( see Farbschema anwenden)
See also
![]() Overview of the Premium Layout
Overview of the Premium Layout
![]() Other functions
Other functions


