The account workbook: Unterschied zwischen den Versionen
Keine Bearbeitungszusammenfassung |
Keine Bearbeitungszusammenfassung |
||
| Zeile 68: | Zeile 68: | ||
You can delete the contents of your account workbook. Select the rows you require in your account workbook and press “Delete rows”. Multiple selection is also possible here. | You can delete the contents of your account workbook. Select the rows you require in your account workbook and press “Delete rows”. Multiple selection is also possible here. | ||
== [[Datei:rxbtnCellAccountValues_11_16.png|link=|16px]] | == [[Datei:rxbtnCellAccountValues_11_16.png|link=|16px]] Master value history == | ||
You can select a cell in your account workbook and use the | You can select a cell in your account workbook and use the “Master value history” function to display a history dialog. From the cell you selected, you see which numerical values this cell already contains. In additional, a change date and information is displayed about who made the changes. | ||
Version vom 17. März 2021, 09:27 Uhr
Use the firesys account workbook to integrate data from your consolidation software easily into firesys and to validate it across several files. The account workbook is a convenient way of making a large amount of data to be validated available to all firesys users in the MeetingPoint. Based on an Excel file, it is easy to link data from the consolidation system with the firesys world.
<imagemap>Image:EN Excel Menüband Inhalt Daten-Import Kontomappe-erstellen.jpg|1200px|center
desc none </imagemap>
Create an account workbook
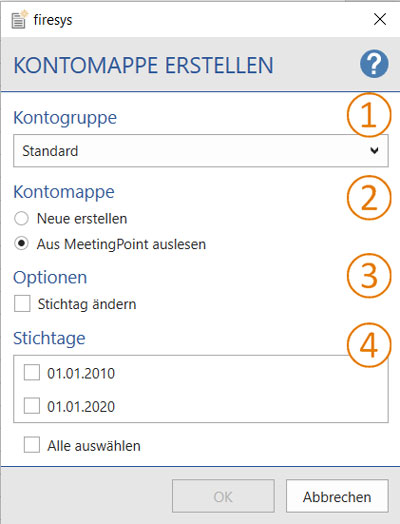
In the “*Validation” ribbon, in the “Cross-file validation” group, create an account workbook by using the “Create account workbook” function. The following dialog appears:
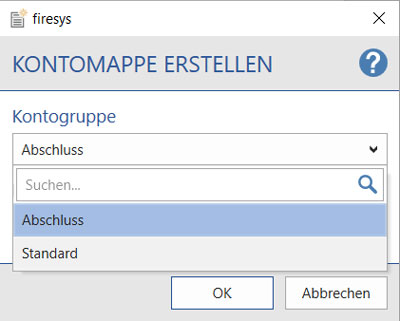
 Account group
In the drop-down menu you see all account groups that were created previously in the master value manager.
 Account workbook
Create new
Here you can select whether additional account values should be assigned to the previously selected account group. If you confirm this selection with “OK”, a new Excel document opens with an empty account workbook.
Read out from MeetingPoint
If you have selected an account workbook from the drop-down menu under “Account group” that already contains account values, you can activate the “Read out from MeetingPoint” function. The dialog expands to the maximum example shown on the right.
 Options
Change key date
You can select this option if you want to change a key date of an account value in the previously selected account group. If you confirm this selection with “OK”, an Excel document opens containing all entries of this account value. Here the entry in the “Key date” column is missing, which you can now enter. To apply this key date, in the “*Validation” menu ribbon, in the “Cross-file validation” group, click on the “Apply master value” button or “Status update” to check whether the changes made can be applied.
 Key dates
This list area displays all existing key dates from the account group that was selected beforehand in the drop-down menu. You can select the individual key dates or use the “Select all” function to select the entire list and then click on “OK” to open a new Excel document. This document displays the account values corresponding to the key dates that were previously selected. You can assign a new status, new values and/or free text to these account values. To apply these new contents, in the “*Validation” ribbon, in the “Cross-file validation” group, click on the “Apply master value” button or “Status update” to check whether the changes made can be applied.
Good to know
| |
|---|---|
Account values that were already applied to the MeetingPoint can be updated individually in the master value manager or else multiple values can be updated via a new account workbook. |
 Sort account workbook
You can sort the contents of your account workbooks at any time according to your individual preferences. firesys enables you to sort in ascending or descending order according to the examples shown on the right.
Good to know
| |
|---|---|
You can use the “Sort account workbook” and “Delete rows” functions only in an opened account workbook. |
Datei:RxbtnCellAccountValues 15 16.png Delete rows
You can delete the contents of your account workbook. Select the rows you require in your account workbook and press “Delete rows”. Multiple selection is also possible here.
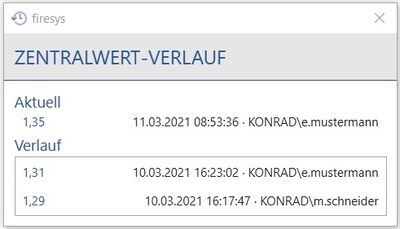
 Master value history
You can select a cell in your account workbook and use the “Master value history” function to display a history dialog. From the cell you selected, you see which numerical values this cell already contains. In additional, a change date and information is displayed about who made the changes.
Archive account values and restore them if necessary
→ Go to the main article on the master value manager
To archive a certain status of the account values, you can use the “Create archive workbook” in the central master manager.
See also
![]() Maintain Excel contents
Maintain Excel contents
![]() The functions of the master value manager
The functions of the master value manager
![]() Insert values in Excel
Insert values in Excel
![]() The validation basic functions
The validation basic functions
![]() An overview of the roll forward functions
An overview of the roll forward functions


