Create an import-definition: Unterschied zwischen den Versionen
Keine Bearbeitungszusammenfassung |
Keine Bearbeitungszusammenfassung |
||
| Zeile 6: | Zeile 6: | ||
Define how the data from the upstream system is transferred “modelled” to the MeetingPoint with the help of firesys. | Define how the data from the upstream system is transferred “modelled” to the MeetingPoint with the help of firesys. | ||
{{Vorlage:Video-Import- | {{Vorlage:Video-Import-Definition_erstellen-English}} | ||
== File selection == | == File selection == | ||
Version vom 19. März 2021, 12:58 Uhr
You can use the data import to integrate a very large number of records from .csv or .txt source files quickly in the firesys environment. The data import reads out the records, they can be individually modelled and then transferred to the firesys MeetingPoint.
The functions
Create an Import definition
Define how the data from the upstream system is transferred “modelled” to the MeetingPoint with the help of firesys.
To add a new Import definition in the Data Import Manager:
-
Create an Import definition after which your data should be inserted into the MeetingPoint. Select the “Data Import Manager” button in the “Data Import” group in the “*Content” menu bar.
→ The data import manager opens. Choose the “Create” button in the “Import definition” group.
→ A dialogue box opens.Click on “Next” to go to the “File Settings” tab.
-
In the area “Number format” the decimal separator and the thousand separator of the import file are set.
Click on “Next” to access the “Assignment & Options” tab.
account
name
value
comment
-
The account, name and value columns are mandatory for data import; the Comment column is optional. All columns can only be assigned once.
-
In the area “Import options” additional options can be created that are applied when the data is read in. With the help of these options the data can be modelled and then transferred to the firesys-MeetingPoint.
-
In the video, an option is created to divide the account values by 1 million during transfer.
-
There are further options, the choices depend on the “target column”.
-
If you want to work with multiple read options, the order in which the options should be applied must be defined.
-
Click on “Finish” to enter the data import manager.
→ The created import definition is now available.
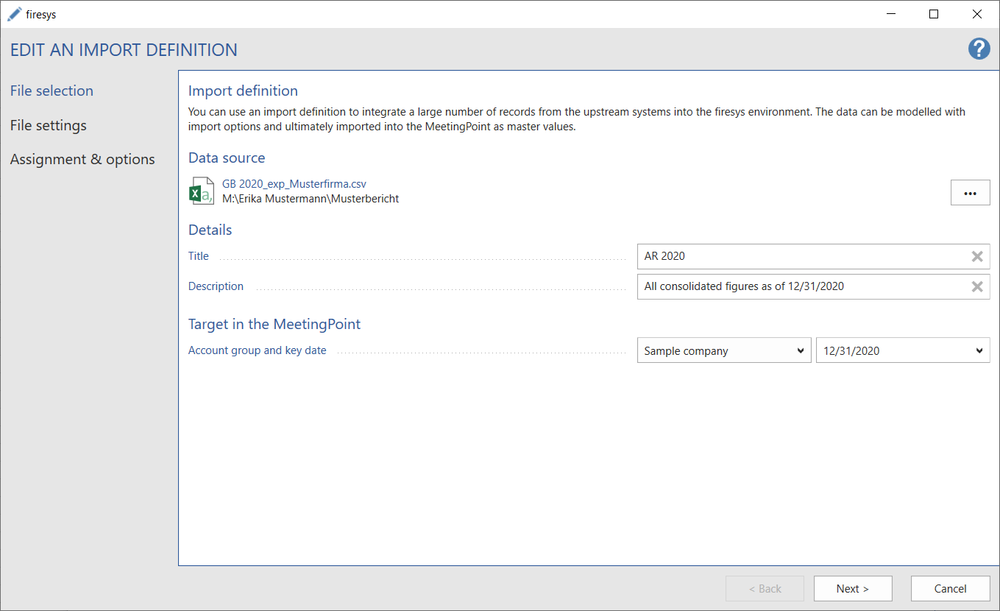
File selection: In the dialog you have the possibility to select a data source from which the data should be read. In the Details area, further meta information can be added to the import definition. As a target for your data you can use an already existing key date in the firesys-MeetingPoint or you can define a new one at this point.
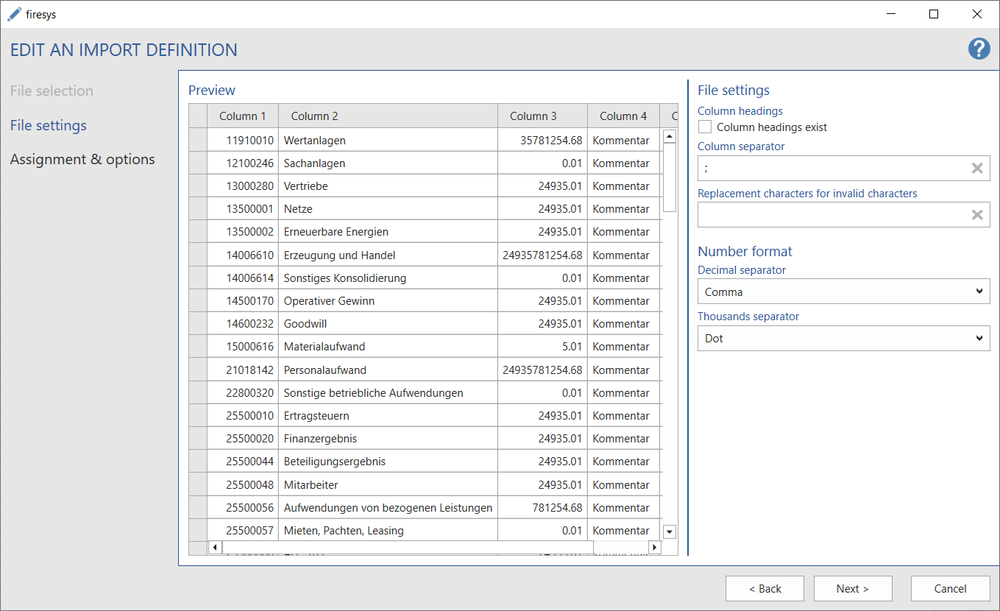
File settings: Determine whether column headings are present in the import file If this is the case, the option will not transfer the first line of the file. Furthermore the column delimiter must be specified, so that firesys can recognize and transfer the records correctly.
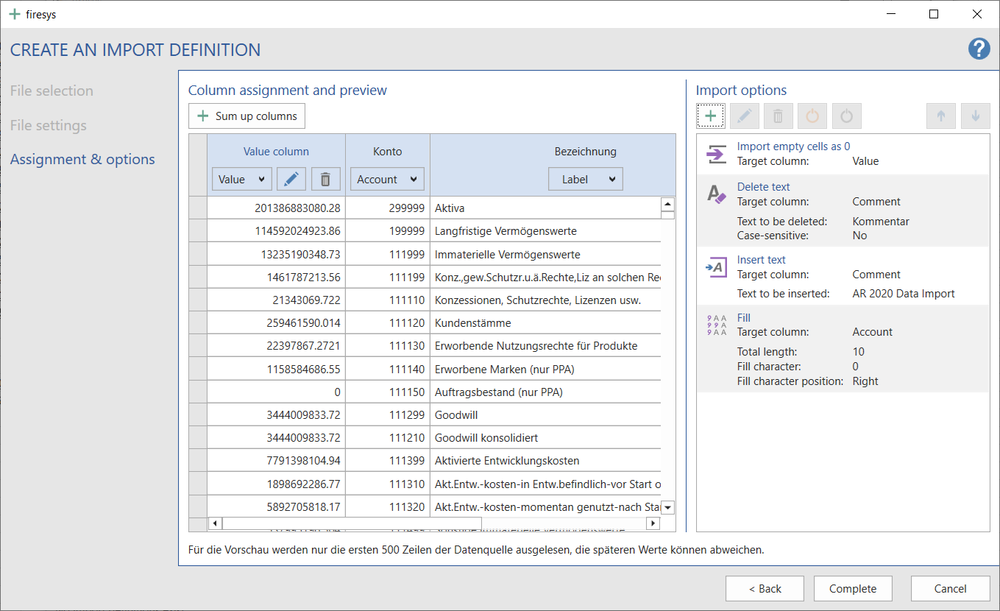
Assignment & Options: In the area “Column assignment and preview” the data records must be structured. The area contains the live view of the import options. To import the data into the firesys-MeetingPoint the columns of the import file must be defined. There are four types for the data columns to choose from:
File selection
Data source
Clicking on the radiobutton opens the file selection dialog in which you can select .csv or .txt files.
Details
Title
The title serves to visually differentiate the import definitions in the manager. The title must be unique and is restricted to 150 characters.
Description
The description serves to visually differentiate the import definitions in the manager. The entry is restricted to 255 characters.
Target in the MeetingPoint
Account group
An existing account group must be selected from the MeetingPoint into which the data is imported.
Key date
An existing key date can be selected from the MeetingPoint or a new key date can be entered. All data in the data source is imported on this key date during the import.
File settings
Preview
This is a view of the data structure of the import file.
Encoding
If the encoding of the data source could not be determined, it must be manually defined here.
The supported encodings of the .csv files can be found in the table below:
| Encoding | Supported |
|---|---|
| UTF-8 | The encoding is supported and automatically recognized. |
| UTF-16 BE | The encoding is supported and automatically recognized. |
| UTF-16 LE | The encoding is supported and automatically recognized. |
| UTF-8 without BOM | The encoding is supported but not automatically detected. |
| ANSI Latin 1 | The encoding is supported but not automatically detected. |
| ANSI Cyrillic | The encoding is supported but not automatically detected. |
| 8859-1 Latin 1 | The encoding is supported but not automatically detected. |
| 8859-5 Cyrillic | The encoding is supported but not automatically detected. |
| 8859-15 Latin 9 | The encoding is supported but not automatically detected. |
| UTF-32 BE | The encoding is not supported. |
| UTF-32 LE | The encoding is not supported. |
File settings
Column headings
If this option is activated, the headings are read out from the first row of the import file.
If this option is activated, the first row of the import file is read out as the record.
The column headings are displayed in the dialog with column 1 to column x.
Column separator
The separator with which the different columns are recognised in the import files.
Only one character can be selected as the separator.
Replacement character for invalid characters
You can select a single character, or no character, to replace invalid characters in the import file. The default setting for the “Replacement character for invalid characters” is the “Blank character” parameter.
For more information about the replacement character, see → Working with master values
Number format
Decimal separator
The following characters can be selected as the decimal separators: None, point, comma.
Thousands separator
The following characters can be selected as the thousands separators: None, point, comma, blank, apostrophe.
Assignment & options
Column assignment and preview
This area contains the live view of the import options. Columns must be defined to import the data into the firesys MeetingPoint. Four types are available for the data columns:
- Account
- Label
- Value
- Comment
The Account, Description and Value columns are mandatory for the data import; the Comment column is optional. All columns can be assigned only once.
Sum up columns
Creates a new column in which several existing columns can be summed up vertically without changing the data source. The Totals column must be given a name and at least two existing columns serving as summands of the new column must be defined. This Totals column can then be assigned a type just like any other column (Account / Name / Value / Comment).
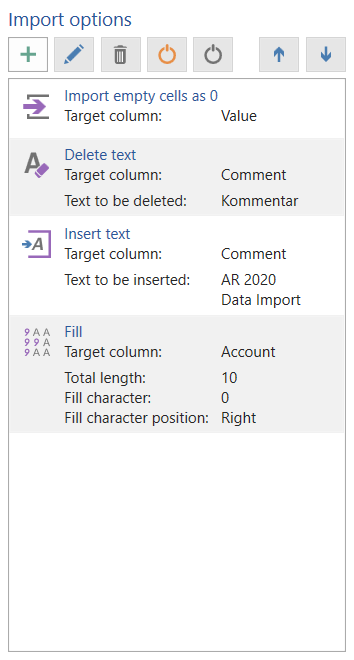
Import options
Additional import options can be created that are applied when the data is imported. These options can be used for modelling the data and subsequently transferring it to the firesys MeetingPoint.
Options
Make your selection from various import options and prioritise the sequence in which the options should be applied.
Add option
Opens a dialog for adding an import option. The individual selection options depend on the target columns that are selected.
Edit
Opens the selected import option for editing.
Delete
Deletes the selected import options.
Activate
Reactivates the selected deactivated import options.
Deactivate
Deactivates the selected import options so that they are no longer applied.
Prioritise higher
Prioritises the selected import option upwards, so that it is applied earlier.
Prioritise lower
Prioritises the selected import option downwards, so that it is applied later.
Import options detailed view
 Fill
Fill
Select a number and a fill character. The number of characters in the column is increased to this number with the fill character.
 Skip the record if cells are empty
Rows that do not have any content are skipped during the data import.
 Factor
Multiplies or divides the imported values by a certain factor.
 Filter
If rows with certain texts should be excluded from the import process, they can be filtered out according to certain parameters.
 Grouping
Combines all account values of an account.
 Import empty cells as 0
Cells that do not have any values are enhanced with a "0" and imported during the data import.
 Prefix
The text that is entered is displayed before the selected record.
 Suffix
The text that is entered is displayed after the selected record.
 Insert text
This option is used to fill empty cells with a particular text.
 Replace text
Select a text that is replaced by a different text when the data is imported.
 Delete text
The configured text/number is deleted when the data is imported.
See also
![]() An overview of the data-import-manager
An overview of the data-import-manager
![]() The interface of the data-import-manager
The interface of the data-import-manager
![]() The list view in the data-import-manager
The list view in the data-import-manager


