Synchronise and detach: Unterschied zwischen den Versionen
Keine Bearbeitungszusammenfassung |
Keine Bearbeitungszusammenfassung |
||
| Zeile 33: | Zeile 33: | ||
In this manager you get a hint for each list entry, on which worksheet and in which cell a conflict has occurred. Additionally, there are buttons in the right part of the list area that help you detach the conflict. | |||
Version vom 8. April 2021, 10:36 Uhr
When working in firesys with numerical values in Excel, five different types of values can be used: There are Manual values, Transmitter values, Account values, Account calculations and Account aggregates. All the information for the individual value types is stored in the firesys MeetingPoint and listed for you in the Master value manager. In order to keep all the numerical values in your workbook up to date and consistent, there is the function " Synchronize values" in the menu ribbon "*Content" in the group "Master values".
<imagemap>Datei:EN_Menüband_Excel_Inhalt_Zentralwerte_Werte-synchronisieren.jpg|center|1200px
desc none </imagemap>
Definition
| |
|---|---|
When you click on the “Synchronise values” button in the “*Content” menu ribbon in the “Master values” group, all master values that are currently inserted into the Excel workbook are compared with their related value in the firesys MeetingPoint. This draws a comparison based on the time of the last change. If the information in the MeetingPoint is more recent than the information in the relevant Excel workbook, the information from the MeetingPoint is transferred to the Excel workbook. Otherwise, the value from the Excel workbook is transferred to the firesys MeetingPoint. If you insert a manual rounding value, the value of the key date-dependent account calculation or account aggregat is transferred to the firesys MeetingPoint when you use the “Synchronise values” function. Note: If this key date-dependent account calculation or account aggregat is also used in other Excel workbooks, they also have to be synchronised to obtain the changed initial value. |
The manager view
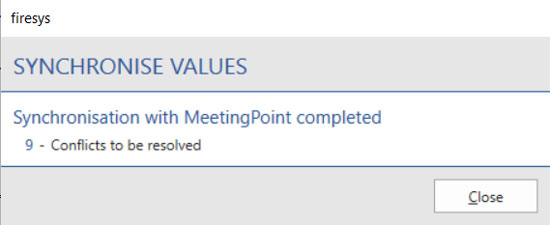
Clicking on the “Synchronise values” button opens a progress dialogue box showing the list and comparison of the numerical values with the MeetingPoint. A result report then opens:
If conflicts with numerical values occurred in your workbook, when you click on “Close”, a manager automatically appears that sorts the individual conflicts by categories:
In this manager you get a hint for each list entry, on which worksheet and in which cell a conflict has occurred. Additionally, there are buttons in the right part of the list area that help you detach the conflict.
Good to know
| |
|---|---|
Each individual entry can be extended to obtain additional information about the conflict that occurred, and you can use the “Expand all” and “Collapse all” buttons above the list area to display additional information or to obtain a clearer overview of the list elements with just one click. |
Video: Synchronise values
How to synchronise your master values:
-
Ensure that master values already exist in your account workbook.
-
Open the Excel workbook whose master values should be synchronised.
-
In the “*Content” menu ribbon in the “Master values” group, click on the “Synchronise values” button.
→ A progress dialogue box appears informing you about the progress of the synchronisation and subsequently a result report. -
Clicking on “Close” ends the synchronisation.
Important note:
If any conflicts occurred during the synchronisation, an overview manager appears listing all of the conflicts.
Detach link
Once a master value was inserted from the MeetingPoint into a cell in the Excel workbook, this cell is permanently connected to the MeetingPoint. This means that you can use the “Synchronise values” function to ensure the integrity of all values. You can remove this connection by using the “Detach link” function.
- To do this, select the cell in which an inserted master value is located.
- Click on the “Detach” button in the “*Content” menu ribbon in the “Master values” group
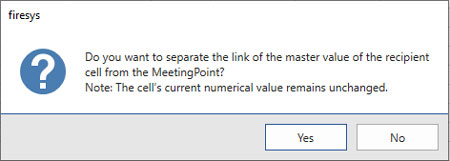
- This opens the following dialogue box:
- Confirm the message by clicking on “Yes”.
See also
![]() Insert in Excel
Insert in Excel
![]() Insert transmitter values
Insert transmitter values
![]() Insert manual values
Insert manual values
![]() Insert account values
Insert account values
![]() Insert an account calculation or account aggregate
Insert an account calculation or account aggregate
![]() Additional functions in the master value manager
Additional functions in the master value manager

