Insert an account calculation or account aggregate
When you work in firesys with numerical values in Excel, you can use what are called account calculations and account aggregates. An account calculation and an account aggregate consists of an addition or subtraction of the account values that are saved in firesys and can be used for all key dates. The calculation result of an account calculation or an account aggregate can be changed as it is being created by using mathematical functions according to the specifications that are relevant to you. Furthermore, after you insert an account calculation or an account aggregate, you can also add a manual rounding value, which you can use to change the result of the account calculation or account aggregate manually to improve how it is presented and to allow you to continue working on it.

Definition
| |
|---|---|
A key date-independent account calculation or account aggregate always consists of the addition or subtraction of one or more accounts. For each key date, the account calculation and account aggregate are then available with the respective account values.
|
The description of the individual components when working with account calculations or account aggregates
The schematic view
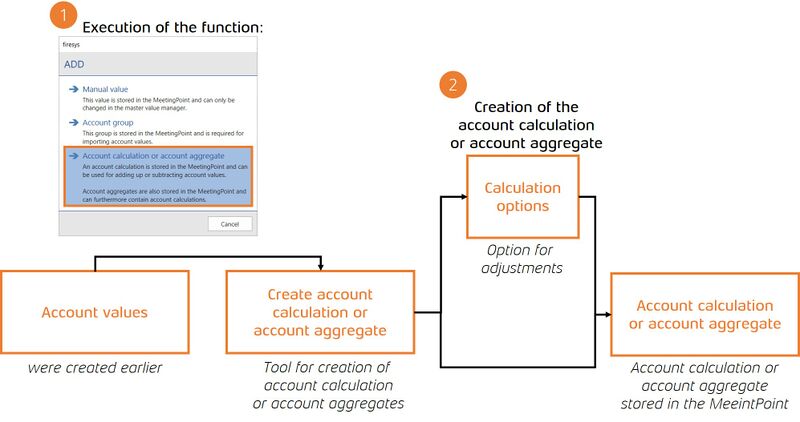
The first diagram shows the relationship between the individual components that are required for creating an account calculation or an account aggregate:
The initial situation is that your MeetingPoint already contains account values. You can use the “Insert” function in the “Management” group in the master value manager to create an account calculation or an account aggregate. The account calculation dialogue box opens, the firesys tool for creating an account calculation or account aggregate. Each account calculation or account aggregate requires a name (which is unique for the account group that is used). You can then select the account group from which the accounts for the account calculation or account aggregate should be used. All available accounts are displayed in the list area. You can left-click on the relevant list entry to select all accounts that should be added - and right-click all accounts that should be subtracted.
You can then click on the “OK” button to create an account calculation or an account aggregate - or optionally, to add a mathematical operator, a pre-defined factor and, where applicable, rounding (to a defined number of decimal places) to the calculation - and then finish creating it by clicking on “OK”. This automatically saves the account calculation or account aggregate in the MeetingPoint.
Note: For each key date, the account calculation or account aggregate is then available with the respective account values for the key date.
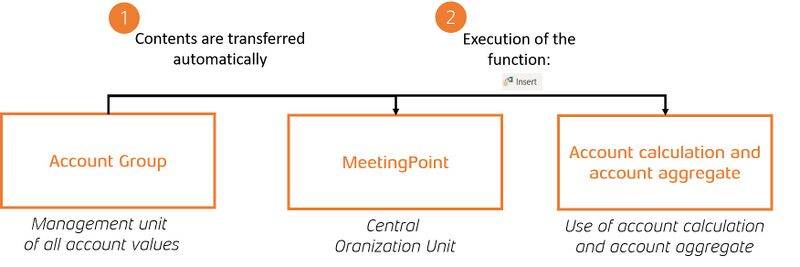
The second diagram shows the context of working further with account calculations or account aggregates, once one or more account calculation(s) or account aggregate(s) have been created in the master value manager and transferred to the MeetingPoint.
The firesys MeetingPoint is used here as the central organisational unit and collection point for all account calculations and account aggregates. From here, the account calculations or account aggregates that exist in the MeetingPoint can be inserted into any cell that is not locked or which contains a different master value by using the “Insert” function (in the “*Content” menu ribbon in the “Master values” group).
Good to know
| |
|---|---|
Account calculations and account aggregates are always related to key dates. Sometimes, account calculations or account aggregates cannot be inserted correctly and used for certain key dates, whereas on other key dates, not all required account values are available (yet) which means that incorrect account calculations or account aggregates are created. |
Video: Create an account calculation
How to create an account calculation:
-
Make sure that account values are already stored in your MeetingPoint.
-
Open the Master value manager in the "*Content" menu ribbon in the "Master values" group.
-
Click on the "Add" button in the "Management" group.
→ A selection dialogue box opens. -
Select the “Account calculation” option.
→ The account calculation dialogue box opens. -
Here you have to enter a unique name for the account group that you used and select the account group in which the account values that are required for the account calculation are located.
-
From the list area with all account values, select those account values that you want to add with a left click, and those that you want to subtract with a right click.
-
You can also configure a mathematical operator, a factor and automatic rounding of the result.
-
Exit the dialogue box by clicking on the “OK” button.
→ The account calculation is now automatically transferred to the MeetingPoint.
Optional options:
Video: Insert an account calculation
How to insert an account calculation:
-
Open the Excel workbook in which the account calculation should be inserted.
-
Select the cell you require.
-
In the “*Content” menu ribbon, in the “Master values” group, click on the “Insert” button.
→ A dialogue opens. -
Click on "Master value".
→ The task pane "Insert values" opens. -
In the work area, select “Account calculation” as the data type and then the account group you require and the correct key date.
-
The stored Account calculations appear in the list area. Select the desired Account calculation here.
-
If you do not require a manual rounding value, you can click on the left-hand button in the “Actions” area to insert the account calculation.
→ Account calculation is inserted in the selected cell
Video: Edit an account calculation
To edit an account calculation:
-
Make sure that an account calculation already exists in your MeetingPoint.
-
In the “*Content” menu ribbon, in the “Master values” group, open the master value manager.
-
In the list view, navigate to the desired account calculation.
-
Click the “Edit” button in the “Management” group.
→ The account calculation dialog opens. -
From the list area with all account values, select those account values that you want to add with a left click, and those that you want to subtract with a right click.
-
You can also configure a mathematical operator, a factor and automatic rounding of the result.
-
Exit the dialogue box by clicking on the “OK” button.
→ The account calculation is now automatically adjusted in the MeetingPoint. -
If you have already inserted the Account calculation in your Excel workbook, click on the "Synchronise values" button in the "*Contents" ribbon in the "Master values" group.
→ The adjustments are transferred to Excel.
Preparatory activities:
Video: Create an account aggregate
To create an account aggregate in the Master value manager:
-
In the ribbon, go to the "*Content" tab in the "Master values" group and select the Master value manager.
→ The Master value manager opens. -
Click the "Add" button in the Master value manager.
→The "Account calculation/Create account aggregate" dialog appears. -
Here you must define a unique name for the account aggregate used and select the account group in which the account values and account calculations required for the account aggregate are located.
-
From the list area with all account values and account calculations, select the account values and account calculations you want to add with a left click and the account values and account calculations you want to subtract with a right click.
Optionally, you can additionally set a mathematical operator, a factor, an automatic rounding of the result and write a comment. -
Confirm the dialog with "OK".
→ The account aggregate is automatically written to the MeetingPoint and can be viewed via the Master value manager.
Note: An account aggregate contains at least one account calculation.
Additional functions
Using a manual rounding value
Once you have added an account calculation or an account aggregate, you see the result immediately in the respective cell. You can use this result further in other account calculations, account aggregates or validations, or it can be used as a presentation number in Word. You can use a manual rounding value to change the final result of an account calculation or an account aggregate. The process is explained in more detail in the following diagram:

The initial situation is that you have already created an account calculation or account aggregate, or you are currently creating a new account calculation or account aggregate. To add a manual rounding value, the work area of the “Insert values” function must be opened and selected as data type “Account calculation”.
Alternatively, you can open the manual rounding wizard via the Master value manager. To do this, click on the button “Master value manager” in the menu ribbon “*Contents” in the group “Master values”. Select the desired account calculation or the desired account aggregate and then click on the “Edit” button in the Master value manager. A dialogue opens where you can select the option “Manual rounding value”.
Good to know
| |
|---|---|
Always ensure that you have selected the correct key date when you create a manual rounding value. |
Select the desired account calculation or account aggregate in the list area.
If you click on the button “Open the rounding wizard” (![]() - Symbol), the initial value of the selected account calculation or account aggregate is displayed.
You can then choose between the following three rounding types under the item "Rounding type" in the drop-down menu:
- Symbol), the initial value of the selected account calculation or account aggregate is displayed.
You can then choose between the following three rounding types under the item "Rounding type" in the drop-down menu:
Manual rounding
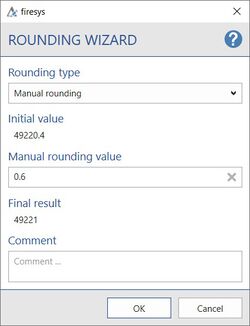
In the input window “Manual rounding value” you can enter any number (negative numbers can also be entered with the - symbol). When entering one or more digits, the invoice result under “Final result” is automatically adjusted in each case. As soon as you have entered a suitable manual rounding value, you can confirm the entry by clicking “Ok”.
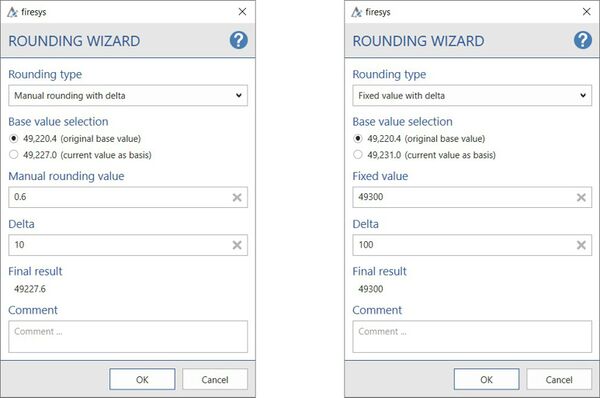
Manual rounding with delta
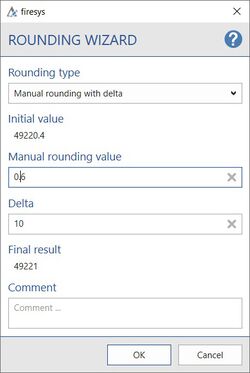
For manual rounding with delta, you can add any value in addition to the manual rounding value in the “Delta” input window. With the help of the delta, a value range determined by you is defined within which the manual rounding value you entered is applied.
Fixed value with delta
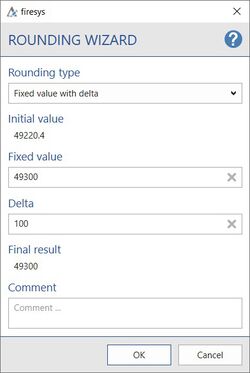
For manual rounding with delta, you can select a delta with a fixed value in addition to the manual rounding value. Here you can use the delta to define a certain range of values. Under “Fixed value” you can enter any value that is displayed within the delta you have defined.
Optionally, a comment can be added to all three rounding types, which is displayed in the Master value manager.
Good to know
| |
|---|---|
There are two ways to add a manual rounding value. The first way is via the task pane "Insert values". Select "Account calculations and account aggregates" as the data type and then Open the rounding wizard under "Actions". The second way is via the Master value manager. To do this, click on the button "Master value manager" in the menu ribbon "*Contents" in the group "Master values". Select the desired account calculation or the desired account aggregate and then click on the "Edit" button in the Master value manager. A dialogue opens where you can select the option "Manual rounding value". |
Change of the base value
If underlying values of the account calculation are changed, a base value selection appears for the rounding types “Manual rounding with delta” and “Fixed value with delta”, in which you can select between the original base value and the currently value as the base.
The following diagram explains the process in more detail:

The initial situation is that new values are transferred to the MeetingPoint by account workbook or data import. If existing account calculations or aggregates containing “Manual rounding with delta” or “Fixed value with delta” are changed by adding or subtracting values, it is then possible to choose between the original base value or the current value as basis for the account calculation or aggregate.
Good to know
| |
|---|---|
As soon as you have made changes to an account calculation or account aggregate that is dependent on key dates, the new end result is automatically transferred to the MeetingPoint and the value of the initial value is thus overwritten, which will affect all other workbooks that reference this account calculation or account aggregate. You can reset a manual rounding value at any time by removing the rounding value that was manually entered beforehand. |
Delete manual rounding value
If you want to delete a manual rounding value, click on the “Master value manager” button in the “*Content” ribbon in the “Master values” group. In the Master value manager, select the account calculation or account aggregate whose manual rounding value you want to delete. Note that you must select a key date-related account calculation or a key date-related account aggregate for this. Then click on the “Delete” button in the “Management” group in the Master value manager.
A dialogue is displayed asking whether the rounding value for this calculation should really be deleted.

Confirm with “Yes” if the manual rounding value is to be deleted.
A note about the deletion of the manual rounding value is displayed in the Master value manager in the drop-down menu of the value concerned.
Video: The Rounding Wizard-Create a manual rounding
To create a manual rounding for an account calculation/aggregate of accounts:
-
Open an Excel workbook and select the cell on the worksheet whose account calculation or account aggregate is to be provided with a rounding value.
-
Click on the “Insert” button in the “*Content” menu ribbon in the "Master values" group.
-
In the selection dialogue that then appears, select the option “Master value”.
→ The task pane “Insert values” opens on the right. -
Select “Account calculations and account aggregates” from the drop-down menu under “Data type”.
-
Then assign the desired account group and the desired key date.
-
Select an account calculation or account aggregate below.
-
Click on the symbol “Open the rounding wizard” in the group “Actions”.
→ The rounding wizard opens. -
Select manual rounding in the drop-down menu under “Rounding type”.
-
Enter the desired value under “Manual rounding value”.
-
Confirm your entry with “Ok”.
-
Select the rounded account calculation/account aggregate in the task pane.
-
Click on the button “Insert selected value” in the group “Actions”.
→ The account calculation/account aggregate is inserted.
Video: The Rounding Wizard-Create a Manual Rounding with delta
To create a manual rounding with delta for an account calculation/aggregate in the Master value manager:
-
Click on the button “Open Master value manager” in the menu ribbon “*Content” in the group “Master values”.
→ The Master value manager opens. -
In the Master value manager, select the desired account calculation/account aggregate.
-
Click on the button “Edit” in the Master value manager in the group “Administration”.
→ The editing dialogue opens. -
Select “Manual rounding value” in the editing dialogue.
→ The rounding wizard opens. -
Under “Rounding type” in the drop-down menu, select “Manual rounding with delta”.
-
Enter your desired rounding value under “Manual rounding value” and your desired delta under “Delta”.
→ The result of the manual rounding is displayed under “Final result”. -
Click on “Ok”.
→ The manual rounding is displayed in the Master value manager under the relevant account calculation/account aggregate.
Video: The Rounding Wizard-Create a Fixed Value with delta
To create a manual rounding for a fixed value with delta for an account calculation/aggregate in the Master value manager:
-
Click on the button “Open Master value manager” in the menu ribbon “*Content” in the group “Master values“.
→ The Master value manager opens. -
In the Master value manager, select the desired account calculation/account aggregate.
-
Click on the button “Edit” in the Master value manager in the group “Administration”.
→ The editing dialogue opens. -
Select “Manual rounding value” in the editing dialogue.
→The rounding wizard opens. -
Under “Rounding type” in the drop-down menu, select the item “Fixed value with delta”.
-
Enter your desired value under “Fixed value” and your desired delta under “Delta”.
→ The result of the rounding is displayed under “Final result”. -
Click on “Ok”.
→ The manual rounding is displayed in the Master value manager under the relevant account calculation/account aggregate.
Select master values/transmitter cells

As soon as you have made changes to an account calculation that is dependent on key dates, the new end result is automatically transferred to the MeetingPoint and the value of the initial value is thus overwritten, which will affect all other workbooks that reference this account calculation. You can reset a manual rounding value at any time by removing the rounding value that was manually entered beforehand.
Good to know
| |
|---|---|
You can select either all transmitter values, or all master values. You cannot select both value types at the same time. |
Video: Highlight master values
To highlight a master value on your worksheet:
-
Open an Excel workbook and activate firesys.
Note: It is assumed that a compatible MeetingPoint has already been connected. -
Open the Sheet Inspector in the "*Status" menu band in the "Information" group.
-
Click on one of the two buttons in the "Select master values" group in the task pane.
→ Click on the left symbol (select master values) to highlight all Excel cells that receive information from the MeetingPoint.
→ Click on the right symbol (select sender cells) to highlight all Excel cells that send information to the MeetingPoint.
See also
![]() Insert in Excel
Insert in Excel
![]() Insert transmitter values
Insert transmitter values
![]() Insert manual values
Insert manual values
![]() Insert account values
Insert account values
![]() Synchronise and detach values
Synchronise and detach values