Insert account values
When working in firesys with numerical values in Excel, the so-called account values can be used. An account value represents a value with a unique designation on a key date. This can be transferred to the firesys MeetingPoint linked to Excel via the Data import or an account folder. It can then be used by all other Excel workbooks, e.g. for cross-file validation. You can also use the "Master values history" button to display the history of your account values.

Definition
| |
|---|---|
An account value is a data record in the firesys MeetingPoint that must contain a numerical value, a name, an associated account and a key date - it can also contain an optional free text. |
The description of the individual components when working with manual values
The schematic view
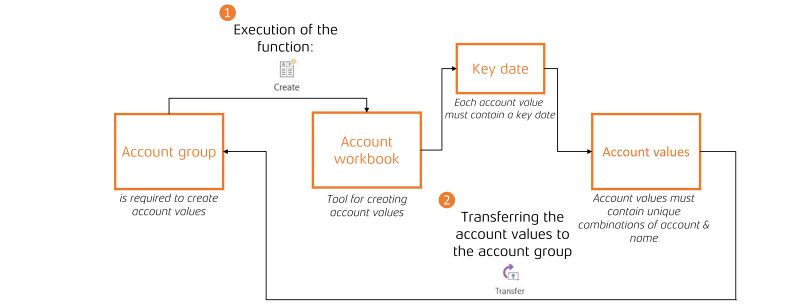
The first diagram shows the context of the individual components that are required for creating an account value:
Using the "Add" function in the "Administration" group in the Master value manager, you can create an account group (if it does not already exist) that is needed as the central management unit of all account values. Using the "Create account workbook" function (in the "*Content" ribbon in the "Data import" group), you can create an account workbook that references the previously created account group. In this account workbook (a newly opened Excel worksheet) you can define the individual components of each account value. It is important to note that a unique combination of assigned account and key date must be used for each individual account value. All account values can then be transferred to the firesys MeetingPoint using the "Transfer account workbook" function (in the "*Content" menu ribbon in the "Data import" group).
Alternatively, you can also transfer account values to the MeetingPoint via the Data import. Using the "Create" function in the Data import manager (in the "*Content" ribbon in the "Data import" group), you can create an import definition that makes it possible to integrate a large number of records from upstream systems into the firesys environment. In the Import definition, select a data source from which you want to obtain your account values. It is important that you assign a title to the Import definition as well as an account group and a key date. The data can be configured using import options and will end up being imported into the MeetingPoint as master values.
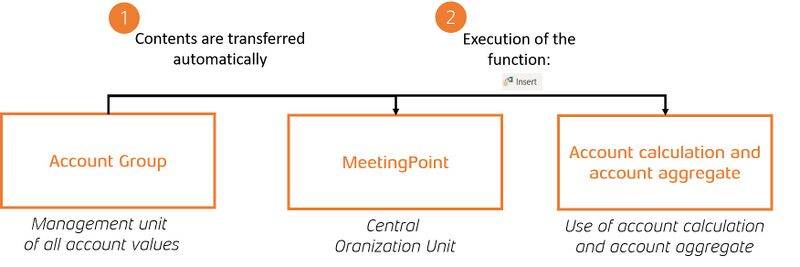
The second diagram shows the context of working further with account values once the account values have been created in the master value manager:
Using the "Transfer account workbook" function (in the "*Contents" ribbon in the "Data import" group), you can transfer all account values to the firesys MeetingPoint. Alternatively, you can transfer account values using the Data import manager in the "Data import" group. The firesys MeetingPoint serves as the central organizational unit and collection point for all master values. Subsequently, the account values present in the MeetingPoint can be inserted by using the "Insert" function (in the "*Content" menu ribbon in the "Master values" group) in any cell that is not locked or contains another master value.
Good to know
| |
|---|---|
Account values can (but do not have to) contain different numerical values for different key dates. An account value and its corresponding key date always map unique information. |
Create and insert an account value

Task Pane Insert values
 Data type
Here you can select between Transmitter values, Manual values, Account values as well as Account calculations and Account aggregates.
 Account group
At this point you can select an account group.
 Key date
Here you can select the key date for values in an account group.
 Actions
![]() Insert the selected value
Insert the selected value
Inserts a value into the selected cell.
![]() Open the rounding wizard
Open the rounding wizard
Opens the rounding wizard for editing and account calculations and ratio aggregates.
![]() Insert key date
Insert key date
Inserts the key date selected above into the selected cell.
Video: Create account values
How to create an account value:
-
Open an Excel workbook and activate firesys.
Note: A prerequisite is that a compatible MeetingPoint was already connected. -
In the “*Content” menu ribbon, in the “Master values” group,
→ open the master value manager. -
In the “Management” group, click on the “Add” button.
→ A selection dialogue box opens. -
Select the “Account group” option and in the input dialogue box that opens, enter the name you require.
-
Then close the master value manager and in the “Account workbook” group, click on the “Create” button.
→ This opens a dialogue box -
which you can select the account workbook to which the account values should be written, and also whether you want to create a new account workbook or load an existing one from the MeetingPoint.
-
This opens a new Excel worksheet in which you can define the components of the individual account values.
-
By using the “Transfer” function (in the “Account workbook” group), you can transfer all of the account values that exist in the account workbook into the MeetingPoint.
→ You have created an account value.
Video: Create Import definition
To add a new Import definition in the Data Import Manager:
-
Create an Import definition after which your data should be inserted into the MeetingPoint. Select the “Data Import Manager” button in the “Data Import” group in the “*Content” menu bar.
→ The data import manager opens. Choose the “Create” button in the “Import definition” group.
→ A dialogue box opens.Click on “Next” to go to the “File Settings” tab.
-
In the area “Number format” the decimal separator and the thousand separator of the import file are set.
Click on “Next” to access the “Assignment & Options” tab.
account
name
value
comment
-
The account, name and value columns are mandatory for data import; the Comment column is optional. All columns can only be assigned once.
-
In the area “Import options” additional options can be created that are applied when the data is read in. With the help of these options the data can be modelled and then transferred to the firesys-MeetingPoint.
-
In the video, an option is created to divide the account values by 1 million during transfer.
-
There are further options, the choices depend on the “target column”.
-
If you want to work with multiple read options, the order in which the options should be applied must be defined.
-
Click on “Finish” to enter the data import manager.
→ The created import definition is now available.
File selection: In the dialog you have the possibility to select a data source from which the data should be read. In the Details area, further meta information can be added to the import definition. As a target for your data you can use an already existing key date in the firesys-MeetingPoint or you can define a new one at this point.
File settings: Determine whether column headings are present in the import file If this is the case, the option will not transfer the first line of the file. Furthermore the column delimiter must be specified, so that firesys can recognize and transfer the records correctly.
Assignment & Options: In the area “Column assignment and preview” the data records must be structured. The area contains the live view of the import options. To import the data into the firesys-MeetingPoint the columns of the import file must be defined. There are four types for the data columns to choose from:
Video: Insert account values
How to insert an account value:
-
Open the Excel workbook in which the account value should be inserted.
-
Select the cell you require.
-
In the “*Content” menu ribbon, in the “Master values” group, click on the “Insert” button.
→ The "Insert" task pane opens. -
Select the value type "Account values" from the drop-down menu in the "Data type" area
-
Select the desired account value in the list area and click on the left button "Insert selected value" in the "Actions" area.
→ The account value is inserted.
Additional functions
 Select master values/
  transmitter cells

An option is available for selecting all master values or transmitter cells automatically on your worksheet. To do this, you can open the worksheet inspector and in the header area in the “Select master values” group, use the two icons to select either all master values that obtain information from the MeetingPoint or all transmitter values that transmit information to the MeetingPoint.
Good to know
| |
|---|---|
You can select either all transmitter values, or all master values. You cannot select both value types at the same time. |
To highlight a master value on your worksheet:
-
Open an Excel workbook and activate firesys.
Note: It is assumed that a compatible MeetingPoint has already been connected. -
Open the Sheet Inspector in the "*Status" menu band in the "Information" group.
-
Click on one of the two buttons in the "Select master values" group in the task pane.
→ Click on the left symbol (select master values) to highlight all Excel cells that receive information from the MeetingPoint.
→ Click on the right symbol (select sender cells) to highlight all Excel cells that send information to the MeetingPoint.
See also
![]() Insert values in Excel
Insert values in Excel
![]() Insert transmitter values
Insert transmitter values
![]() Insert manual values
Insert manual values
![]() Insert an account calculation or account aggregate
Insert an account calculation or account aggregate
![]() Synchronise and detach values
Synchronise and detach values
![]() Additional functions in the master value manager
Additional functions in the master value manager