Create a dictionary
When creating and updating the dictionary from monolingual tables, languagewords writes all texts which are found in the print areas of your Excel workbook into column B of the dictionary. This first language is referred to as the “Main language”.
Alternatively, it is also possible to take over an existing translation from bilingual Excel work-sheets (see bilingual tables).
Video: Creating a dictionary
This is how you create a dictionary with firesys:
-
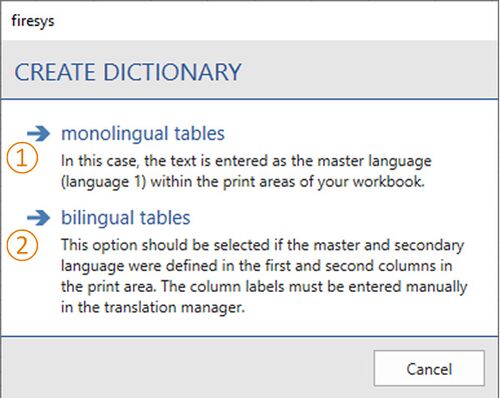
On the “*Translation” ribbon, in the “Dictionary” group, choose the “Create/update” button. In the dialog that follows, select one of the two options:
-
Single-language tables
In this case, the text is entered as the master language (language 1) within the print areas of your workbook. -
Bilingual tables
Choose this option if you have the texts of the master language in the first column and those of the secondary language in the second column of the print area. Column labels must be entered manually in the translation manager. -
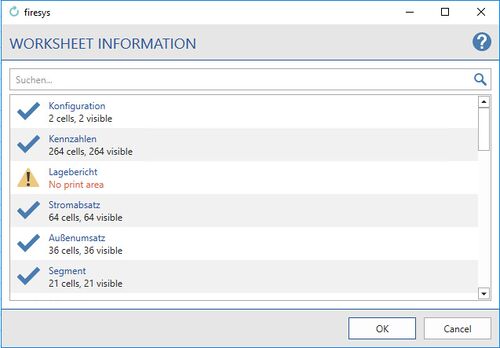
Check the information in the following window.
Note:In the dialog you can see which worksheets in your Excel workbook in the dictionary or ignored. Sheets without a print area and protected sheets cannot be added to the dictionary. -
Click on
-
“Cancel” to correct the settings
-
“OK” to create the dictionary or
→ The dictionary is created.
Preparation of the Excel file
Set print areas
You must first determine print areas for the individual worksheets of your Excel workbook; the dictionary will only accept text within the print areas for translation at a later date. Everything outside of these print areas (even worksheets with no print areas) will be ignored when creating and updating the dictionary.
What is included in the dictionary?
Within the print area, the text in the cells with at least one letter or symbol is added to the dictionary; numbers are ignored.
Good to know
| |
|---|---|
The worksheets must not be protected. |
Dates in the dictionary
If a year is in the dictionary, it can be changed from a single point for all tables, e.g. from “2015” to “2016”.
- If a year is simply given as a number (e. g. “2015”), it will be interpreted as a number and not be included into the dictionary initially. However, you can adjust this as follows:
- Select the required cell and click on the “Include directly” button in the “Dictionary” group in the “*Translation” tab. The cell is added directly to the dictionary. Note: Only one cell can be selected; it must be assigned the number format “Standard”.
- Dates in the format of “31.12.2015”, if formatted as dates, will be treated as text and added to the dictionary when updating. This way, the format of the date can be adjusted automati-cally for the respective language.
Create dictionary
First review the language settings for new dictionaries in the “Dictionary settings” (see „Settings in Excel – dictionary“).
- Click on the “Create / Update” button in the “Dictionary” group in the “*Translation” tab
- Select one of the following options:
 Single-language tables
In this case, the text is entered as the master language (language 1) within the print areas of your workbook.
 Bilingual tables
Choose this option if you have the texts of the master language in the first column and those of the secondary language in the second column of the print area. Column labels must be entered manually in the translation manager.
Good to know
| |
|---|---|
The second column of the print area is always deleted and used as translation, even if it only in-cludes numbers! |
Check the information in the following dialogue:
In the dialogue you can see which worksheets in your Excel workbook in the dictionary or ig-nored. Sheets without a print area and protected sheets cannot be added to the dictionary.
Click
- “OK” to create the dictionary or
- “Cancel” to correct the settings (see “Preparation of the Excel file“).
Components of the dictionary
languagewords has inserted a new worksheet named “Synopsis” at the beginning of your Excel workbook. This sheet contains:
Language columns
The number of languages (maximum of) and their names are in accordance with your settings (see chapter “Settings in Excel – dictionary”); You can change the number of visible languages and their names at any time (see “Changing the number and names of languages”). Depending on the option that is selected when creating a new language, the following is included:
![]() with monolingual tables, the first column (B) contains the text in the first language
(“main language”); the translations must be entered in the remaining columns manually;
with monolingual tables, the first column (B) contains the text in the first language
(“main language”); the translations must be entered in the remaining columns manually;
![]() with bilingual tables, the second column (C) contains the existing translation; additional lan-guages must also be added manually.
with bilingual tables, the second column (C) contains the existing translation; additional lan-guages must also be added manually.
Columns for hits
These contain hyperlinks to all occurrences of a text within the print areas of the entire workbook.
Select language
With this command, you can change the language of the tables in your Excel workbook once the translation has been entered in the dictionary. You thereby select the language displayed in the print areas of your worksheets. Select the desired language in the “*Translation” tab in the “Dictionary” group under “Select lan-guage”. If a text is not translated in the dictionary, “0” is displayed in this position of the worksheet. If Ex-cel settings do not permit zeros to be displayed, the cell will remain blank.
Good to know
| |
|---|---|
Missing translations in tables are displayed as a note in linktables in the Excel data manager. |
Video: Select language
To change the language in the Excel file and change in Word:
-
In Excel, click on the button “Select language” on the tab “*Translation” in the group “Dictionary”.
-
Select the desired target language from the drop-down menu.
→ The data in the Excel file is translated in real time. -
Save your Excel file and open the Word document containing the translated data.
-
Click on the “*Publish” tab in Word.
-
In the “Language and number format” group, select the desired target language from the drop-down menu.
-
Then select all the Excel data in the text whose language is to be changed.
-
On the “*Contents” tab in the “Excel data” group, click on the “Update” button.
→ Your data will be translated.
Note: The number format set for the target language is also applied.
firesys dictionary
firesys has created a dictionary with approximately 50,000 translations containing terms from the world of finance. If you are using the translation manager in firesys, you can check whether missing translations of your terms exist in the firesys dictionary. These are then automatically added to your terms from the firesys dictionary.
Editing the worksheets
In order to jump from terms in the dictionary to their hits in the worksheets, click on a hyperlink in a hit column. In order to jump from a hit to the dictionary, click on the symbol “To dictionary” in the “firesys” group on the “*Translation” tab: If a text occurs multiple times, you can navigate using the “ Previous hit” or “ Next hit” symbols.
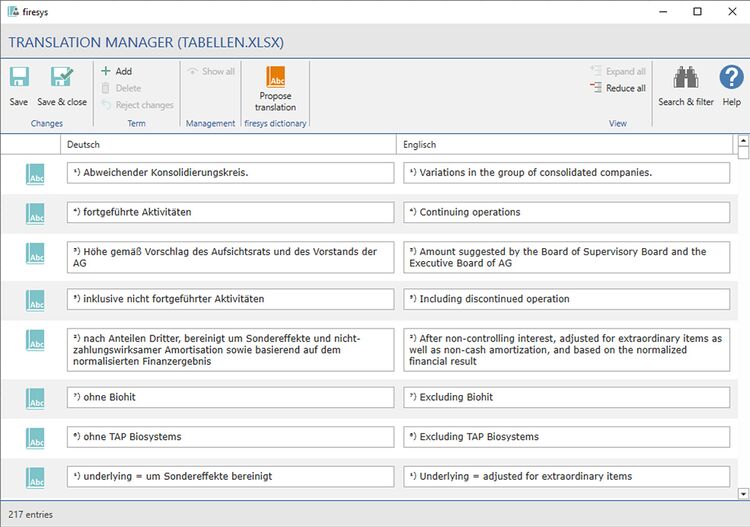
Alternatively, you can navigate directly to the word from any term by clicking “Translation man-ager” in the “Dictionary” group on the “*Translation” tab.
Edit terms
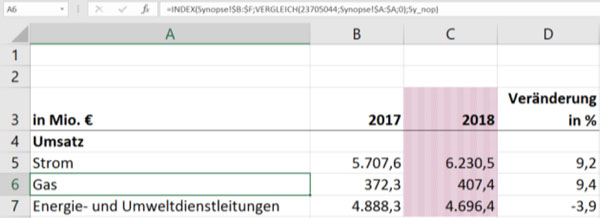
In the worksheets, all texts that have been accepted into the dictionary have been “formulized”, that is, they have been replaced with references to the dictionary in the “Synopsis” worksheet. In cell A7 of the following image, you do not find “Gas”, but rather a reference to the corresponding text from the dictionary has been inserted:
Good to know
| |
|---|---|
The synopsis serves only to view your translations and as a navigation to the hits. The entries are always edited in the Translation manager. |
You are not allowed to change the text “Gas” in cell A7, but need to switch to the source instead, i.e. switch to the corresponding entry in the Translation manager. Therefore, the link to the dic-tionary will remain.
If you nevertheless write over the contents of cell A7, for example by entering “R&D”, the link to the dictionary will be removed. The next time you update, “R&D” will be added to the dictionary as a new, untranslated term. If you delete the contents of cell A7, the hyperlink to the hit in the dictionary will be deleted the next time you update.
Add new term
New terms that are added within the print area of your worksheets will be handled as follows during the next update:
- New terms are added to the dictionary in the bottom of column B (main language column) and linked to the hit(s). Then they have to be translated into the other languages.
- If the term is already in the dictionary, it is automatically linked to the existing terms and their translation.
Good to know
| |
|---|---|
Please note: New text is always added to the main language (column B), regardless of which language is currently selected. |
Use word list
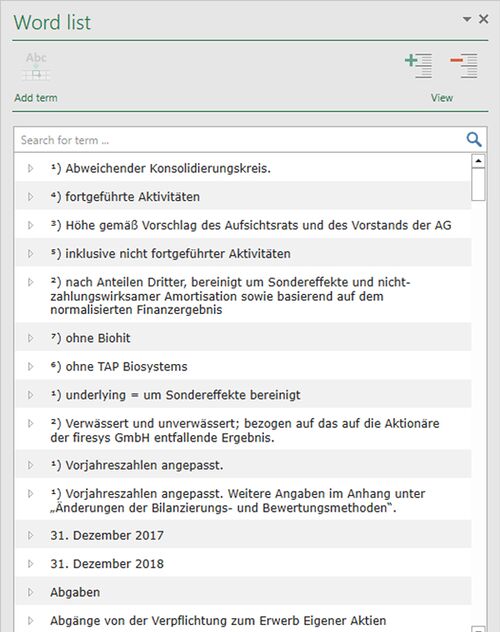
The word list contains all terms of the dictionary in alphabetical order including their translation. Use the word list to copy a term already existing in your workbook and to insert it in another location in the main language.
- Select the desired cell.
- From the “*Translation” tab in the “Dictionary” group, click the “Word list” button.
- The task area of the word list opens:
- Select the desired word and transfer it by clicking “Insert term”. Then update the dictionary to add the inserted term.
This ensures that the texts are written and translated in a uniform manner. We recommend using the word list to see whether a text is already used in another location.
Delete text
If text is deleted, the corresponding hit in the dictionary is removed. If the text is no longer in any worksheet, the text is crossed out in the dictionary but is not automatically removed. This allows the translation to be used again later if needed. Superfluous terms in the dictionary can be removed via the “*Translation” tab in the “synopsis sheet “ group under “Delete terms”.
Good to know
| |
|---|---|
Multiple selection allows you to delete several terms at once. |
Insert, rename or delete worksheets
Terms in newly added worksheets are accepted into the dictionary or linked with already existing terms if they are within the print area. If a worksheet is deleted, the hits for the terms used there are removed and, if the term is no longer used in the entire workbook, it is displayed as crossed out.
If the name of a worksheet is changed, the references in the dictionary to the hits must be ad-justed. This happens automatically if the option “Review and update hits” is activated (see“Dictionary”).
If the “Review and update hits” option is deactivated, you can update the hits manually. From the “*Translation” tab in the “Hits” group, click the “Update” button.
Update dictionary
Every time you add, change or delete text within the print areas of your worksheets, you need to update the dictionary in order to transfer these changes to the dictionary and, if necessary, adjust the hits.
Select “Create / Update” in the “*Translation” tab in the “Dictionary” group. Changed text within the print area of your worksheets is treated as follows:
- If languagewords finds a text that has not yet occurred in the entire workbook, it is added to the dictionary and has to be translated in the Translation manager.
- If the text is already included in the dictionary and is translated, however, the new hit is au-tomatically linked to the existing entry in the dictionary.
Good to know
| |
|---|---|
If duplicate terms are recognised during the update, firesys supports you with the correction of this issue by means of a specially-developed assistant. |
Working with synonyms
Synonyms are identical terms with different meanings, which are translated differently in a foreign language. For example, the German word “Darlehen” is sometimes translated as “loans” and sometimes as “borrowings”, depending on the context. And the favourite word of employees who are not German native speakers, “Rechnungsabgrenzungsposten”, is some cases translated as “Prepaid expenses” and in others as “Deferred income”.
Varying translations: intentional or not?
When creating the dictionary, you are very likely to find that the wording of some manually created Excel workbooks in individual worksheets is not always uniform, and that identical texts have been sometimes translated differently – although this was not necessary or intentional.
If there are identical terms in the main language with differing translations, they are marked with the supplement #n# (the deviating translations will remain in this case).
If this is not intentional, because it is based on wrong spelling or inconsistent translation, the deviating translations must be adjusted in the Translation manager.
Good to know
| |
|---|---|
The supplement for synonyms is automatically removed when the tables are imported in your firesys documents. |
Define synonyms
You can allocate varying translations to identical terms with different meanings. In order to translate “Rechnungsabgrenzungsposten” as “prepaid expenses” in some cases and as “deferred income” in others,
- translate “Rechnungsabgrenzungsposten” as “prepaid expenses” in the Translation manager.
- Add a “next free synonym” to the term via the Translation Assistant.
- Close the Translation manager by clicking “Save & close”.
- Select the main language in the menu ribbon.
- In the worksheets, go to the worksheets in which “Rechnungsabgrenzungsposten” is to ap-pear as “deferred income”. In the “*Translation” tab in the “Dictionary” group, select “Word list” and add the term “Rechnungsabgrenzungsposten#1#”.
- Delete the supplement #1#.
- Select “Create / Update” in the “Dictionary” group, click on the term, open the Translation manager and allocate the translation to the term (in our example “deferred income”).
Working with terms in the Translation manager
To create a new term or to edit an existing term in the Translation manager, take the following steps.
- Navigate to the “Translation manager” symbol in the “Dictionary” group in the “*Translation” tab.
- Click “Add”.
- A new row is created in the manager. Here you can enter a term in the main language and in all sub-languages. You can also edit existing terms by clicking on them.
- The “Undo changes” function undoes all of the changes made in a row.
- Confirm your change with
- Save, to save the changes and to continue working in the Translation manager.
- Save & close, to save the changes and to close the dialogue.
Good to know
| |
|---|---|
“Search & find” allows you to search for new and edited terms and to show these in a filtered overview. |
Formatting dictionary entries
Deviating formatting of individual words or symbols within an Excel cell can be transferred to Word with firesys. A typical example of this is a superscript number to refer to a footnote: Equity capital[1].
Good to know
| |
|---|---|
Naturally, entire texts can also be formatted in the Translation manager, e.g. if the entire text should be made bold. |
All information about how to insert control characters and special typographic characters can be found in the article "The list view in the translation manager".
Insert footnotes
Use this function to insert the contents of a single cell with several footnotes as a linked firesys object in the body text of your Word document. To prepare this, proceed as follows:
- Navigate to the “Translation manager” symbol in the “Dictionary” group in the “*Translation” tab.
- Click “Add” in the Translation manager to create a new entry
- Click on the new entry and select “Footnote” in the Translation Assistant (the control symbol #FN# will be inserted in the entry).
- Copy and paste the text of a footnote after the control symbol.
- Repeat the last two steps for the number of footnotes you require (e.g.: #FN#1 First footnote #FN#2 Second footnote #FN#3 Third footnote #FN#4 Fourth footnote).
- Each footnote will be later shown in a separate section in Word.
- Insert the footnote with linktext at the desired position in your report (see “Insert table from file“) or as when adding a table directly from the selected Excel range (see chapter “Insert table directly from selected Excel range”).
Organizing the Translation manager
Changing the number and names of languages
The number of language columns and their names when creating the dictionary depends on the “setting in the Dictionary”. To change the names of the languages later or reduce the number of languages shown, click on the arrow in the “*Translation” tab in the “Dictionary” group under “Translation manager” and select “Configuration”.
Sort dictionary / Translation manager
When the dictionary is created, the texts are initially entered in the worksheets unsorted in the order in which they occur. When updating the dictionary, new texts are always added to the bot-tom. You can sort the dictionary / the Translation manager at any time by any language of your choice: On the “*Translation” tab in the “Synopsis sheet“ group under “Sort”, select the language you wish to sort by.
Delete terms from the dictionary
Texts that no longer occur in the workbook because they have been deleted from the worksheets will remain in the dictionary together with their translation, but they are crossed out. You can decide if you want to keep these terms or delete them permanently from the dictionary.
In the dictionary, mark one or more connected rows that contain crossed out text. Selected “De-lete terms” in the “Synopsis sheet” group in the “*Translation” tab.
See also
![]() The dictionaries in firesys
The dictionaries in firesys
![]() The master dictionary
The master dictionary
![]() Working with the sub-dictionary
Working with the sub-dictionary
![]() Settings in Excel – dictionary
Settings in Excel – dictionary
