Overview of the Excel data manager

Aus firesys Hilfe
Zur Navigation springen Zur Suche springen

Interface of the Excel data manager

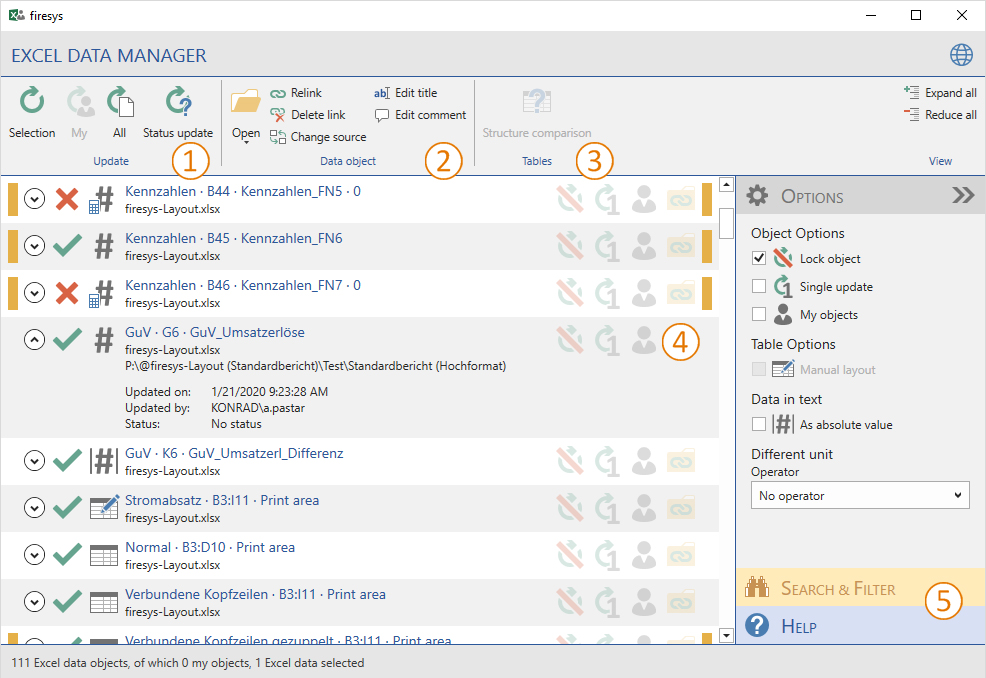
The “control centre” monitoring all data that is imported and updated from Excel. It is divided into an action area and an option area. You can find all information on editing tables on the “Actions” tab. You can find further information on settings in the “Options” task area.


Die Standard-Ansicht des Excel-Daten-Managers


Firesys Icons BubbleTransparent 1 white background.png Update functions You can use these functions to update your linked Excel data with one click. This means that your business report always contains correctly maintained values. See # Excel data manager – the update functions for details.
Firesys Icons BubbleTransparent 2 white background.png Data object options The data object options in the Excel data manager support you when working with your Excel documents. For example, you can quickly design a manual layout for an Excel table. See #Data object options for details.
Firesys Icons BubbleTransparent 3 white background.png Structure comparison Opens a browser window in which the structures from the Excel range and the Word table are compared.
Firesys Icons BubbleTransparent 4 white background.png List view Here you can find information on all Excel objects linked to the document. For example, you can double-click on an object to navigate to this object and highlight it. See #List view for details.
Firesys Icons BubbleTransparent 5 white background.png Filter & help functions You can simplify working with the Excel data manager by using filters to structure how information is displayed. If you still have any questions about its functions, the integrated help menu will assist you further. See #Search and help function for details.

Excel data manager – the update functions

To ensure that linked Excel objects in your Word document are always up to date, you can use the update functions to update existing Excel objects quickly. You can choose whether you want to update only one object, all objects that are currently selected, or all objects that are linked in the Excel data manager.


EN Word Inhalt Excel-Daten-Manager-Aktualisierungsfunktionen.jpg


Overview update functions

Image.Link.Update.Selection.16.png Update selection

Checks and updates the selected object or objects in the list. The system checks the linked Excel objects for changes in content and structure and, if changes have occurred since the last update, updates the data in your Word document.

RxbtnUpdateMyObjects 16.png Update my objects

Updates all Excel objects labelled as “my objects”.

Image.Link.Update.All.24.png Update all

Checks and updates all Excel objects contained in your document and creates an update report, which also indicates if any problems occurred during the update (for more information, see Update/troubleshooting).


Glühbirne neu.png
Good to know

Avoid working on your Excel documents while Excel data is being updated.


Image.Link.Update.Status.24.png Status update

Checks whether the selected Excel objects (and objects linked to them) are up to date and updates the information in the list. The Excel objects are not updated.

Video: Status update


A detailed explanation of the individual steps

This is how you update linked Excel objects with firesys, in three different ways:

  • Option 1: By using the “Update” function in the menu ribbon (shown in this video)

    1. Use the mouse pointer to select a linked Excel object that you want to update.

    2. In the “*Content” menu ribbon, in the “Excel data manager” group, click on the “Update” button.
      → A progress dialog appears.
      Note:The “Update all Excel objects” function is also available on the split button.
      →The Excel object was updated.

  • Option 2: By using the context-sensitive menu in firesys

    1. Use the mouse pointer to select a linked Excel object that you want to update.

    2. Right-click in the object’s area.
      →The context-sensitive menu appears.

    3. Here you can select the “Update” function.
      → A progress dialog then appears.
      → The Excel object was updated.

  • Option 3: By using the menu ribbon in the Excel data manager

    1. Use the mouse pointer to select a linked Excel object that you want to update.

    2. In the “*Content” menu ribbon, in the “Excel data manager” group, click on the “Excel data manager” button.
      →This opens the Excel data manager and the “Update” ribbon contains the update functions.

    3. Here you can choose whether you want to update all or just the selected Excel objects.
      →A progress dialog then appears.
      → The Excel object(s) are updated.


Video: Select language


The explanation of the individual steps in detail

To change the language in the Excel file and change in Word:

  1. In Excel, click on the button “Select language” on the tab “*Translation” in the group “Dictionary”.

  2. Select the desired target language from the drop-down menu.
    → The data in the Excel file is translated in real time.

  3. Save your Excel file and open the Word document containing the translated data.

  4. Click on the “*Publish” tab in Word.

  5. In the “Language and number format” group, select the desired target language from the drop-down menu.

  6. Then select all the Excel data in the text whose language is to be changed.

  7. On the “*Contents” tab in the “Excel data” group, click on the “Update” button.
    → Your data will be translated.

  8. Note: The number format set for the target language is also applied.

Data object options

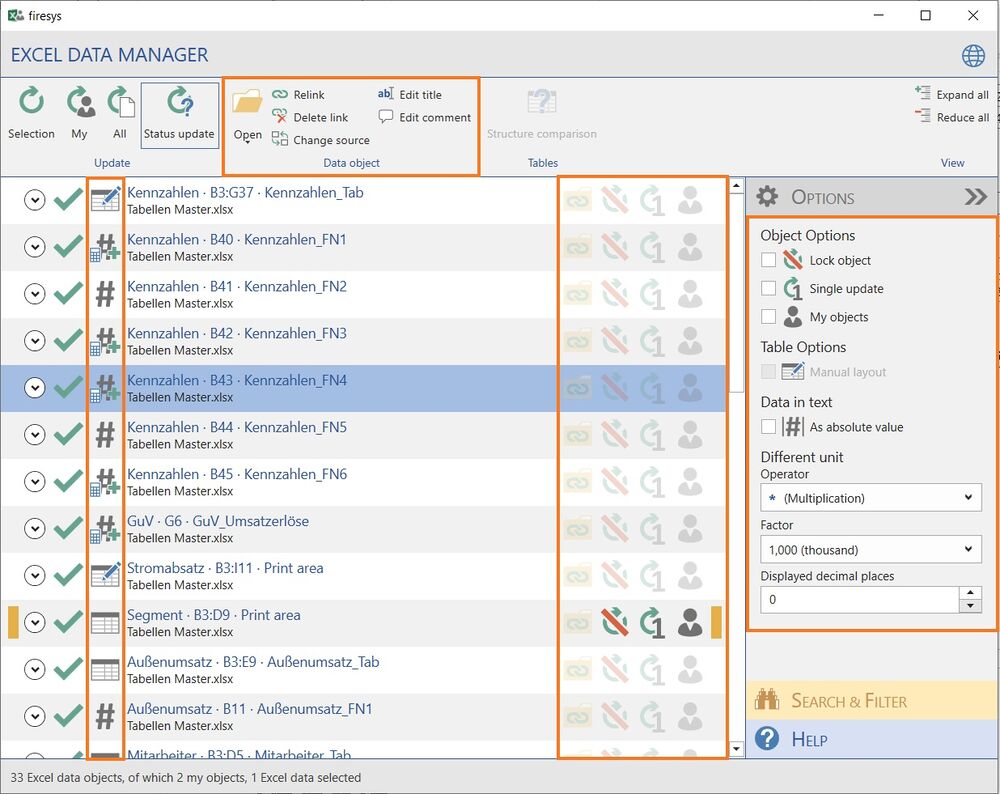
The Excel Data Manager offers you a quick overview of all connected Excel objects. All status information is displayed here in a list area. The Excel data manager also contains a menu area above the list area and a page area with additional functions, which also offers additional help content. When working with firesys, Excel contents can be connected to Word in different configurations (the so-called data object options). This data-object relationship defines the structural alignment of the individual Excel objects (for example, as a linked table element or data in a text object). You can already get an overview of the configuration of the individual Excel objects in the list view using symbols.

On the sample screen, a maximum configuration of all possible variants is prepared. The individual icons are then explained.

EN Word Inhalt Excel-Daten-Manager Daten-Objekt-Optionen.jpg


Data object options in the menu ribbon

Image.Common.Manager.Open.24.png Open source

Opens the Excel source file, displays the worksheet and marks the range selected in the list where the object originates.

Open folder

Opens the folder where the Excel source file is stored.

Image.Link.Reconnect.16.png Reconnect

Changes the connection of an object (to another worksheet or file) or restores a broken connection.

Image.Link.Unlink.16.png Delete link

Removes the link to the Excel source. Tables are no longer displayed in the Excel Data Manager and can therefore no longer be updated.

Glühbirne neu.png
Good to know

The “Delete link” option transforms data in text into normal text.

Image.Link.ChangeSource.24.png Change source

Change the name or location (path) of the Excel source file.

Image.Common.Manager.Title.Edit.16.png Edit title

Create or edit the title of the selected object to make it easier to find in the Excel data manager or by using the “Search” function. Assigned titles are transferred from toolsweb to Excel.

Image.Common.Manager.Comment.Edit.16.png Edit comment

You can write “comments” on your Excel object to make it easier to find in the Excel Data Manager or by using the “Search” function.

Glühbirne neu.png
Good to know

You can remove a comment or a title at any time by deleting the text that was entered and clicking on “OK”.


Data object options in the list view

Image.Link.Update.MyObject.32.png
The data object options

Image.Link.IsNoUpdate.16.png Lock object

A list object can be locked and cannot be updated as a result.

Image.Link.IsSingleUpdate.16.png Single update

The selected list object is ignored when the “Update all” function is performed and can only be updated with the “Update selection” function.

Image.Link.IsMyObject.16.png My objects

The selected list object is given the status "My object". Objects with this status can be updated separately by using the “My objects” function.

Image.Link.IsRelative.24.png Relative paths

The selected list object receives a relative path, i.e. the path specification of the connected Excel workbooks refers to a storage location in relation to the current directory of the Word document.

Glühbirne neu.png
Good to know

Relative paths can be switched on or off in the firesys settings in the tab "General".


Glühbirne neu.png
Good to know

Avoid working on your Excel documents while Excel objects are being updated.


Tabelle.png
The table options

Image.Link.IsTable.32.png Table

A complete table from an Excel file is located in the Word document.

Image.Link.IsTableManuallyFormatted.24.png Table with manual layout

A complete table from an Excel file is located in the Word document and was assigned a manual layout.


Daten Text.png
The data in text options

Image.Link.IsDitAbsolute.16.png Data in text

Contents from an Excel cell are displayed at the required position in the Word document.

Image.Link.IsDitAbsolute.16.png Data in text as absolute value

Contents from an Excel cell are displayed as an absolute value at the required position in the Word document. This inserts the number as a pure number without sign.

Daten im Text-Objekte, die bei der nächsten Aktualisierung als Absolutwert gesetzt werden.png Data in text objects which will be set as an absolute value during the next update

For an already existing data in text object, the “As absolute value” option was selected. During the next update, the element is displayed as a normal data in text object as an absolute value.

Daten im Text-Objekte, die bei der nächsten Aktualisierung nicht mehr als Absolutwert gesetzt werden.png Data in text objects which will no longer be set as an absolute value during the next update

For a data in text objects, the “As absolute value” setting is removed. The next time the Excel data object is updated, the data in text object is displayed as a normal data in text object.

Daten im Text-Objekte mit abweichender Einheit.png Data in text objects with a different unit

This icon indicates a data in text object for which a different unit was defined.

Daten im Text-Objekte, die bei der nächsten Aktualisierung mit abweichender Einheit gesetzt werden.png Data in text objects which are set with a different unit during the next update

This icon indicates that a different unit was added for an existing data in text object. During the next update, the element becomes a normal data in text object with a different unit.

Daten im Text-Objekte mit abweichender Einheit, die seit der letzten Aktualisierung bearbeitet wurden.png Data in text objects with a different unit which were processed since the last update

This icon indicates that an existing data in text object with a different unit was processed since the last update.

Daten im Text-Objekte mit abweichender Einheit, die bei der nächsten Aktualisierung nicht mehr mit abweichender Ein.png Data in text objects with a different unit that are no longer set with a different unit during the next update

This icon indicates that an existing data in text object with a different unit was changed since the last save operation and the different unit was removed. During the next update, this element is displayed as a normal data in text object with a different unit.

Daten im Text-Objekte als Absolutwerte mit abweichender Einheit.png Data in text objects as an absolute value with a different unit

This icon indicates that an existing data in text object with a different unit was set as an absolute value.

Daten im Text-Objekte, die bei der nächsten Aktualisierung als Absolutwert mit abweichender Einheit gesetzt werden.png Data in text objects which are set as an absolute value with a different unit during the next update

This icon indicates that an existing data in text object was changed in such a way that it now contains a different unit and an absolute value. This change will be applied the next time it is saved.

Daten im Text-Objekte als Absolutwerte mit abweichender Einheit, die seit der letzten Aktualisierung bearbeitet wur.png Data in text objects as an absolute value with a different unit which were processed since the last update

This icon indicates that an existing data in text object with absolute values and a different unit was changed since it was last saved.

Daten im Text-Objekte mit abweichender Einheit, die bei der nächsten Aktualisierung nicht mehr als Absolutwerte mit.png Data in text objects with a different unit which are no longer set as absolute values with a different unit during the next update

This icon indicates that an existing data in text object with a different unit and an absolute value was changed since it was last saved and the different unit and the “Absolute value” status was removed. During the next update, this element is displayed as a normal data in text object with a different unit.


Abweichende Einheit.png
Different unit

Operator.png Operator

Here you can select which mathematical operator you want to use for calculating the different unit.

Faktor.jpg Factor

For each calculation type, one of the specified factors - 1,000 (thousand), 1,000,000 (one million) and 1,000,000,000 (a billion) can be selected.

Nachkommastelle.png Displayed decimal places

You can define how many decimal places are displayed for your number.

Glühbirne neu.png
Good to know

With divisions, the result is rounded up to the specified decimal place.


List view

In the list view you can find information on all Excel objects linked to the document. By double-clicking on an object in the window, you navigate to the relevant object and select it. You must close the Excel data manager before you can continue working in the Word document. To edit multiple objects at once, select these by holding down the shift or control key.


Current status
Image-Common-Manager-Status-UpToDate.png Up to date
Image-Common-Manager-Status-Outdated.png Outdated
Image-Common-Manager-Status-Unknown.png Unknown (perform status update)

Yellow vertical highlighting: layout warnings

Indicates layout issues between the Excel source and the Word document (manually changed cell widths in tables in Word, incorrect assignments of row types in Excel, missing font types for conditional formatting or struckthrough cells with content on your computer or else contents were found in struckthrough cells in Excel).

Yellow vertical highlighting: layout warnings

Orange vertical highlighting: content-related warnings

Indicates errors within the Excel source (such as a validation problem with toolsvalidation, division by zero, missing reference or missing languagewords translation).

Orange vertical highlighting: content-related warnings

Red vertical highlighting: problems

Indicates objects which cannot be updated because a problem has occurred. Expanding the object displays the problem and a solution suggestion.

Red vertical highlighting: problems

Additional information

Clicking on the left arrow expands the objects and shows additional information (see also “View”). In the problem/solution suggestion area, if applicable, an explanation is given why an object was not updated in the last update process. Here you will also find the toolsvalidation status information.


Search and help function

You can simplify working with the firesys managers by using filters to structure how information is displayed. If you still have any questions about its functions, the integrated help menu will assist you further. This article uses the Excel data manager interface to represent the content and graphics manager.

The search & filter function

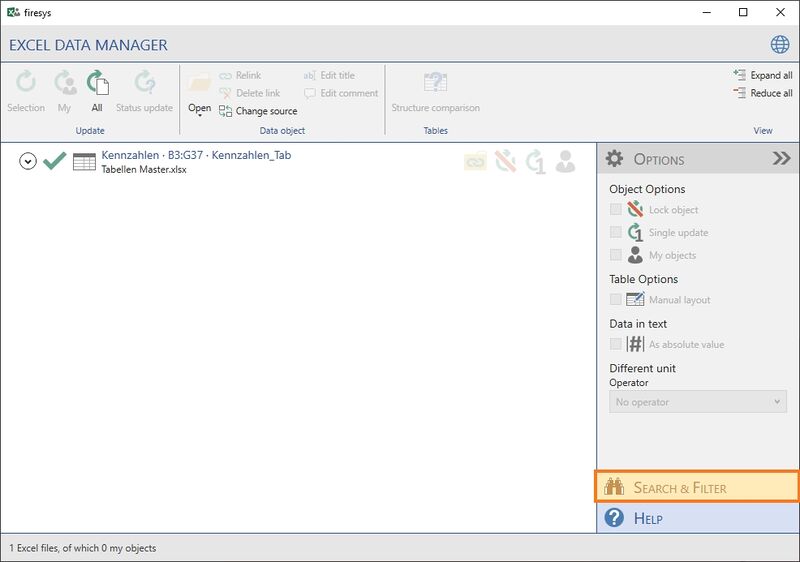
You find the search & filter function in the expandable work area on the right-hand side.


EN Word Manager-Suche-&-Filtern.jpg


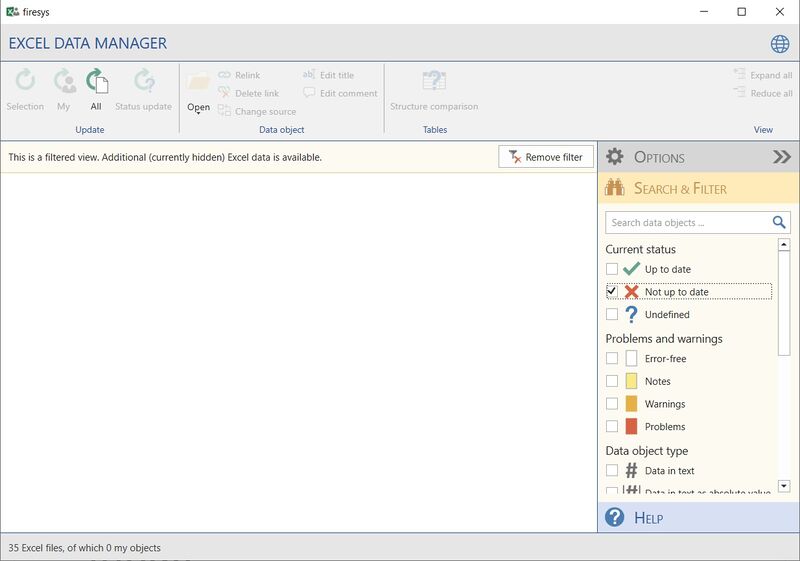
By clicking on the button you open the Search & filter area. Here you see an overview of all properties of the contents of the respective manager that can be filtered. In this example with the Excel data manager, you see the filter options categorised by the relevant types. As soon as you click on a filter, the display in the list view changes. Only those elements that correspond to the selected filter category are displayed. You can reset the selection at any time by deselecting the individual elements or clicking on the “Remove filter” button located above the list.


EN Word Manager-Filteransicht.jpg


The help function

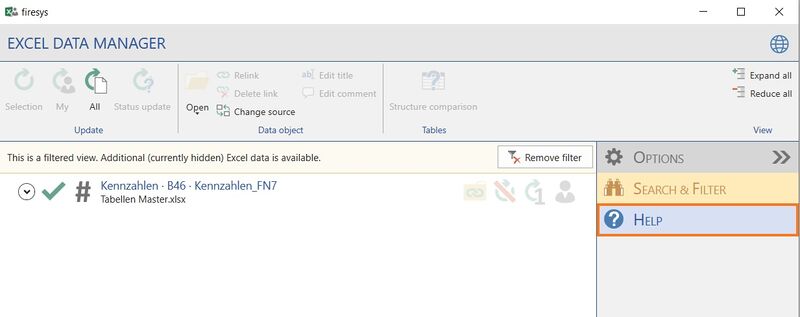
If you have a question regarding the functionality of the firesys manager, you can use the integrated help menu at any time.


EN Word Manager-Hilfeansicht.jpg


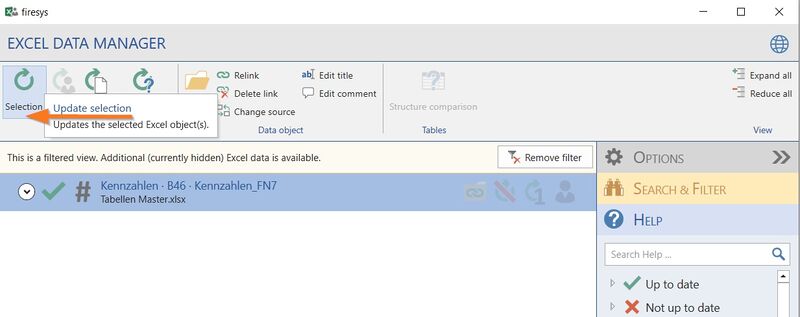
You open the help area by clicking on the button. All of the manager’s functions with the icon used and the function name are displayed here. You can expand each list element to display additional information. Furthermore, for all elements that are located in the manager’s permanently visible menu ribbon, a red information arrow is displayed when you position the mouse over the function which displays the position of the button. Functions that are located in the “Options” work area are indicated in the descriptive text.


EN Word Manager Hilfeansicht.jpg

Video: The help and search function in the managers


The explanation of the individual steps in detail

How to use the help and search function in the firesys managers:

    Note: The help and search function is shown as an example for all managers using the Excel data manager.

  1. Click on the button “Excel data manager” in the menu ribbon “*Design” in the group “Excel data”. The Excel data manager opens.
    → At the bottom right of the Excel data manager you will find both the “Search & Filter” and the “Help” function.

  2. If you click on the “Search & Filter” button, a task pane opens.
    →Here you will find an overview of all filterable properties of the contents of the respective manager. As soon as you click on a filter, the display in the list view changes. Only the elements that correspond to the selected filter category are displayed. You can reset the selection at any time by deselecting the individual elements or by clicking on the “Cancel filter” button above the list.

  3. If you click on the “Help” button, the help area opens. All functions of the manager are displayed here with the symbol used and the function name. You can expand each list element to obtain further information. In addition, a red arrow is displayed for all elements that are permanently visible in the manager's menu ribbon. If you touch the functions with the mouse, it shows you the position of the button in the menu band of the data manager. If you click on an element, a descriptive text is displayed below the element.

See more

Navigation hoch.svg Insert contents from Excel into Word
Navigation rechts.svg Insert Excel contents
Navigation rechts.svg The toolsxbrl functions
Navigation rechts.svg The change display in Excel
Navigation rechts.svg Settings in Word – data from Excel

Further contents

firesys website
Customer area
YouTube