The context sensitive menu in firesys: Unterschied zwischen den Versionen
Keine Bearbeitungszusammenfassung |
Keine Bearbeitungszusammenfassung |
||
| (Eine dazwischenliegende Version von einem anderen Benutzer wird nicht angezeigt) | |||
| Zeile 4: | Zeile 4: | ||
=== The context-sensitive menu in the body text === | === The context-sensitive menu in the body text === | ||
[[Datei:Word Menü-kontextsensitiv-1.jpg|mini|upright=2.0|The view of the context-sensitive menu in the body text]] | [[Datei:EN Word Menü-kontextsensitiv-1.jpg|mini|upright=2.0|The view of the context-sensitive menu in the body text]] | ||
When you are working with firesys, if you positioned the mouse pointer at any place in your document, and provided you have not selected a graphic or an element that is linked from Excel, the context-sensitive help menu appears, displayed on the right-hand side. | When you are working with firesys, if you positioned the mouse pointer at any place in your document, and provided you have not selected a graphic or an element that is linked from Excel, the context-sensitive help menu appears, displayed on the right-hand side. | ||
| Zeile 11: | Zeile 11: | ||
==== Previous and next change ==== | ==== Previous and next change ==== | ||
''[[ | ''[[The_change_display_in_Excel|→ Go to the main article about the change indicator in Excel]]'' | ||
This executes the “Previous change” or “Next change” function from the “*Content” menu ribbon in the “Excel data” group. | This executes the “Previous change” or “Next change” function from the “*Content” menu ribbon in the “Excel data” group. | ||
==== Insert Excel data ==== | ==== Insert Excel data ==== | ||
''[[ | ''[[Insert_Excel_contents|→ Go to the main article about inserting Excel contents]]'' | ||
This opens the menu for the “Insert” function from the “*Content“ ribbon in the “Excel data” group. | This opens the menu for the “Insert” function from the “*Content“ ribbon in the “Excel data” group. | ||
==== Insert graphic ==== | ==== Insert graphic ==== | ||
''[[ | ''[[Insert_graphics|→ Go to the main article about inserting graphics]]'' | ||
This opens the menu for the “Insert” function from the “*Content“ ribbon in the “Graphics” group. | This opens the menu for the “Insert” function from the “*Content“ ribbon in the “Graphics” group. | ||
==== Special characters ==== | ==== Special characters ==== | ||
''[[ | ''[[Overview_of_special_characters|→ Go to the main article for special characters in firesys]]'' | ||
This opens the menu for the “Special characters” function from the “*Layout“ ribbon in the “Text” group. | This opens the menu for the “Special characters” function from the “*Layout“ ribbon in the “Text” group. | ||
==== Hanging indent ==== | ==== Hanging indent ==== | ||
''[[ | ''[[Highlight_texts|→ Go to the main article about the formatting functions in firesys]]'' | ||
This opens the menu for the “Hanging indent” function from the “*Layout“ ribbon in the “Text” group. | This opens the menu for the “Hanging indent” function from the “*Layout“ ribbon in the “Text” group. | ||
| Zeile 39: | Zeile 39: | ||
==== Insert graphic ==== | ==== Insert graphic ==== | ||
''[[ | ''[[Insert_graphics|→Go to the main article about inserting graphics]]'' | ||
This opens the menu for the “Update” function from the “*Content“ ribbon in the “Graphics” group. | This opens the menu for the “Update” function from the “*Content“ ribbon in the “Graphics” group. | ||
==== Graphics manager ==== | ==== Graphics manager ==== | ||
''[[ | ''[[The_graphics_manager|→ Go to the main article about the graphics manager]]'' | ||
Here you can directly open the “graphics manager” from the “*Content” menu ribbon in the “Graphics” group. | Here you can directly open the “graphics manager” from the “*Content” menu ribbon in the “Graphics” group. | ||
| Zeile 52: | Zeile 52: | ||
==== Previous and next change ==== | ==== Previous and next change ==== | ||
''[[ | ''[[Overview_of_the_Excel_data_manager|→ Go to the main article about the functions of the Excel data manager]]'' | ||
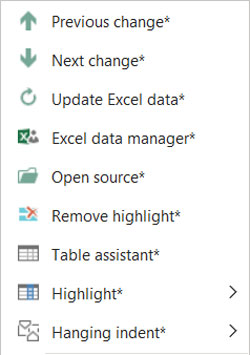
This executes the “Previous change” or “Next change” function from the “*Content” menu ribbon in the “Excel data” group. | This executes the “Previous change” or “Next change” function from the “*Content” menu ribbon in the “Excel data” group. | ||
==== Update Excel data ==== | ==== Update Excel data ==== | ||
''[[ | ''[[Overview_of_the_Excel_data_manager#Excel_data_manager_.E2.80.93_the_update_functions|→ Go to the main article about the update functions in the Excel data manager]]'' | ||
The selected Excel object is updated. | The selected Excel object is updated. | ||
| Zeile 67: | Zeile 67: | ||
==== Open source ==== | ==== Open source ==== | ||
''[[ | ''[[Overview_of_the_Excel_data_manager#Data_object_options|→ Go to the main article about the data object options in the Excel data manager]]'' | ||
This opens the linked Excel document from which the data of the Excel object originates. | This opens the linked Excel document from which the data of the Excel object originates. | ||
==== Remove highlight ==== | ==== Remove highlight ==== | ||
''[[ | ''[[Status_and_highlighting|→ Go to the main article about the coloured highlighting and status function in firesys]]'' | ||
All coloured highlighting (if available) from Excel data links is removed from the currently selected text area. | All coloured highlighting (if available) from Excel data links is removed from the currently selected text area. | ||
==== Table assistant ==== | ==== Table assistant ==== | ||
''[[ | ''[[Design_tables_in_Word#The_table_assistant|→ Go to the main article about the functions of the table assistant]]'' | ||
This opens the table assistant which you can use to format and design the currently selected table. | This opens the table assistant which you can use to format and design the currently selected table. | ||
==== Highlighting ==== | ==== Highlighting ==== | ||
''[[ | ''[[Design_texts_in_Excel|→ Go to the main article about the highlight functions in firesys]]'' | ||
The menu for selecting the highlights of table rows (that are located in Excel) is displayed. | The menu for selecting the highlights of table rows (that are located in Excel) is displayed. | ||
==== Hanging indent ==== | ==== Hanging indent ==== | ||
''[[ | ''[[Design_texts_in_Excel#Highlighting|→ Go to the main article about the formatting functions in firesys]]'' | ||
This opens the menu for the “Hanging indent” function from the “*Layout“ ribbon in the “Text” group. | This opens the menu for the “Hanging indent” function from the “*Layout“ ribbon in the “Text” group. | ||
| Zeile 93: | Zeile 93: | ||
== See also == | == See also == | ||
[[Datei:Navigation_hoch.svg|link=]] [[ | [[Datei:Navigation_hoch.svg|link=]] [[Overview_of_the_firesys_basic_functions|The firesys basic functions]] <br> | ||
[[Datei:Navigation_rechts.svg|link=]] [[Overview_of_the_dashboard|The firesys dashboard]] <br> | [[Datei:Navigation_rechts.svg|link=]] [[Overview_of_the_dashboard|The firesys dashboard]] <br> | ||
[[Datei:Navigation_rechts.svg|link=]] [[The_firesys_support_%26_system_check|The firesys support and system check]] <br> | [[Datei:Navigation_rechts.svg|link=]] [[The_firesys_support_%26_system_check|The firesys support and system check]] <br> | ||
Aktuelle Version vom 1. März 2023, 15:17 Uhr
When working with firesys in Word, you can use the right mouse button to open a context-sensitive menu that provides you with direct access to important functions in firesys (depending on the position of the mouse pointer).
When you are working with firesys, if you positioned the mouse pointer at any place in your document, and provided you have not selected a graphic or an element that is linked from Excel, the context-sensitive help menu appears, displayed on the right-hand side.
You can quickly access the following functions here:
Previous and next change
→ Go to the main article about the change indicator in Excel
This executes the “Previous change” or “Next change” function from the “*Content” menu ribbon in the “Excel data” group.
Insert Excel data
→ Go to the main article about inserting Excel contents
This opens the menu for the “Insert” function from the “*Content“ ribbon in the “Excel data” group.
Insert graphic
→ Go to the main article about inserting graphics
This opens the menu for the “Insert” function from the “*Content“ ribbon in the “Graphics” group.
Special characters
→ Go to the main article for special characters in firesys
This opens the menu for the “Special characters” function from the “*Layout“ ribbon in the “Text” group.
Hanging indent
→ Go to the main article about the formatting functions in firesys
This opens the menu for the “Hanging indent” function from the “*Layout“ ribbon in the “Text” group.
Insert graphic
→Go to the main article about inserting graphics
This opens the menu for the “Update” function from the “*Content“ ribbon in the “Graphics” group.
Graphics manager
→ Go to the main article about the graphics manager
Here you can directly open the “graphics manager” from the “*Content” menu ribbon in the “Graphics” group.
Previous and next change
→ Go to the main article about the functions of the Excel data manager
This executes the “Previous change” or “Next change” function from the “*Content” menu ribbon in the “Excel data” group.
Update Excel data
→ Go to the main article about the update functions in the Excel data manager
The selected Excel object is updated.
Excel data manager
→ Go to the main article about the data object options in the Excel data manager
This opens the linked Excel document from which the data of the Excel object originates.
Open source
→ Go to the main article about the data object options in the Excel data manager
This opens the linked Excel document from which the data of the Excel object originates.
Remove highlight
→ Go to the main article about the coloured highlighting and status function in firesys
All coloured highlighting (if available) from Excel data links is removed from the currently selected text area.
Table assistant
→ Go to the main article about the functions of the table assistant
This opens the table assistant which you can use to format and design the currently selected table.
Highlighting
→ Go to the main article about the highlight functions in firesys
The menu for selecting the highlights of table rows (that are located in Excel) is displayed.
Hanging indent
→ Go to the main article about the formatting functions in firesys
This opens the menu for the “Hanging indent” function from the “*Layout“ ribbon in the “Text” group.
See also
![]() The firesys basic functions
The firesys basic functions
![]() The firesys dashboard
The firesys dashboard
![]() The firesys support and system check
The firesys support and system check
![]() The basic functions of firesys
The basic functions of firesys
![]() The firesys settings in Excel and Word
The firesys settings in Excel and Word


