Design texts in Excel: Unterschied zwischen den Versionen
Keine Bearbeitungszusammenfassung |
Keine Bearbeitungszusammenfassung |
||
| Zeile 107: | Zeile 107: | ||
{{MoreContent}} | {{MoreContent}} | ||
[[Kategorie:Excel Dokument-gestalten-Übersicht]] | [[Kategorie:English-Excel Dokument-gestalten-Übersicht]] | ||
[[en:Design_texts_in_Excel]] | [[en:Design_texts_in_Excel]] | ||
Version vom 18. Dezember 2019, 12:14 Uhr
The “Layout” menu ribbon makes working with firesys in Excel easier. There are a number of options which you can use to change your document’s layout quickly and easily according to your requirements.
TBD Grafik
Formatting text
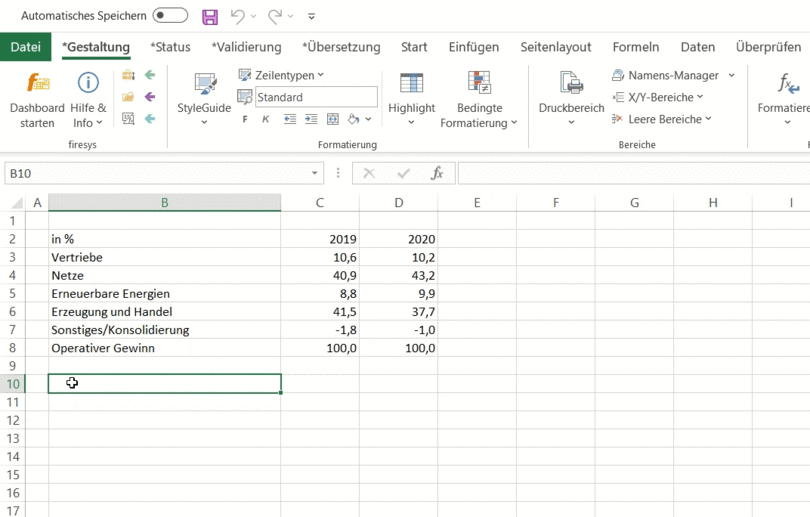
 Select line types
Here you can assign a line type to the currently selected cell. Predefined styles are available for the table header and table body.
So können Sie in Excel einer Tabelle Bereiche zuweisen:
-
Um eine Tabelle in Word einfügen zu können, benötigt diese einen zugewiesenen Namen oder Druckbereich. Wählen Sie hierzu den kompletten Bereich der Tabelle in Ihrem Excel-Dokument aus.
-
Im Menüband „*Gestaltung“ können Sie in der Gruppe „Bereiche“ für die zuvor festgelegte Auswahl mit der Funktion „Druckbereich“ den gewünschten Druckbereich automatisch festlegen,
-
Um einen Zeilentypen zuweisen zukönnen, müssen Sie die entsprechende Zeile, bzw. eine Zelle aus dieser Zeile markieren.
-
Im Menüband „*Gestaltung“ in der Gruppe „Formatierung“ können Sie mit der Funktion „Zeilentypen“ die verschiedenen Zeilentypen zuweisen – z.B. „Tabellenkopf einzelne“ für die Tabellenkopfzeile.
-
Um eine der von firesys vordefinierten Spaltenhervorhebungen zu verwenden, wählen Sie die hervorzuhebende Spalte aus.
-
Klicken Sie im Menüband „*Gestaltung“ in der Gruppe „Formatierung“ auf das Menü „Highlight“ und wählen Sie ein Highlight aus dem Dropdown-Menü aus.
Einen Zeilentyp zuweisen:
Eine Spaltenhervorhebung zuweisen:
Good to know
| |
|---|---|
It is sufficient to select a cell in a column and assign one of the predefined styles to it - firesys automatically assigns the selected style to the complete table row. |
Datei:RxebRowType 16.png Show style
Indicates which format style is currently in use in the selected cell.
 Bold
Bold
Formats the selected text in bold.
 Italic
Formats the selected text in italics.
![16px]/[Datei:IndentIncreaseExcel_16.png 16px]/[Datei:IndentIncreaseExcel_16.png](/mediawiki/images/8/81/IndentDecreaseExcel_16.png) Decrease / increase indent
Decrease / increase indent
Insert of remove a tab in the selected Excel cell.
 Connect and centre
Connects selected Excel cells and aligns the cell content to the centre.
 Highlighting
Highlight entire columns or individual cells in Excel with a defined background colour or remove the highlighting. In Excel, a pattern is set across the selected cells so the background and font colours are easily recognizable. Depending on the layout, various highlights are available (e.g.: previous year, current year, ...).
 Highlight
Colours cells in Excel yellow or removes this highlighting so that this can be transferred to Word. This way, numbers or texts in tables, that have not been defined yet, can be highlighted sustain-ably.
 Hide numbers
Colours selected cells red or removes this highlighting so that the cells can be replaced with Xs in Word. This function is useful if you want to transfer your confidential data to external parties, e.g. your translator.
 Ignore number format
Highlights the selected cells in green or removes the highlight. The contents of the cells highlight-ed in green (e.g. the term “Chapter 2.1”) are ignored when the number format of language-numbers is used.
 Import brackets
In the past, numbers in brackets were shown as negative numbers in Word. When you apply the “import brackets” function to Excel cells, numbers in brackets (e.g. information from the notes) are transferred to Word when updating. When the number format of languagenumbers is used, they are not recognized as negative numbers and therefore remain in the table as numbers in brackets. This is particularly useful if you want to display information from the notes with brack-ets in your tables.
 Strikethrough
Highlights the selected cells in light blue or removes this highlight again. With cells that are high-lighted in light blue, two diagonal lines are set when they are imported into Word. This can be used in reports, for example, which are created in accordance with the Solvency II Standard.
 Conditional formatting
Find trends and patterns in your data easily with the aid of bars. Colours and symbols visually highlight important values. The conditional formatting can be transferred to Word.
The transfer of the background and font colours of an Excel cell is available to you in all firesys documents. The relevant option must be activated in Word for the transfer. In the firesys layout, you can also integrate icon sets in tables.
Siehe auch
![]() Die Gestaltungs-Funktionen in Excel
Die Gestaltungs-Funktionen in Excel
![]() Der StyleGuide
Der StyleGuide
![]() Excel-Bereiche in firesys verwenden
Excel-Bereiche in firesys verwenden
![]() Excel-Formeln in firesys verwenden
Excel-Formeln in firesys verwenden
![]() Ansichten und Kommentare in Excel
Ansichten und Kommentare in Excel
