Insert an account calculation or account aggregate
When you work in firesys with numerical values in Excel, you can use what are called account calculations. An account calculation consists of an addition or subtraction of the account values that are saved in firesys and can be used for all key dates. The calculation result of an account calculation can be changed as it is being created by using mathematical functions according to the specifications that are relevant to you. Furthermore, after you insert an account calculation, you can also add a manual rounding value, which you can use to change the result of the account calculation manually to improve how it is presented and to allow you to continue working on it.
<imagemap>Datei:Excel Menüband Inhalt Einfügen Andere-Werte.jpg|center|1200px
rect 1 79 208 191 Die_Basisfunktionen_von_firesy
rect 212 78 283 190 Die_Kontenmappe
rect 287 77 365 189 Arbeit_mit_Zentralwerten
rect 371 76 513 108 Die_Kontenmappe#Kontenmappen_sortieren
rect 372 110 512 139 Die_Kontenmappe#Zeilen_l.C3.B6schen
rect 373 140 510 171 Die_Kontenmappe#Der_Kontowert-Verlauf
rect 535 83 623 190 Der_Zentralwert-Manager
rect 626 82 731 191 Werte_synchronisieren_und_lösen
rect 735 83 888 112 Werte_in_Excel_einfügen
rect 733 112 888 135 Werte_synchronisieren_und_lösen#Werte_l.C3.B6sen
rect 736 135 888 169 Senderwerte_einfügen
rect 894 81 991 188 Das_Validierungsblatt
rect 998 80 1122 110 Validierungen_erstellen
rect 996 112 1118 137 Validierung_bearbeiten
rect 995 141 1118 176 Validierung_löschen
rect 1132 81 1287 190 Die_Vorrollen_Funktionen_in_der_Übersicht
desc none
</imagemap>
Definition
| |
|---|---|
A key date-independent account calculation or account aggregate always consists of the addition or subtraction of one or more accounts. For each key date, the account calculation and account aggregate are then available with the respective account values.
|
The description of the individual components when working with account calculations
The schematic view
The first diagram shows the relationship between the individual components that are required for creating an account calculation:
The initial situation is that your MeetingPoint already contains account values. You can use the “Insert” function in the “Management” group in the master value manager to create an account calculation. The account calculation dialogue box opens, the firesys tool for creating an account calculation. Each account calculation requires a name (which is unique for the account group that is used). You can then select the account group from which the accounts for the account calculation should be used. All available accounts are displayed in the list area. You can left-click on the relevant list entry to select all accounts that should be added - and right-click all accounts that should be subtracted.
You can then click on the “OK” button to create an account calculation - or optionally, to add a mathematical operator, a pre-defined factor and, where applicable, rounding (to a defined number of decimal places) to the calculation - and then finish creating it by clicking on “OK”. This automatically saves the account calculation in the MeetingPoint.
Note: For each key date, the account calculation is then available with the respective account values for the key date.
The second diagram shows the context of working further with account calculations, once one or more account calculation(s) have been created in the master value manager and transferred to the MeetingPoint.
The firesys MeetingPoint is used here as the central organisational unit and collection point for all account calculations. From here, the account calculations that exist in the MeetingPoint can be inserted into any cell that is not locked or which contains a different master value by using the “Insert” function (in the “*Content” menu ribbon in the “Master values” group).
Good to know
| |
|---|---|
Account calculations are always related to key dates. Sometimes, account calculations cannot be inserted correctly and used for certain key dates, whereas on other key dates, not all required account values are available (yet) which means that incorrect account calculations are created. |
Create and insert an account calculation
Example
So erstellen Sie einen Kontenberechnung:
-
Stellen Sie sicher, dass bereits Kontenwerte in Ihrem MeetingPoint hinterlegt sind.
-
Öffnen Sie Sie im Menüband „*Inhalt“ in der Gruppe „Zentralwerte“ den Zentralwert-Manager.
-
Klicken Sie in der Gruppe „Verwaltung“ auf den Knopf „Hinzufügen“.
→ Ein Auswahl-Dialog öffnet sich. -
Wählen Sie die Option „Kontenberechnung“ aus.
→ Der Kontenberechnungs-Dialog öffnet sich. -
Hier müssen Sie eine für die verwendete Kontenberechnung eindeutige Bezeichnung festlegen und die Kontengruppe, in der sich die für die Kontenberechnung benötigten Kontenwerte befinden, auswählen.
-
Wählen Sie aus dem Listenbereich mit allen Kontenwerten mit einem Linksklick die zur Addition - und einem Rechtsklick zur Subtraktion gewünschten Kontenwerte aus.
-
Sie können zusätzlich noch einen mathematischen Operator, einen Faktor und eine automatische Rundung des Ergebnisses einstellen.
-
Verlassen Sie den Dialog mit einem Klick auf den Knopf „OK“.
→ Die Kontenberechnung wird nun automatisch in den MeetingPoint übertragen.
Optionale Möglichkeiten:

How to insert an account calculation:
-
Open the Excel workbook in which the account calculation should be inserted.
-
Select the cell you require.
-
In the “*Content” menu ribbon, in the “Master values” group, click on the “Insert” button.
-
In the work area, select “Account calculation” as the data type and then the account group you require and the correct key date.
-
The account calculations that were saved appear in the list area. Select the account calculation you require here.
-
If you do not require a manual rounding value, you can click on the left-hand button in the “Actions” area to insert the account calculation.
Additional functions
Using a manual rounding value
Once you have added an account calculation, you see the result immediately in the respective cell. You can use this result further in other account calculations or validations, or it can be used as a presentation number in Word. You can use a manual rounding value to change the final result of an account calculation. The process is explained in more detail in the following diagram:
The initial situation is that you have already created an account calculation, or you are currently creating a new account calculation. To add a manual rounding value, the work area of the “Insert values” function must be opened and selected as data type “Account calculation”.
Good to know
| |
|---|---|
Always ensure that you have selected the correct key date when you create a manual rounding value. |
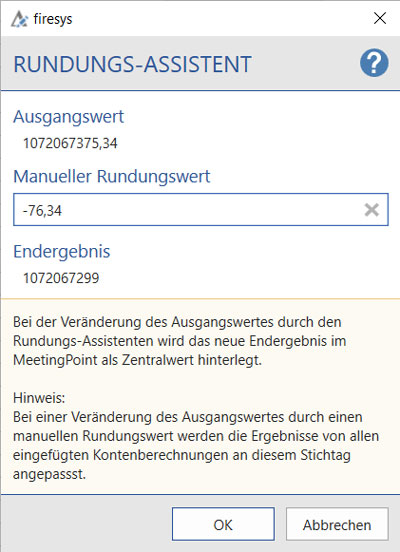
You can now select the account calculation you require in the list area. When you click on the “Rounding wizard” button, you see the initial value of the selected account calculation. In the “Manual rounding value” dialogue box that follows, enter any number you like (you can also use the − icon to enter negative numbers). When you enter one or more figures, the calculation result automatically changes under “Final result”. As soon as you have entered an appropriate manual rounding value, you can confirm the entry by clicking on “OK”.
Good to know
| |
|---|---|
Sobald Sie Änderungen an einer stichtagsbezogenen Kontenberechnung vorgenommen haben, wird das neue Endergebnis automatisch in den MeetingPoint übernommen und damit der Wert des Ausgangswertes überschrieben, was sich auf alle anderen Arbeitsmappen, die auf diese Kontenberechnung referenzieren, auswirken wird. Sie können einen manuellen Rundungswert jederzeit wieder durch das Entfernen des vorher eingegebenen manuellen Rundungswertes zurücksetzen. |
Zentralwerte / Senderzellen auswählen
As soon as you have made changes to an account calculation that is dependent on key dates, the new end result is automatically transferred to the MeetingPoint and the value of the initial value is thus overwritten, which will affect all other workbooks that reference this account calculation. You can reset a manual rounding value at any time by removing the rounding value that was manually entered beforehand.
Good to know
| |
|---|---|
You can select either all transmitter values, or all master values. You cannot select both value types at the same time. |
So heben Sie einen Zentralwerte auf Ihrem Arbeitsblatt hervor:
-
Öffnen Sie dazu eine Excel-Arbeitsmappe und aktiveren Sie firesys.
Hinweis: Es wird vorausgesetzt, dass ein kompatibler MeetingPoint bereits angebunden wurde. -
Öffnen Sie Sie im Menüband „*Status“ in der Gruppe „Information„ den Blatt-Inspektor.
-
Klicken Sie im Arbeitsbereich in der Gruppe „Zentralwerte auswählen“ auf einen der beiden Knöpfe.
-
Beim Klick auf das linke Symbol (Zentralwerte auswählen) werden Ihnen alle Excel-Zellen farbig hervorgehoben, die Informationen aus dem MeetingPoint erhalten.
-
Beim Klick auf das rechte Symbol (Senderzellen auswählen) werden Ihnen alle Excel-Zellen farbig hervorgehoben, die Informationen an den MeetingPoint senden.
Siehe auch
![]() Werte aus dem MeetingPoint in Excel einfügen
Werte aus dem MeetingPoint in Excel einfügen
![]() Senderwerte einfügen
Senderwerte einfügen
![]() Manuelle Werte einfügen
Manuelle Werte einfügen
![]() Kontenwerte einfügen
Kontenwerte einfügen
![]() Werte synchronisieren und lösen
Werte synchronisieren und lösen
![]() Eingefügte Werte verwalten
Eingefügte Werte verwalten
Weitere Inhalte
→ Webseite
→ Kundenbereich
→ YouTube